Removal and Installation

REMOVAL
1. With Air Bag:
Remove the steering wheel pad.
NOTICE: If the airbag connector is disconnected with the ignition switch at ON or ACC, DTCs will be recorded. Never use airbag parts from another vehicle. When replacing parts, replace with new parts.
a. Place the front wheels facing straight ahead.
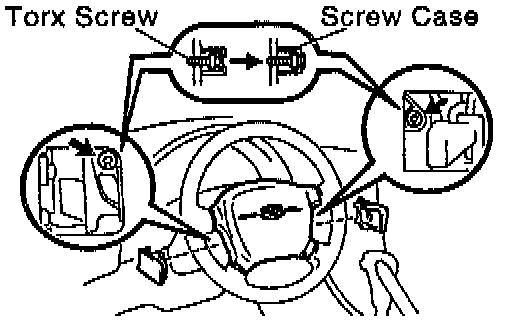
b. Using a torx socket wrench, loosen the two torx screws until the groove along the screw circumference catches on the screw case.

c. Pull the wheel pad out from the steering wheel and disconnect the airbag connector.
CAUTION: When storing the wheel pad, keep the upper surface of the pad facing upward. Never disassemble the wheel pad.
NOTICE: When removing the wheel pad, take care not to pull the airbag wire harness.
2. With Out Air Bag:
Remove steering wheel pad.
a. Remove the screw.
b. Remove the pad.
c. Disconnect the terminal.
3. Remove the steering wheel.
a. Disconnect the connector.
b. Remove the steering wheel set nut.
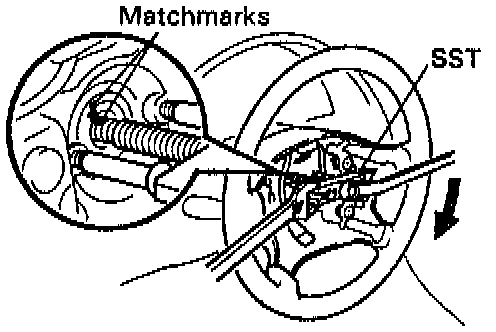
c. Place matchmarks on the steering wheel and main shaft.
d. Using the 09950 - 50010 (09951 - 05010, 09952 - 05010, 09953 - 05020, 09954 - 05020), remove the wheel.
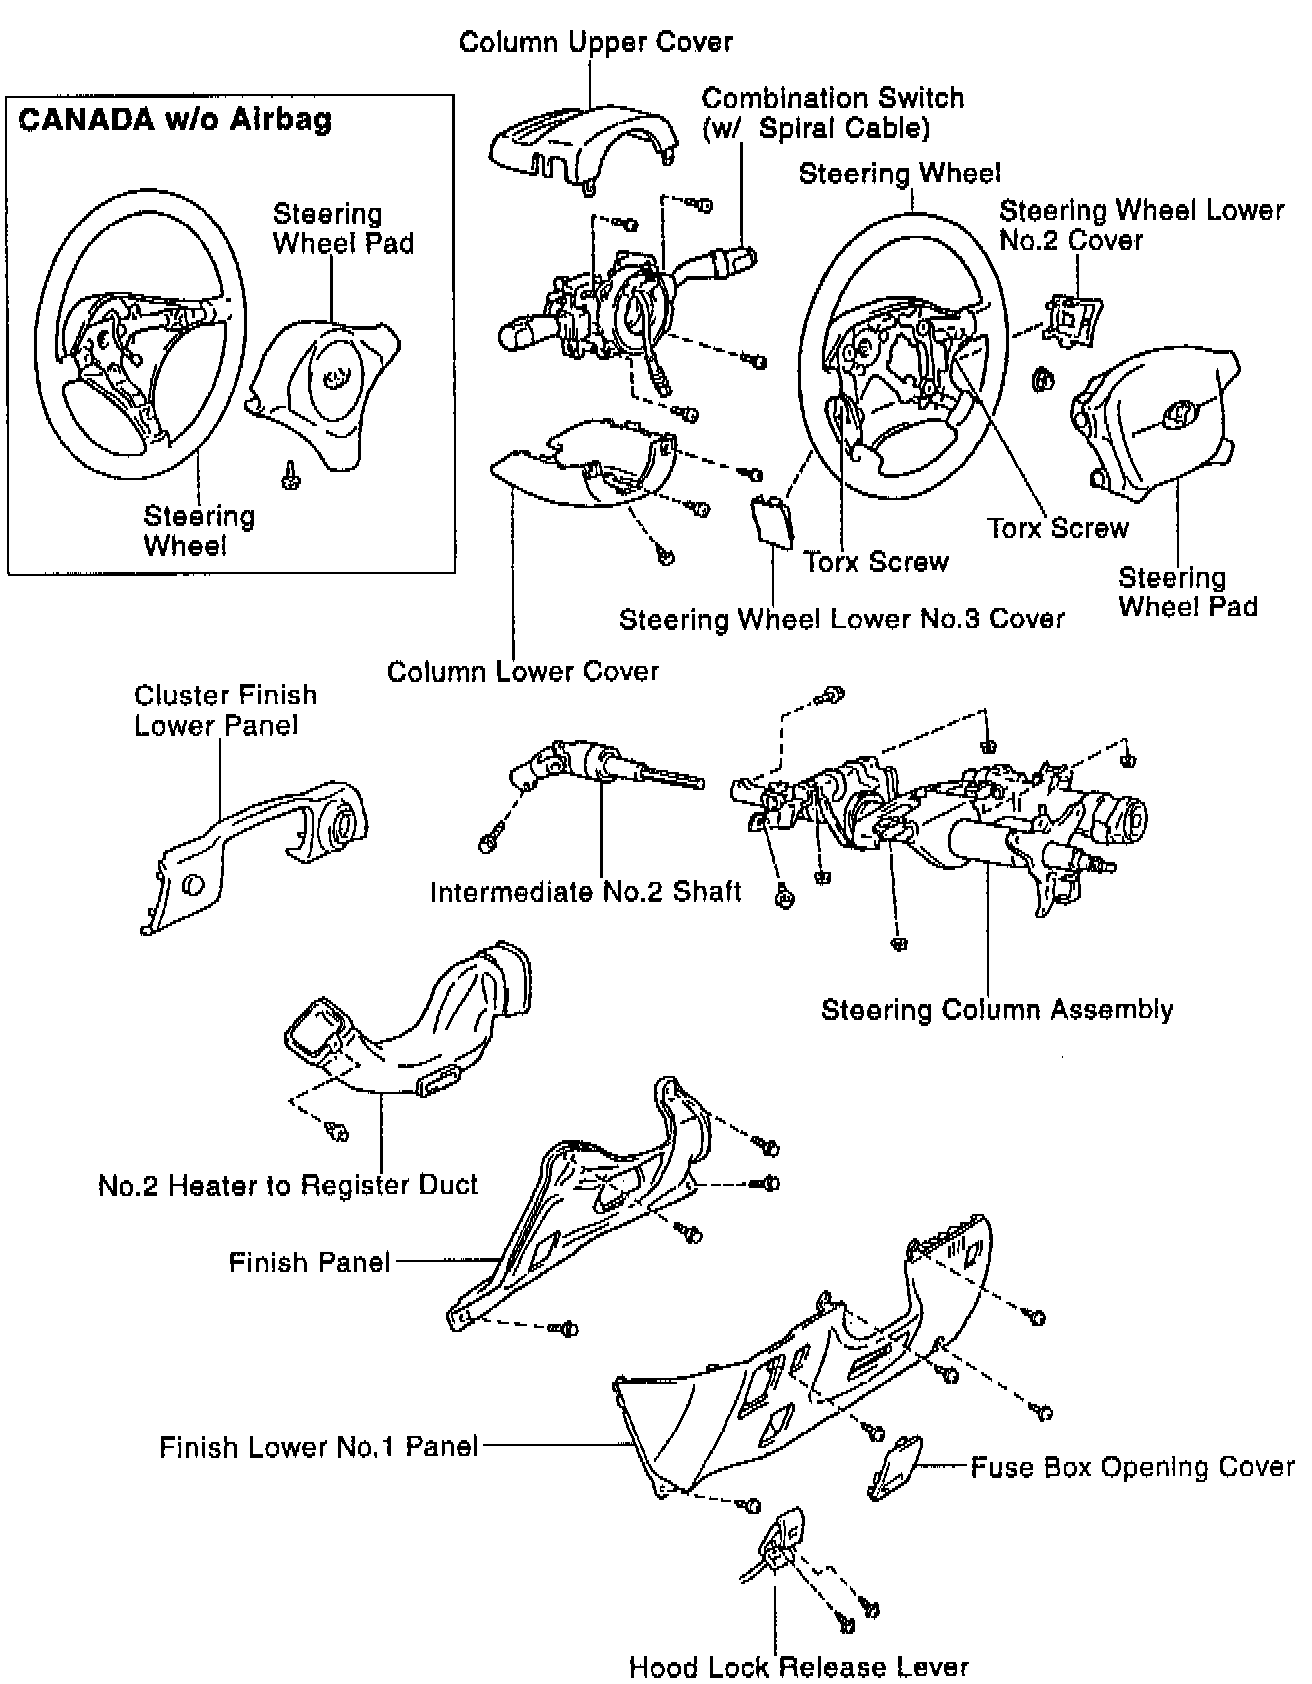
4. Remove the upper and lower column covers after removing the 3 screws.
5. Remove the combination switch.
a. Disconnect the connectors.
b. If there is an airbag, disconnect the airbag connector.
c. Remove the four screws.
6. If there is an airbag remove the spiral cable.
NOTICE: Do not disassemble the cable or apply oil to it.
7. Remove the cluster finish lower panel.
8. Remove the finish lower No.1 panel.
a. Remove the fuse box opening cover from the panel.
b. Remove the two screws and disconnect the hood lock release lever from the panel.
c. Remove the five panel set screws.
9. Remove the finish panel.
Removing the four bolts.
10. Remove the No.2 heater to register duct.
Removing the clip.
11. Disconnect the intermediate No.2 shaft.

a. Loosen bolt A and remove bolt B.
b. Place matchmarks on the intermediate No.2 shaft and control valve shaft.
12. Remove the intermediate No.2 shaft after
Removing the (A) bolt.
13. Remove the steering column assembly.
a. Disconnect the connectors.
b. Remove the four column assembly set nuts and bolt.
INSTALLATION
First Of Two:
1. Install the steering column assembly.
a. Tighten the four column assembly set nuts and bolt.
Torque:
- Nut: 25 Nm (19 ft. lbs.)
- Bolt: 14 Nm (11 ft. lbs.)
b. Connect the connectors.
2. Install the intermediate No.2 shaft.
Temporarily tighten the (A) bolt.
3. Connect the intermediate No.2 shaft.
a. Align the matchmarks on the intermediate No.2 shaft and control valve shaft.
b. Torque the bolt B.
Torque: 35 Nm (26 ft. lbs.)
c. Torque the bolt A.
Torque: 35 Nm (26 ft. lbs.)
4. Install the No.2 heater to the register duct.
Install the clip.
5. Install the finish panel and tighten the four bolts.
6. Install the finish lower No.1 panel by doing the following.
a. Tighten the five panel set screws.
b. Connect the hood lock release lever with the two screws.
c. Install the fuse box opening cover.
7. Install the cluster finish lower panel.
8. If the vehicle came with an airbag, install the spiral cable.
9. Install the combination switch.
a. Tighten the four screws.
b. Connect the airbag connector.
c. Connect the connectors.
10. Install the upper and lower column covers then, tighten the three screws.
11. Center spiral cable.
a. Check that the front wheels are facing straight ahead.

b. Turn the cable counterclockwise by hand until it becomes harder to turn the cable, then rotate the cable clockwise about 2.5 turns to align the mark.
HINT: The cable will rotate about 2.5 turns to either left or right of the center.
12. Install the steering wheel.
a. Align the matchmarks on the wheel and main shaft.
b. Tighten the wheel set nut.
Torque: 34 Nm (25 ft. lbs.).
c. Connect the connector.
13. w/airbag.
Install steering wheel pad.
NOTICE:
- Make sure the wheel pad is installed to the specified torque. If the wheel pad has been dropped, or there are cracks, dents or other defects in the case or connector, replace the wheel pad with a new one. When installing the wheel pad, take care that the wirings do not interfere with other parts and are not pinched between other parts.
a. Connect the airbag connector.

b. Install the wheel pad after confirming that the circumference groove of the torx screws is caught on the screw case.
c. Using a torx socket wrench, tighten the two screws.
Torque: 9.0 Nm (80 inch lbs.)
d. Install the steering wheel lower No.2 and No.3 covers.
14. w/o airbag:
Install the pad with the screw.
15. Check the steering wheel center point.