Oil Pump Replace
REMOVALHINT: When repairing the oil pump, the oil pan and strainer should be removed and cleaned.
1. Drain engine oil.
2. Remove engine under covers.
3. Remove front exhaust pipe.
4. Remove engine mounting center member.
5. Remove two (front).
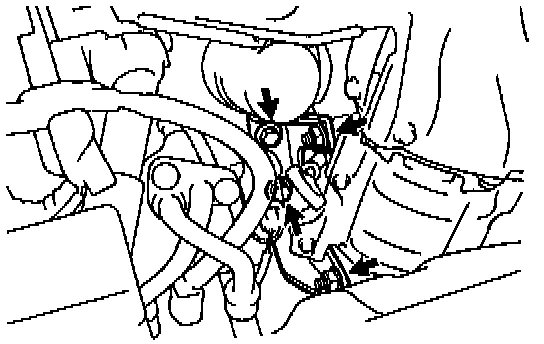
a. Disconnect the oxygen sensor (bank 1 sensor 2) connector.
b. Remove the 2 bolts, 2 nuts and RH exhaust manifold stay.

c. Remove the 3 bolts, 2 nuts, TWO, gasket, retainer and cushion.
6. Remove rear end plate stiffener.

a. Remove the bolt, nut and intake manifold stay.

b. Remove the 6 bolts and plate stiffener.
7. Remove oil pan.
a. Remove the oil dipstick.

b. Remove the 17 bolts and 2 nuts.
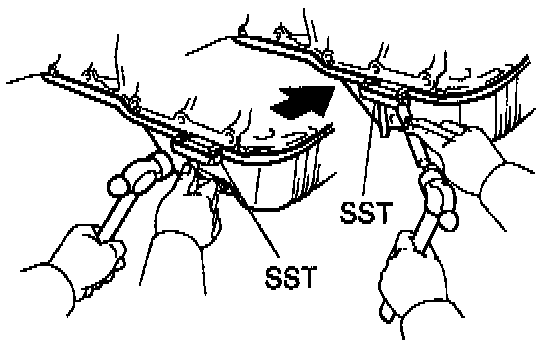
c. Insert the blade of Special Service Tool (SST) 09032 - 00100 or equivalent, between the cylinder block and oil pan, and cut off applied sealer and remove the oil pan.
NOTICE:
- Do not use SST for the oil pump body side and rear oil seal retainer.
- Be careful not to damage the oil pan flange.
8. Remove oil strainer and oil pan baffle plate.

Remove the 2 bolts, 2 nuts, oil strainer, baffle plate and gasket.

9. Suspend engine with engine sling device.
10. Remove timing belt.
11. Remove NO.2 idler pulley.
Remove the bolt and idler pulley.
12. Remove crankshaft timing pulley.
13. Remove oil pump pulley.
14. Remove oil pump.
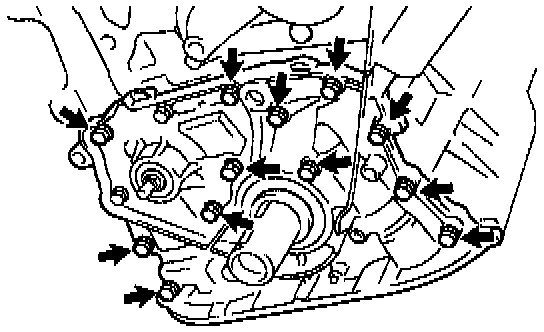
Remove the 12 bolts, oil pump and gasket.
INSTALLATION
1. Install oil pump.

Install a new gasket and the oil pump with the 12 bolts. Uniformly tighten the bolts in several passes.
Torque: 8.8 Nm (78 inch lbs.)
HINT: Each bolt length is indicated in the illustration.
Bolt length:
25 mm (0.98 inch) for A
35 mm (1.38 inch) for B
2. Install oil pump pulley.
3. Install crankshaft timing pulley.
4. Install NO.2 idler pulley.
5. Install timing belt.
6. Remove engine sling device.
7. Install oil pan baffle plate and oil strainer.
Install a new gasket, the oil strainer and baffle plate with the 2 bolts and 2 nuts.
Torque: 5.4 Nm (48 inch lbs.)
8. Install oil pan.
a. Remove any old packing Formed In Place Gasket (FIPG) material and be careful not to drop any oil on the contact surfaces of the oil pan and cylinder block.
- Using a razor blade and gasket scraper, remove all the old packing (FIPG) material from the gasket surfaces and sealing groove.
- Thoroughly clean all components to remove all the loose material.
- Using a non-residue solvent, clean both sealing surfaces.
NOTICE: Do not use a solvent which will affect the painted surfaces.

b. Apply seal packing to the oil pan as shown in the illustration.
Seal packing: Part No. 08826 - 00080 or equivalent
- Install a nozzle that has been cut to a 3 - 5 mm (0.12 - 0.20 inch) opening.
- Parts must be assembled within 5 minutes of application. Otherwise the material must be removed and reapplied.
- Immediately remove nozzle from the tube and reinstall cap.
c. Install the oil pan with the 17 bolts and 2 nuts. Uniformly tighten the bolts and nuts in several passes.
Torque: 5.4 Nm (48 inch lbs.)
d. Install the dipstick.
9. Install rear end plate stiffener.
a. Install the plate stiffener with the 6 bolts. Alternately tighten the the bolts in several passes.
Torque:
12 mm head 21 Nm (15 ft. lbs.)
14 mm head 44 Nm (32 ft. lbs.)
b. Install the intake manifold stay with the bolt and nut.
Torque:
Bolt 21 Nm (15 ft. lbs.)
Nut 44 Nm (32 ft. lbs.)
10. Install front Three-Way Catalytic Converter (TWC).
a. Place the cushion, retainer and a new gasket on the TWC.
b. Install the TWC with the 3 bolts and 2 nuts.
Torque: 29 Nm (21 ft. lbs.)
c. Install the RH exhaust manifold stay with the 2 bolts and 2 new nuts.
Torque: 42 Nm (31 ft. lbs.)
d. Connect the oxygen sensor (bank 1 sensor 2) connector.
11. Install engine mounting center member.
12. Install front exhaust pipe.
13. Fill with engine oil.
14. Start engine and check for oil leaks.
15. Recheck engine oil level.
16. Install engine under covers.