Installation
INSTALLATION1. Install rear end plate.
Install the rear end plate with the bolt.
Torque: 9.3 Nm (82 inch lbs.)

2. M/T: Install flywheel.
a. Apply adhesive to 2 or 3 threads of the bolt end.
Adhesive: Part No.08833 - 00070, THREE BOND 1324 or equivalent
b. Install the flywheel on the crankshaft.
Manual Transmission, Flywheel Bolt Installation:

c. Install and uniformly tighten the 8 bolts in several passes, in the sequence shown.
Torque: 88 Nm (65 ft. lbs.)
3. A/T: Install drive plate.
Torque: 83 Nm (61 ft. lbs.)
4. M/T: Install clutch disc and cover.
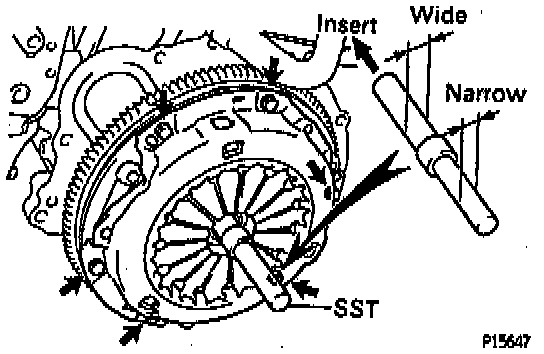
Using Special Service Tool (SST) 09301 - 00210 or equivalent, install the disc and cover with the 6 bolts.
Uniformly tighten the bolts in several passes.
Torque: 19 Nm (14 ft. lbs.)
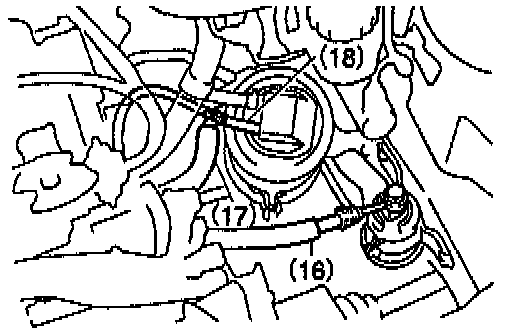
5. Install transaxle to engine.
a. Attach the transaxle to the engine.

b. Install the ground strap and 6 bolts.
Torque:
14 mm head 46 Nm (34 ft. lbs.)
17 mm head 64 Nm (47 ft. lbs.)
6. A/T: Install torque converter clutch mounting bolts.
a. Apply adhesive to 2 or 3 threads of the bolt end.
Adhesive: Part No.08833 - 00070, THREE BOND 1324 or equivalent
b. Hold the crankshaft pulley bolt with a wrench, and install the 6 bolts evenly.
Torque: 25 Nm (18 ft. lbs.)
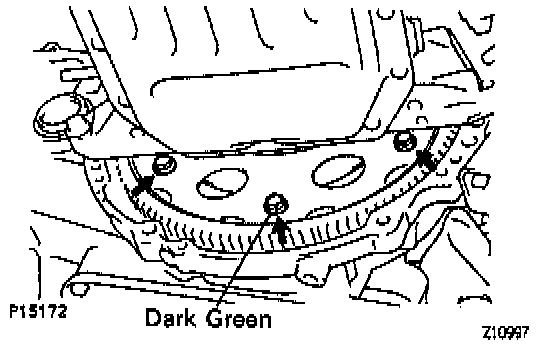
HINT: First tighten the dark green coned bolt, install the other bolts.
7. Install rear end plate stiffener.

Install the plate stiffener with the 6 bolts. Alternately tighten the bolts in several passes.
Torque:
12 mm head 21 Nm (15 ft. lbs.)
14 mm head 44 Nm (32 ft. lbs.)
8. Install NO.2 intake manifold stay.
Install the intake manifold stay with the bolt and nut.
Torque:
Bolt: 21 Nm (15 ft. lbs.)
Nut: 44 Nm (32 ft. lbs.)
9. Install LH exhaust manifold stay.

Install the exhaust manifold stay with the bolt and nut.
Torque:
Bolt: 39 Nm (29 ft. lbs.)
Nut: 42 Nm (31 ft. lbs.)
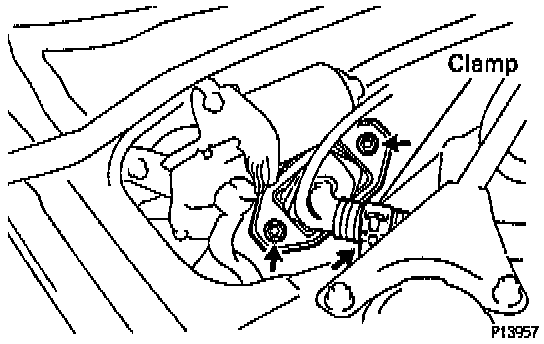
10. Install starter.

a. Install the starter, the oxygen sensor and engine wire brackets with the 2 bolts.
Torque: 39 Nm (29 ft. lbs.)
b. Connect the starter cable with the nut.
c. Connect the starter connector.
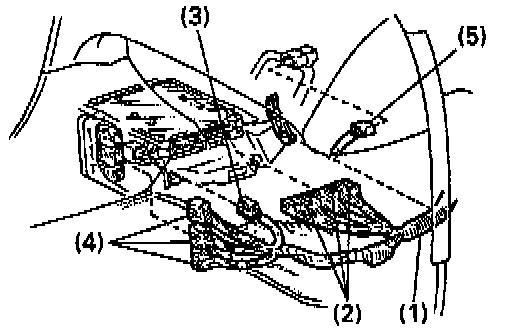
11. Connect connectors and cable.
Connect the connectors and cable:
1) Vehicle Speed Sensor (VSS) connector
2) A/T: Park/Neutral Position (PNP) switch connector
3) A/T: 2 solenoid connectors
4) Ground cable
Install the ground cable with the bolt.
12. Install A/T throttle cable to throttle body and intake manifold.
a. Connect the throttle cable to the throttle body.
b. Install the throttle cable to the cable bracket.
c. Connect the throttle cable to the clamps on the intake manifold.
13. Install drive shaft bearing bracket.

Install the bearing bracket with the 3 bolts.
Torque: 64 Nm (47 ft. lbs.)
14. Install engine and transaxle assembly in vehicle.
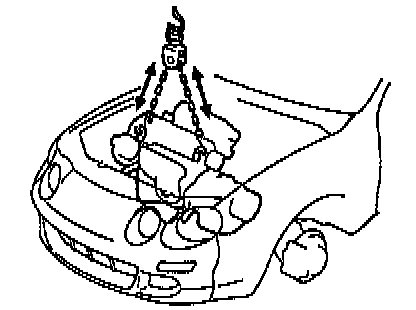
a. Attach the engine chain hoist to the engine hangers.
b. Slowly lower the engine into the engine compartment.
Tilt the transaxle downward, lower the engine and clear the LH body mounting.
c. Keep the engine level, and align RH and LH mountings with the body mountings.

d. Attach the RH engine mounting bracket to the mounting insulator, and temporarily install the bolt and 2 nuts.

e. Temporarily install the LH engine mounting insulator to the body with the through bolt.
f. Attach the LH engine mounting bracket to the mounting insulator, and install the 2 nuts and bolt (M/T) or 2 bolts (A/T).
Torque: 64 Nm (47 ft. lbs.)
g. Tighten the through bolt holding the LH engine mounting insulator to the body.
Torque: 73 Nm (54 ft. lbs.)

h. Tighten the bolt and 2 nuts holding the RH engine mounting bracket to the mounting insulator.
Torque:
Bolt: 37 Nm (27 ft. lbs.)
Nut: 52 Nm (38 ft. lbs.)
i. Connect the ground strap connector.
j. Remove the engine chain hoist from the engine.

15. Install engine mounting center member.
a. Attach the center member together with the rear engine mounting insulator to the front suspension member.
b. Temporarily install the 2 bolts holding the center member to the body.
c. Install the rear engine mounting bracket with the 2 bolts (A/T) or 3 bolts (M/T).
Torque: 78 Nm (58 ft. lbs.)
d. Temporarily install the bolt and 2 nuts holding the rear engine mounting insulator to the front suspension member.
e. Temporarily install the bolt holding the rear engine mounting bracket to the mounting insulator.
f. Temporarily install the bolt and nut holding the front engine mounting bracket to the mounting insulator.
g. Tighten the 2 bolts holding the center member to the body.
Torque: 35 Nm (26 ft. lbs.)
h. Tighten the bolt and 2 nuts holding the rear engine mounting insulator to the front suspension member.
Torque: 80 Nm (59 ft. lbs.)
i. Tighten the bolt holding the rear engine mounting bracket to the mounting insulator.
Torque: 88 Nm (65 ft. lbs.)
j. Tighten the bolt and nut holding the front engine mounting bracket to the mounting insulator.
Torque: 88 Nm (65 ft. lbs.)
k. Install the A/C pipe to the bracket.
l. Install the 2 dust covers to the center member.
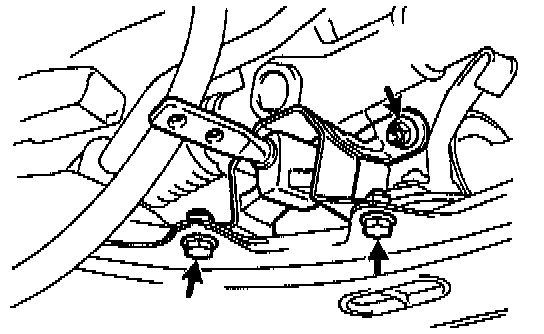
16. Install exhaust pipe support bracket.
Install the support bracket with the 2 bolts and nut.
Torque: 19 Nm (14 ft. lbs.)

17. A/T: Install transaxle control cable to engine mounting center member.
Install the control cable with the 2 clamps and 2 bolts.

18. Connect transaxle control cable(s) to transaxle.

19. M/T: Install clutch release cylinder.
a. Install the release cylinder with the 2 bolts.
Torque: 12 Nm (9 ft. lbs.)
b. Install the bracket with the bolt, and install the tube to the bracket with the clamp.
c. Install the tube with the clamp and bolt.
d. Connect the back-up light switch connector.

20. M/T: Install starter.
a. Install the starter, the oxygen sensor and engine wire brackets with the 2 bolts.
Torque: 39 Nm (29 ft. lbs.)
b. Connect the starter wire and cable with the nut.
c. Connect the starter connector.
21. Install Power Steering (PS) pump.
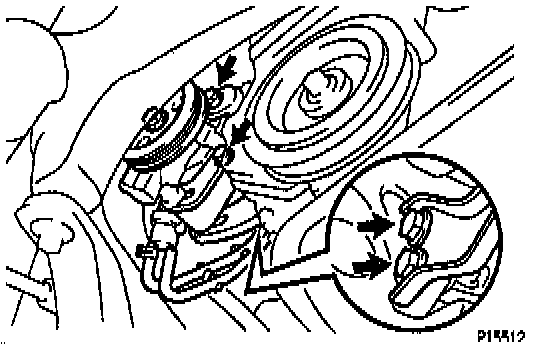
a. Temporarily install the PS pump with the 4 bolts.
b. Tighten the 3 bolts (except pivot bolt).
Torque: 43 Nm (32 ft. lbs.)

c. Install the drive belt with the pivot bolt and adjusting bolt.
Torque:
Adjusting bolt 39 Nm (29 ft. lbs.)
Pivot bolt 43 Nm (32 ft. lbs.)

d. Connect the 2 air hoses to the air tube.
22. Install A/C compressor.

a. Install the A/C compressor with the 3 bolts.
Torque: 25 Nm (18 ft. lbs.)
b. Connect the A/C compressor connector.

23. Install generator drive belt.
a. Install the drive belt with the pivot bolt, adjusting lock bolt (w/ A/C) and adjusting bolt.
b. Tighten the pivot bolt, adjusting lock bolt (w/ A/C) and adjusting bolt (w/o A/C).
Torque:
Pivot bolt 54 Nm (40 ft. lbs.)
Adjusting lock bolt (w/ A/C), or Adjusting bolt (w/o A/C) 19 Nm (14 ft. lbs.)
24. Install drive shafts.

25. Install front exhaust pipe.
a. Place 2 new gaskets to the front and rear of the front exhaust pipe.
b. Temporarily install the 2 bolts and 2 new nuts holding the front exhaust pipe to the rear Three-Way Catalytic Converter (TWC).
c. Temporarily install 3 new nuts holding the front exhaust pipe to the front TWC.
d. Temporarily install the 2 bolts holding the front exhaust pipe to the exhaust pipe support bracket.
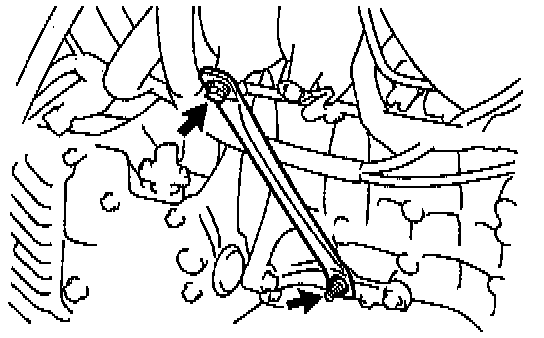
e. Using a 14 mm deep socket wrench, tighten the 3 nuts holding the front exhaust pipe to the front TWC.
Torque: 62 Nm (46 ft. lbs.)
f. Tighten the 2 bolts and nuts holding the front exhaust pipe to the rear TWC.
Torque: 43 Nm (32 ft. lbs.)
g. Tighten the 2 bolts holding the front exhaust pipe to the exhaust pipe support bracket.
Torque: 19 Nm (14 ft. lbs.)
26. Connect engine wire to cabin.
a. Push in the engine wire through the cowl panel.
b. Install the engine wire retainer with the 2 nuts.
c. Install the wire clamp to the bracket.
d. Connect the wire and connectors:
1) Engine wire from clamp on Engine Control Module (ECM) bracket
2) 3 ECM connectors
3) Circuit opening relay connector
4) 3 connectors to connectors on bracket
5) A/C amplifier connector
e. Install the floor carpet.
f. Install these parts:
- Lower instrument panel finish panel
- Cowl side trim
- Scuff plate

27. Connect engine wire to engine compartment relay box.
a. Connect the 2 connectors.
b. Install the 2 relay box covers.
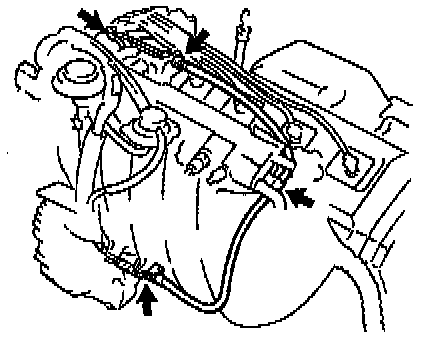
28. Connect connectors, wire, cable, cord, strap and hoses.
Connect the connectors, wire, cable, cord, strap and hoses:
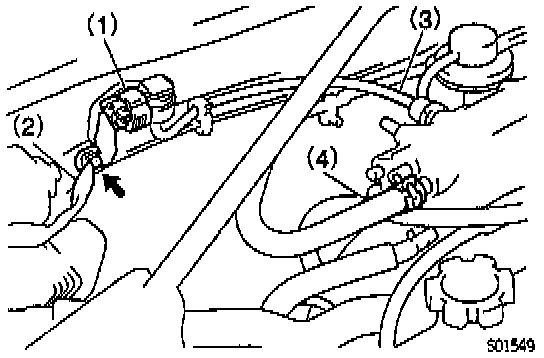
1) Manifold Absolute Pressure (MAP) sensor connector
2) MAP sensor wire to clamp on bracket
3) MAP sensor vacuum hose to gas filter on intake manifold
4) Brake booster vacuum hose to intake manifold

5) DLC1 to bracket
6) Engine wire protector to bracket

7) Engine wire clamp to bracket
Install the ignition coil and igniter assembly with the 3 bolts, and install the engine wire to the bracket.
8) Igniter connector
9) Ignition coil connector
10) High-tension cord to ignition coil
11) Noise filter

12) Ground cable to body
13) Ground strap to body

14) Heater hose to water outlet
15) Heater hose to water bypass pipe
16) Fuel inlet hose to fuel filter
Connect the inlet hose with 2 new gaskets and the union bolt.
Torque: 29 Nm (22 ft. lbs.)
17) Fuel return hose to return pipe
18) Evaporative Emission (EVAP) hose to charcoal canister
29. Install radiator.
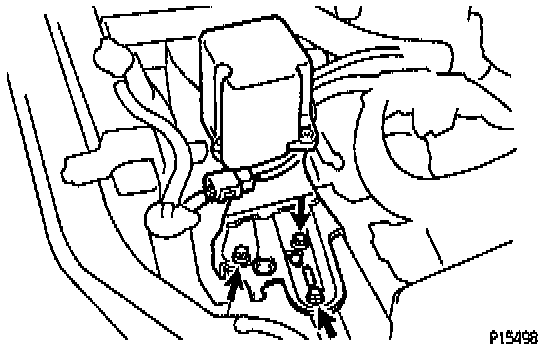
30. w/ Cruise Control System: Install cruise control actuator.
a. Install the actuator with the 3 bolts.
b. Connect the actuator connector.

31. Install accelerator cable to throttle body, cable bracket and clamps.

32. Install air cleaner case.
a. Install the air cleaner case with the 3 bolts.
b. Install the 2 engine wires to the clamps on the air cleaner case.
c. Install the air filter.
33. Install air cleaner cap.
a. Connect the air cleaner hose to the throttle body.
b. Install the air cleaner cap to the air cleaner case with the 4 clamps.
c. Tighten the hose clamp.

d. Connect the connector, cord, cables and hoses:
1) Intake Air Temperature (IAT) sensor connector
2) High-tension cord to air cleaner hose
3) Accelerator cable to clamp
4) Cruise control actuator cable to clamps
5) Positive Crankcase Ventilation (PCV) hose to air cleaner hose
6) California only: Air hose for idle-up to air cleaner hose
34. Install battery.

HINT: Face the arrow mark on the hold-down clamp forward.
35. Fill with engine coolant.
36. Fill with engine oil.
37. Start engine and check for leaks.
38. Install engine under covers.
39. Install engine hood.
40. Recheck engine coolant and oil levels.