California Only
INSPECTION
1. VISUALLY INSPECT LINES AND CONNECTIONS
Look for loosen connections, sharp bends or damage.
2. VISUALLY INSPECT FUEL TANK
Look for deformation, cracks or fuel leakage.
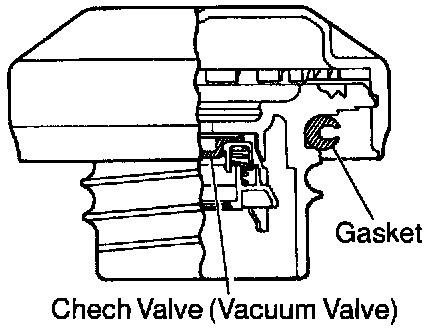
3. VISUALLY INSPECT FUEL TANK CAP
Check if the cap and/or gasket are deformed or damaged. if necessary, repair or replace the cap.
4. California Only:
(a) Check the airtightness in the fuel tank and filler pipe

(1) Remove the EVAP line hose from the charcoal canister side and then pressurize and make the internal pressure in the fuel tank 4 kPa (41 gf/sq. cm, 0.58 psi)
(2) Check that the internal pressure of the fuel tank can be hold for 1 minute.
(3) Check the connected portions of each hose and pipe.
(4) Check the installed parts on the fuel tank
If there is no abnormality, replace the fuel tank and filler pipe.
(5) Reconnect the EVAP line hose to the charcoal canister.
(b) Inspect fuel cut off valve and fill check valve

(1) Disconnect the purge line hose from the purge port with the charcoal canister.
(2) Plug the cap to the air drain hose.
(3) Disconnect the EVAP line hose from the EVAP port with the charcoal canister.
(4) Pressurize 4 kPa (41 gf/sq. cm, 0.58 psi) to the purge port and check that there is ventilation through the EVAP line hose.
HINT: In the condition that the fuel fuel is full, as the float value of the fill check valve is closed and has no ventilation, it is necessary to check the fuel amount (volume).
Check if there is any struck in the vent line hose, EVAP line hose and if there is no stuck in them, replace the fuel cut off valve and fill check valve.
(c) Check air inlet line

(1) Disconnect the air inlet hose from the charcoal canister.
(2) Check that there is ventilation in the air inlet line.
(d) Remove charcoal canister
(1) Disconnect the these connectors:
- VSV connector
- Vapor pressure sensor connector
(2) Disconnect the 3 hoses from the charcoal canister.
(3) Disconnect the vent line hose.
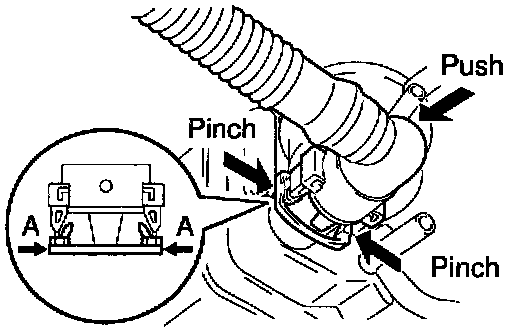
(4) Push the connector deep inside.
(5) Pinch portion A.
(6) Pull out the connector.
(7) Remove the 2 bolts and charcoal canister.

(e) Visually inspect charcoal canister
Look for cracks or damage.
(f) Inspect charcoal canister
(1) Plug the vent port with the cap.

(2) While holding the purge port closed blow air (1.76 kPa, 18 gf/sq. cm, 0.26 psi) into the EVAP port and check that air flows from the air drain port.

(3) While holding the purge port and the air drain port closed blow air (1.76 kPa 18 gf/sq. cm, 0.26 psi) into the EVAP port and check that air does not flow from the air inlet port.

(4) Apply vacuum (3.43 kPa, 25.7 mm Hg, 1.01 in.Hg) to the purge port, check that the vacuum does not decrease when the air inlet port is closed, and check that the vacuum decreases when the air inlet port is released.

(5) While holding the air inlet port closed, apply vacuum (3.43 kPa, 25.7 mm Hg, 1.01 in.Hg) to the EVAP port and check that air flows into the purge port.
If a problem is found, replace the charcoal canister.
(6) Remove the hose and cap from vent port.
(g) Inspect VSV for evap
(h) Inspect VSV for vapor pressure sensor
(i) Inspect vapor pressure sensor