Removal and Replacement
REMOVAL1. REMOVE STEERING WHEEL PAD AND STEERING WHEEL
2. REMOVE DOOR SCUFF PLATE
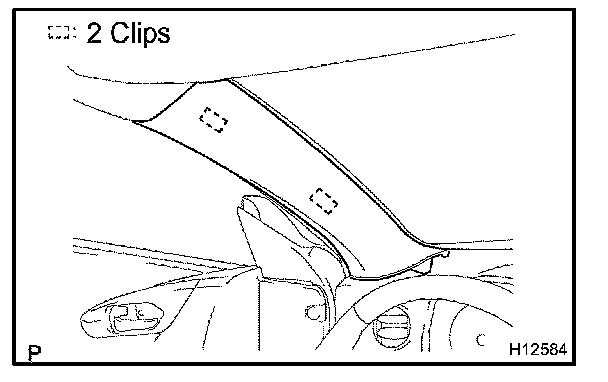
3. REMOVE COWL SIDE TRIM
4. REMOVE LOWER NO. 1 FINISH PANEL

a. Remove the 2 screws and hood lock release lever.
b. Remove the 2 bolts.
c. Using a screwdriver, remove the lower No. 1 finish panel.
HINT: Tape the screwdriver tip before use.
5. REMOVE FINISH PANEL
6. REMOVE COLUMN COVERS
7. REMOVE SPIRAL CABLE
8. REMOVE WIPER AND WASHER SWITCH AND LIGHT CONTROL SWITCH AND HEADLIGHT DIMMER SWITCH
9. REMOVE CLUSTER FINISH PANEL

a. Remove the 2 screws.
b. Using a screwdriver, remove the cluster finish panel.
HINT: Tape the screwdriver tip before use.
10. REMOVE COMBINATION METER
11. REMOVE LOWER FINISH PANEL

a. Remove the 2 bolts and 3 screws.
b. Using a screwdriver, disconnect the lower finish panel.
HINT: Tape the screwdriver tip before use.
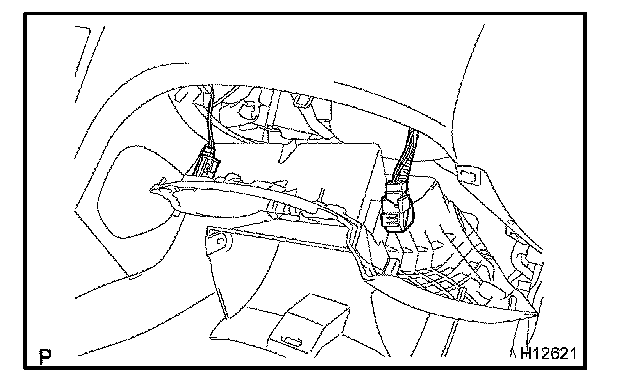
c. Using a clip remover, disengage the airbag connector clamp.
d. Disconnect the connector, then remove the lower finish panel.
12. DISCONNECT PASSENGER AIRBAG CONNECTOR
Disconnect the passenger airbag connector.
NOTE: When disconnecting the airbag connector, take care not to damage the airbag wire harness.
13. REMOVE PASSENGER AIRBAG ASSEMBLY

Remove the bolt, 2 nuts, and passenger airbag assembly.
Torque: Bolt: 20 N.m (204 kgf.cm, 15 ft.lbf)
14. REMOVE UPPER CONSOLE PANEL

a. M/T:
Remove the shift lever knob.
b. Using a screwdriver, remove the upper console panel, the disconnect the connector.
HINT: Tape the screwdriver tip before use.
15. w/ Power window:
REMOVE POWER WINDOW CONTROL SWITCH
16. w/o Power window:
REMOVE CONSOLE BOX HOLE COVER
17. REMOVE CONSOLE BOX
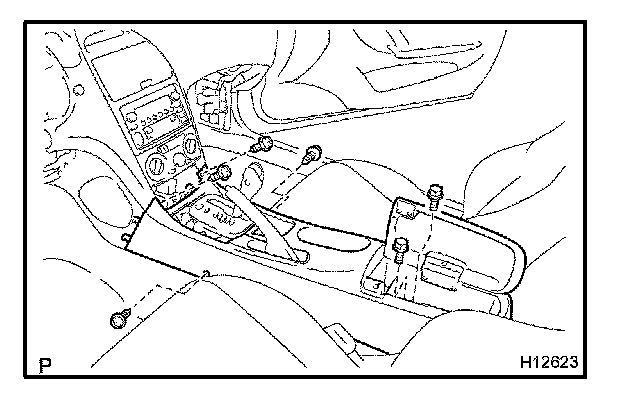
a. Remove the box bottom mat.
b. Remove the 2 bolts, 4 screws and console box.
18. REMOVE END FINISH PANELS

a. Driver's side:
Remove the 2 screws.
b. Passenger's side:
Remove the screws
c. Using a screwdriver, remove the end finish panels.
HINT: Tape the screwdriver tip before use.
19. REMOVE CENTER CLUSTER FINISH PANEL WITH HEATER CONTROL NAME PLATE

a. Remove the heater control knobs.
b. Remove the 4 screws.
c. Using a screwdriver, remove the center cluster finish panel with heater control name plate, then disconnect the connector.
HINT: Tape the screwdriver tip before use.
d. Remove the 4 screws and clock from the center cluster finish panel.

e. Remove the 2 screws and heater control name plate from the center cluster finish panel as shown in the illustration.
20. w/ Radio:
REMOVE RADIO
21. w/o Radio:
REMOVE STEREO OPENING COVER ASSEMBLY
22. REMOVE HEATER CONTROL AND ACCESSORY ASSEMBLY
23. REMOVE STEERING COLUMN
24. REMOVE FRONT PILLAR GARNISH
a. Using a screwdriver, remove the front pillar garnish.
HINT: Tape the screwdriver tip before use.
b. Employ the same manner described above to the other side.
25. REMOVE FRONT DOOR OPENING TRIM
26. REMOVE INSTRUMENT PANEL
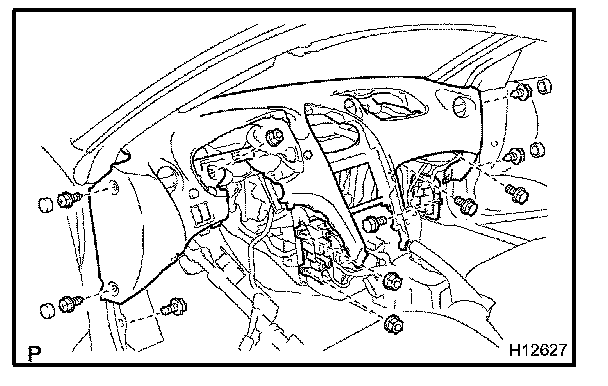
a. Disconnect the connectors.
b. Disengage the wire harness clamps.
c. Remove the J/B set bolts and nuts.
d. Using a screwdriver, remove the 4 caps.
HINT: Tape the screwdriver tip before use.
e. Remove the 2 bolts, nut, 4 screws and instrument panel.
27. REMOVE NO.1 AND NO.2 BRACE
28. REMOVE REINFORCEMENT

a. w/ ABS:
Remove the 2 nuts and ABS ECU.
b. Remove the 3 bolts, 4 nuts and reinforcement.
INSTALLATION
Installation is in the reverse order of removal.