Engine Installation
Part 1 Of 4:
Part 2 Of 4:
Part 3 Of 4:
Part 4 Of 4:

INSTALLATION
1. ASSEMBLY ENGINE AND TRANSAXLE

2. INSTALL ENGINE AND TRANSAXLE ASSEMBLY IN VEHICLE
a. Attach the engine sling device to the engine hangers.
b. Slowly lower the vehicle, and raise the engine into the engine compartment.
c. Keep the engine level, and align RH and LH mountings with the body bracket.

d. 1ZZ-FE: Install the RH engine mounting insulator with the 4 bolts and 2 nuts.
Torque: 52 Nm (530 kgf-cm, 38 ft. lbs.)
e. 2ZZ-GE Install the RH engine mounting insulator with the 5 bolts and 2 nuts.
Torque: 52 Nm (530 kgf-cm, 38 ft. lbs.)

f. Install the LH engine mounting through bolt and nut.
Torque: 80 Nm (816 kgf-cm, 59 ft. lbs.)
3. REMOVE ENGINE SLING DEVICE
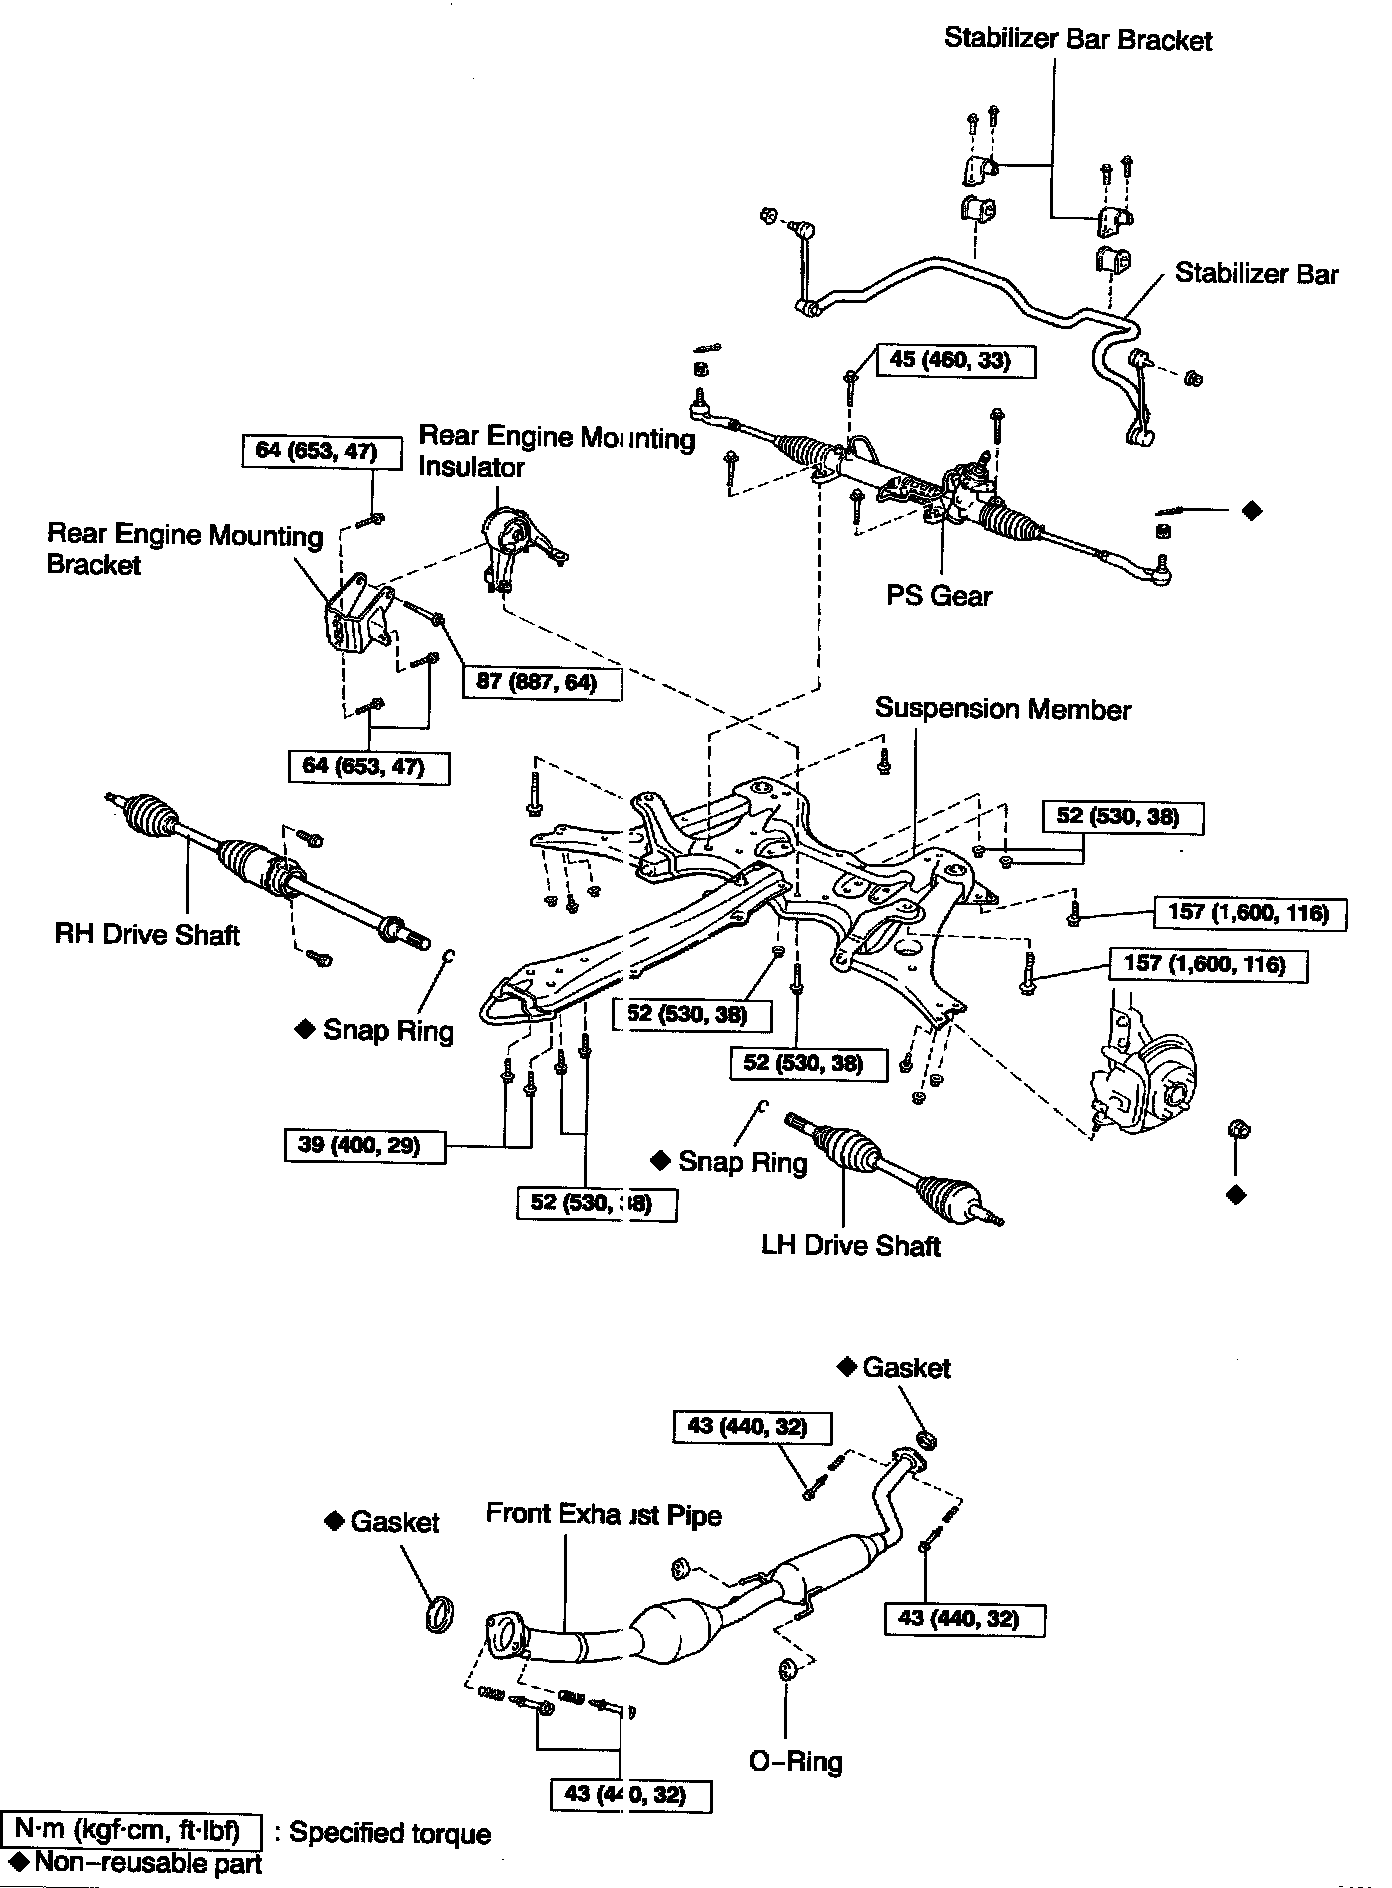
4. INSTALL REAR ENGINE MOUNTING
a. Install the rear engine mounting bracket with the 3 bolts.
Torque: 64 Nm (653 kgf-cm, 47ft. lbs.)
b. Temporarily install the rear engine mounting insulator with the through bolt.

5. INSTALL SUSPENSION MEMBER
a. Install the suspension member with the 9 bolts and 3 nuts.
Torque:
A 52 Nm (530 kgf-cm, 32 ft. lbs.)
B 52 Nm (530 kgf-cm, 32 ft. lbs.)
C 157 Nm (1,600 kgf-cm, 116 ft. lbs.)
D 157 Nm (1,600 kgf-cm, 116 ft. lbs.)
E 39 Nm (400 kgf-cm, 29 ft. lbs.)
Nut 52 Nm (530 kgf-cm, 32 ft. lbs.)
b. Tighten the rear engine mounting through bolt.
Torque: 87 Nm (887 kgf-cm, 64 ft. lbs.)
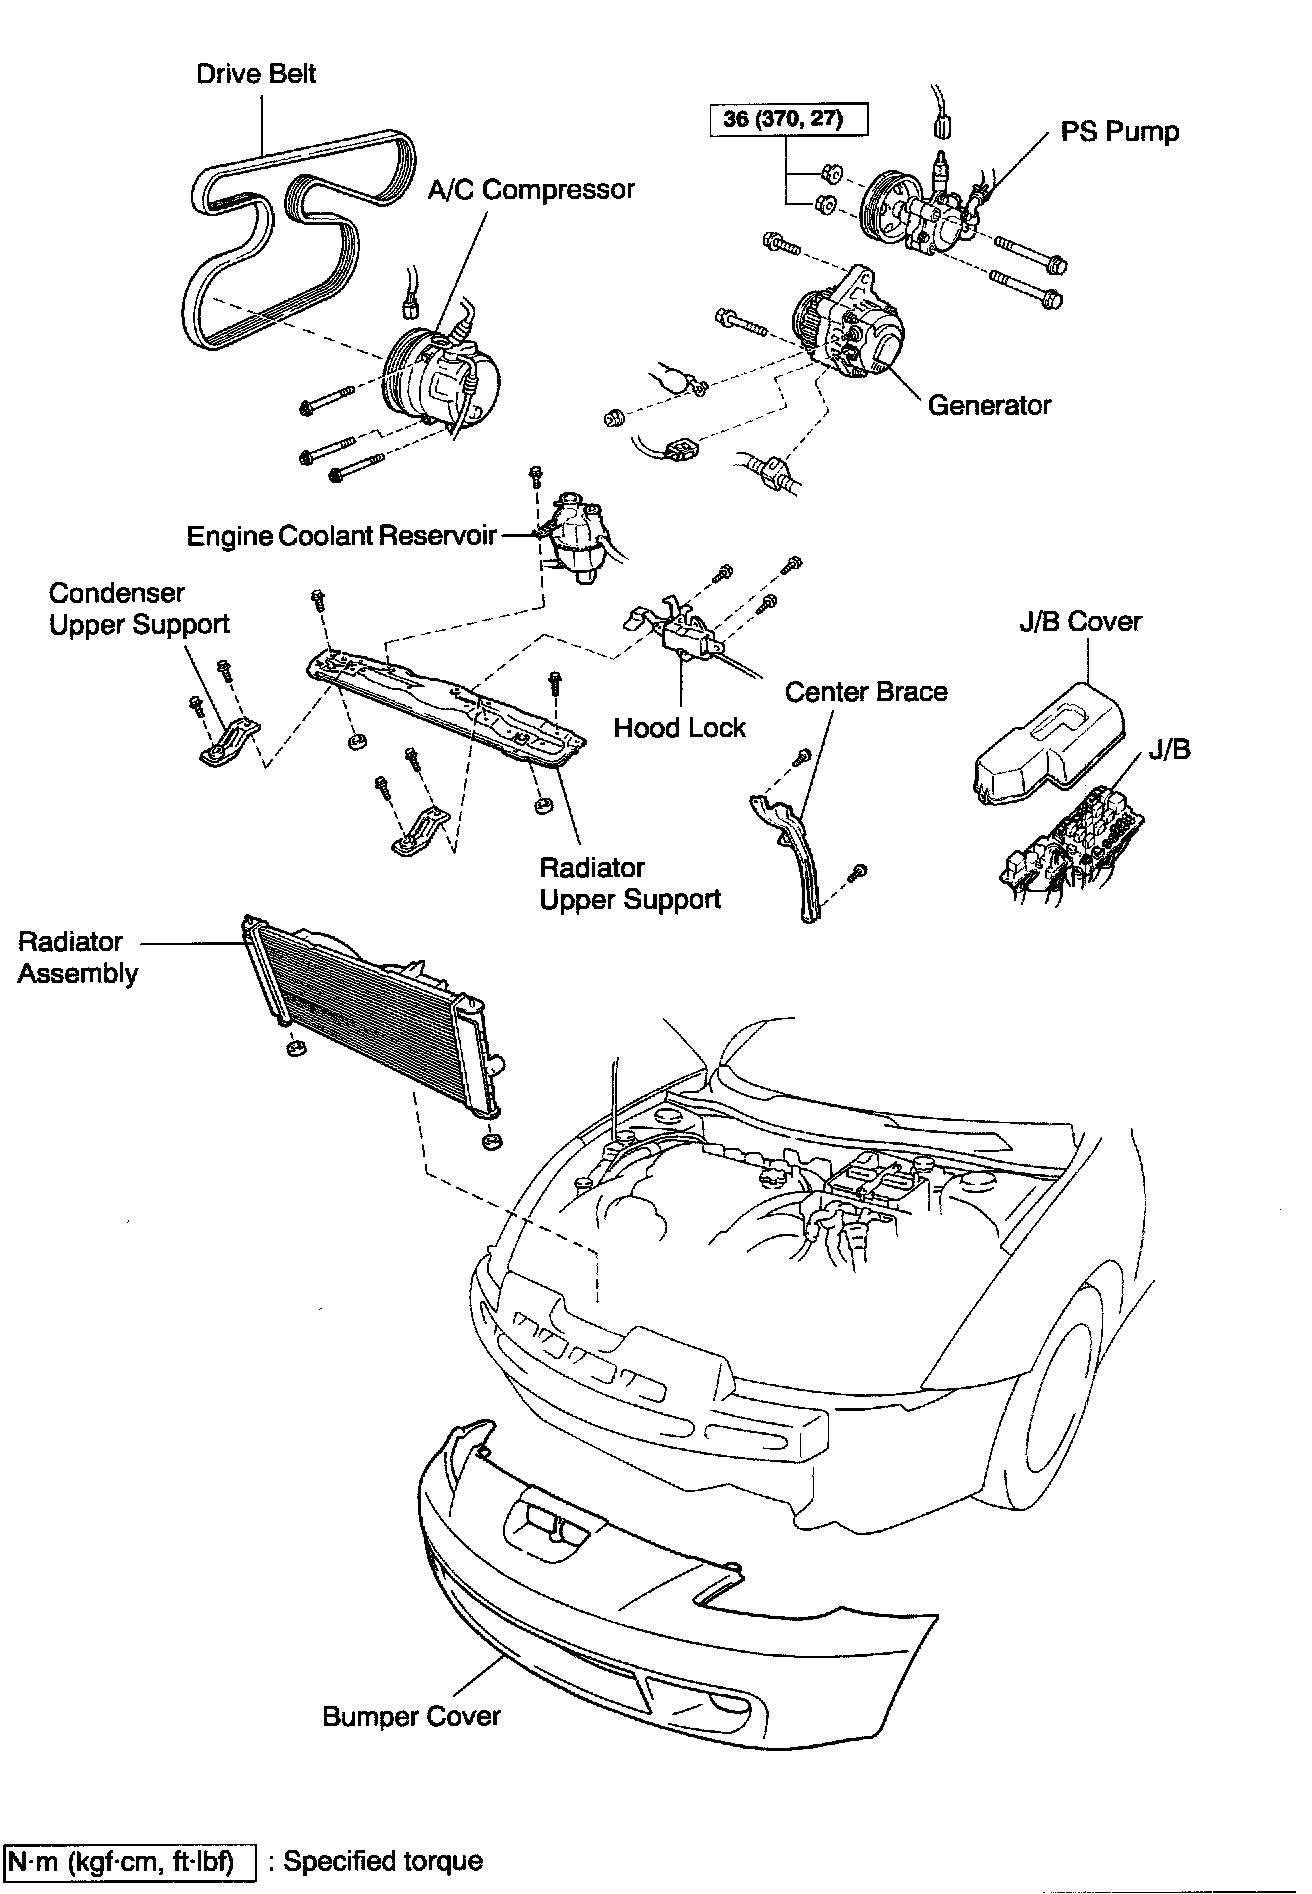
6. CONNECT PS GEAR
Install the PS gear with the 4 bolts.
Torque: 45 Nm (460 kgf-cm, 33 ft. lbs.)
7. INSTALL STABILIZER BAR BRACKET
8. CONNECT PS PUMP
a. Install the PS pump with the 2 through bolts and nuts.
Torque: 36 Nm (370 kgf-cm, 27 ft. lbs.)
b. Connect the PS oil pressure switch connector.

9. 1ZZ-FE: INSTALL EXHAUST MANIFOLD
a. Install the gasket and exhaust manifold with the 5 nuts.
Torque: 37 Nm (377 kgf-cm, 27 ft. lbs.)
b. Install the exhaust manifold stay with the 3 bolts.
Torque: 49 Nm (500 kgf-cm, 37 ft. lbs.)
c. Install the upper heat insulator with the 6 bolts.
Torque: 12 Nm (123 kgf-cm, 9 ft. lbs.)

10. 2ZZ-GE: INSTALL EXHAUST MANIFOLD
a. Install the gasket and exhaust manifold with the 2 nuts and 3 bolts.
Torque: 50 Nm (510 kgf-cm, 37 ft. lbs.)
b. Install the exhaust manifold stay with the 4 bolts.
Torque: 50 Nm (510 kgf-cm, 37 ft. lbs.)
c. Install the upper heat insulator with the 5 bolts.
Torque: 20 Nm (204 kgf-cm, 15 ft. lbs.)

11. INSTALL EXHAUST PIPE
a. Install the 2 gaskets and exhaust pipe.
b. Connect the 2 O-rings.
c. Install the 4 springs and bolts.
Torque: 43 Nm (440 kgf-cm, 32 ft. lbs.)

d. Connect the 2 heated oxygen sensor.
12. INSTALL DRIVE SHAFT
13. CONNECT 2 GROUND CABLES
14. CONNECT TRANSAXLE CONTROL CABLE(S)

15. M/T: CONNECT CLUTCH RELEASE CYLINDER
a. Install the release cylinder with the 2 bolts.
Torque: 12 Nm (120 kgf-cm, 9 ft. lbs.)
b. Install the brackets with the 3 bolts.
Torque:
Bolt A 12 Nm (120 kgf-cm, 9 ft. lbs.)
Bolt B 4.9 Nm (50 kgf-cm, 43 inch lbs.)
16. CONNECT TUBE AND HOSE
a. Connect the brake booster vacuum hose.
b. Connect the 2 heater hoses to the engine side.
c. Connect the fuel tube to the fuel pipe on vehicle side.
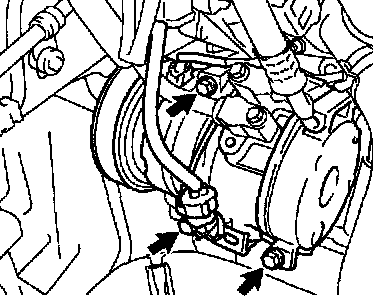
17. w/A/C: INSTALL A/C COMPRESSOR
a. Install the A/C compressor with the 3 bolts.
Torque: 25 Nm (255 kgf-cm, 18 ft. lbs.)
b. Connect the A/C compressor connector.
18. INSTALL GENERATOR AND DRIVE BELT
19. INSTALL RADIATOR ASSEMBLY

20. w/Cruise Control System: INSTALL CRUISE CONTROL ACTUATOR
a. Install the actuator with the 3 bolts.
b. Connect the actuator connector.

21. CONNECT ENGINE WIRE TO ENGINE COMPARTMENT RELAY BOX
a. Install the engine wire to the relay box.
b. Connect the 3 connectors.

c. Connect the J/B to the relay box.
d. Connect the 3 connectors.
e. Install the relay box upper cover.
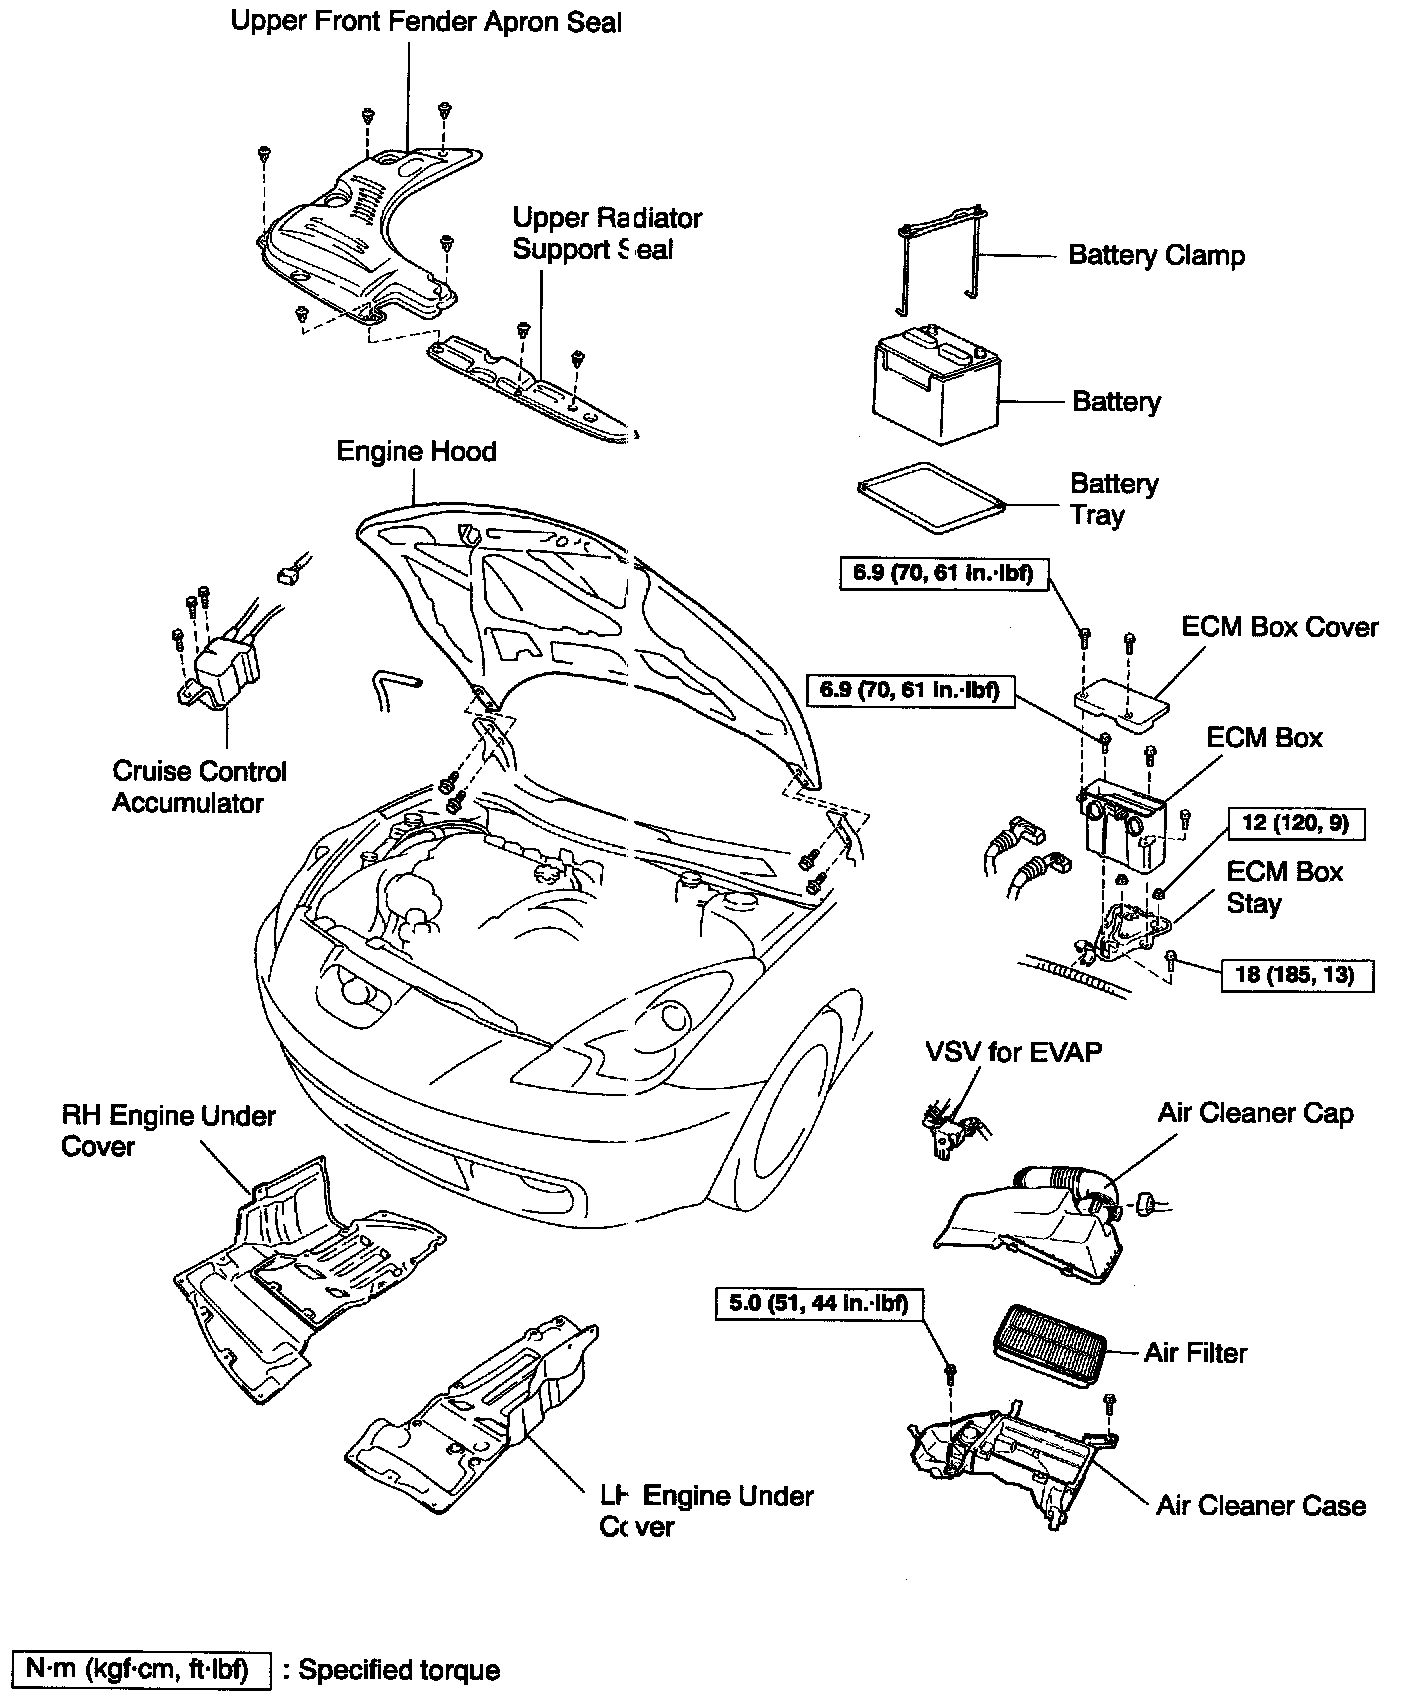
22. INSTALL ECM BOX

a. Install the ECM box stay with the 2 nuts and bolt.
Torque:
Nut 12 Nm (120 kgf-cm, 9 ft. lbs.)
Bolt 18 Nm (185 kgf-cm, 13 ft. lbs.)

b. Install the ECM box with the 3 bolts.
Torque: 6.9 Nm (70 kgf-cm, 61 inch lbs.)
c. Connect the 2 engine wire to the ECM box.
d. Connect the clamp to the ECM box.
e. Install the ECM to the ECM box.
f. Connect the 2 connectors to the ECM box.
g. Connect the 4 connectors to the ECM
h. Install the ECM cover with the 2 bolts.
Torque: 6.9 Nm (70 kgf-cm, 61 inch lbs.)

23. INSTALL AIR CLEANER CASE
a. Connect the 2 hoses to the air cleaner case.
b. Install the air cleaner case with the 2 bolts.
Torque: 5.0 Nm (51 kgf-cm, 44 inch lbs.)
c. Connect the hose to the intake air control valve.
d. Connect the hose to the VSV for canister closed valve (CVC).
e. Install the air filter.

24. INSTALL AIR CLEANER CAP
a. Install the air cleaner hose to the throttle body with the hose clamp.
b. Connect the air cleaner cap to the air cleaner case with the 3 clamps.
c. Connect the 2 hoses.
d. Connect the VSV for EVAP.
e. Connect the MAF meter connector.
25. INSTALL HEADLIGHT AND BUMPER COVER
26. INSTALL BATTERY AND TRAY
27. FILL WITH TRANSAXLE OIL
28. FILL WITH ENGINE OIL
29. FILL WITH ENGINE COOLANT
30. START ENGINE AND CHECK FOR LEADS
31. PERFORM ENGINE ADJUSTMENT
32. CHECK FRONT WHEEL ALIGNMENT
33. INSTALL ENGINE UNDER COVERS
34. INSTALL ENGINE HOOD
35. ROAD TEST VEHICLE
Check for abnormal noises, shock slippage, correct shift points and smooth operation.
36. RECHECK ENGINE COOLANT AND OIL LEVELS