Removal and Installation
Side Airbag Assembly:

REMOVAL
NOTE:
- If the wiring connector of the SRS is disconnected and the ignition switch is at ON position, DTCs will be recorded.
- Never use the airbag parts from another vehicle. When replacing parts, replace them with new parts.

1. REMOVE FRONT SEAT
a. Remove the 2 seat track covers and 4 bolts.
b. Disconnect the side airbag connector.
NOTE: When handling the airbag connector, take care not to damage the airbag wire harness.
c. Remove the front seat.
2. REMOVE RECLINING ADJUSTER RELEASE HANDLE
3. REMOVE RECLINING ADJUSTER KNOB

4. REMOVE FRONT SEAT CUSHION SHIELD

5. REMOVE INNER FRONT SEAT CUSHION SHIELD
Remove the screw and inner front seat cushion shield
6. REMOVE SEAT CUSHION ASSEMBLY
a. Remove the wire harness from the seat cushion assembly.
NOTE: When handling the airbag wire harness, take care not to damage the airbag wire harness.
b. Remove the 4 bolts and seat cushion assembly.
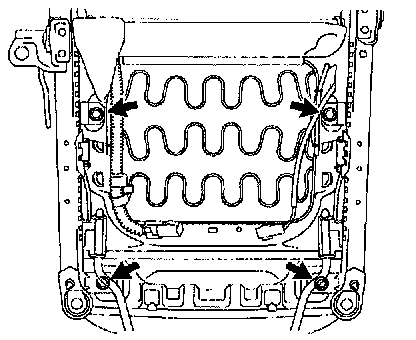
7. REMOVE SEATBACK ASSEMBLY

a. Remove the hog rings of the seatback frame, as shown in the illustration.

b. Remove the 4 bolts and seatback assembly.
CAUTION: Do not store the seatback assembly with the airbag deployment side facing downward.
INSTALLATION
NOTE: Never use airbag parts from another vehicle. When replacing parts, replace them with new parts.
1. INSTALL SEATBACK ASSEMBLY

a. Install the seatback assembly to the seat adjuster with the 4 bolts.
Torque: 43 N.m (440 kgf.cm, 32 ft.lbf)

b. Install 5 new hog rings.
HINT: When installing the hog rings, take care to prevent wrinkles as little as possible.
2. INSTALL SEAT CUSHION ASSEMBLY
a. Install the seat cushion assembly with the 4 bolts.
Torque: 21 N.m (210 kgf.cm, 15 ft.lbf)

b. Install the wire harness to the seat cushion assembly.

3. INSTALL INNER FRONT SEAT CUSHION SHIELD
Install the inner front seat cushion shield with the screw.

4. INSTALL FRONT SEAT CUSHION SHIELD
5. INSTALL RECLINING ADJUSTER KNOB
6. INSTALL RECLINING ADJUSTER RELEASE HANDLE
7. INSTALL FRONT SEAT
NOTE: When mounting the seat to the vehicle, take care not to damage the airbag wire harness.
a. Connect the side airbag connector.
b. Slide the front seat to the most front position.
NOTE: Make sure that seat adjuster locks.
c. Without holding the seat track handle, mount the seat to the vehicle.
HINT: If holding the seat track handle, the adjusted rear most position slip off.
d. Tighten the bolts on the front side temporarily, from the bolt on the inner side tighten them completely.
Torque: 37 N.m (375 kgf.cm, 27 ft.lbf)
e. Slide the seat to the most front position to install the bolts on the rear side.
Torque: 37 N.m (375 kgf.cm, 27 ft.lbf)
f. Install the 2 seat track covers.