Part 3
ENGINE UNITCOMPONENTS:

COMPONENTS:

COMPONENTS:

COMPONENTS:

COMPONENTS:

COMPONENTS:

COMPONENTS:

COMPONENTS:

COMPONENTS:

REASSEMBLY (STEPS 37-56)
37. INSTALL TIMING CHAIN COVER SUB-ASSEMBLY (w/Oil Pump)
38. INSTALL WATER PUMP ASSEMBLY
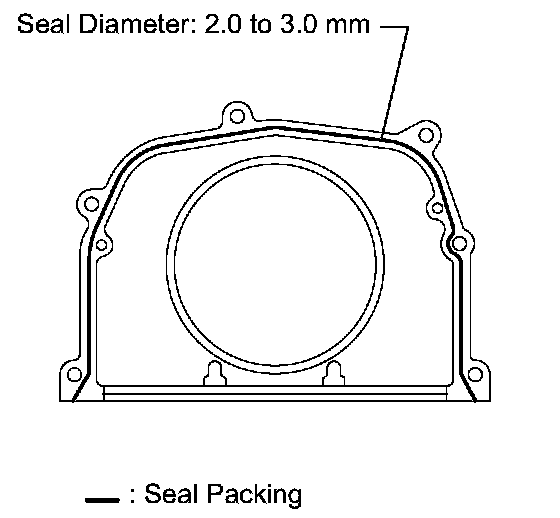
39. INSTALL ENGINE REAR OIL SEAL RETAINER
a. Apply seal packing in a continuous line as shown in the illustration.
Seal packing: Toyota Genuine Seal Packing Block, Three Bond 1207B or Equivalent
Standard seal diameter: 2.0 to 3.0 mm (0.079 to 0.118 inch)
NOTICE:
^ Remove any oil from the contact surface.
^ Install the crankcase within 3 minutes after applying seal packing.
^ Do not start the engine for at least 2 hours after the installation.
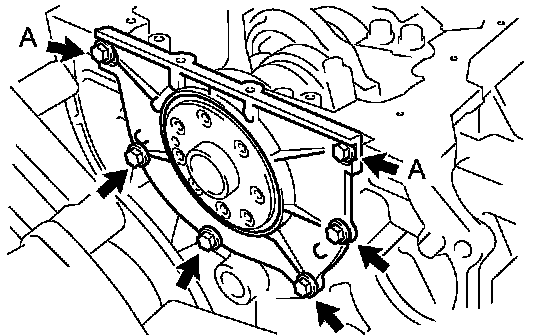
b. Install the oil seal retainer with the 6 bolts.
Torque: 10 Nm (102 kgf-cm, 7 ft. lbs.)
NOTICE: Apply adhesive 1324 to the 2 bolts labeled A.
Adhesive: Toyota Genuine Adhesive 1324, Three Bond 1324 or Equivalent
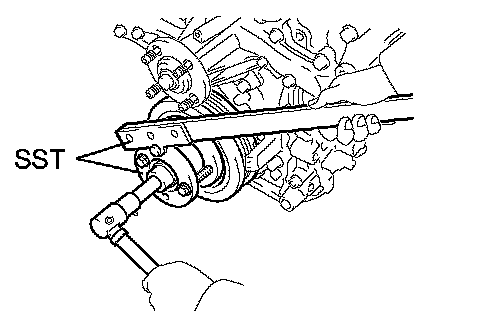
40. INSTALL CRANKSHAFT PULLEY
a. Align the pulley set key with the key groove of the pulley, and slide on the pulley.
b. Using SST, install the pulley bolt.
SST 09213-70011 (09213-70020), 09330-00021
Torque: 250 Nm (2,549 kgf-cm, 184 ft. lbs.)
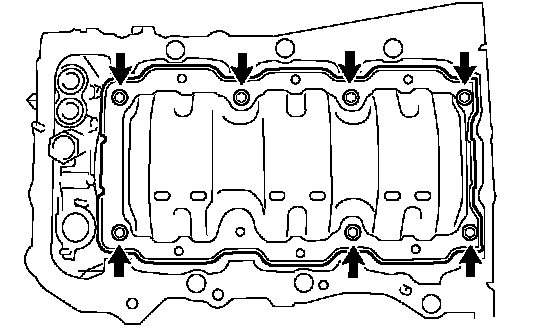
41. INSTALL OIL PAN BAFFLE PLATE
a. Install the oil pan baffle plate with the 7 bolts.
Torque: 10 Nm (102 kgf-cm, 7 ft. lbs.)
42. INSTALL OIL PAN SUB-ASSEMBLY
43. INSTALL OIL STRAINER SUB-ASSEMBLY
44. INSTALL NO. 2 OIL PAN SUB-ASSEMBLY
45. INSTALL OIL FILTER ELEMENT
46. INSTALL OIL FILTER CAP SUB-ASSEMBLY
47. INSTALL WATER INLET HOUSING
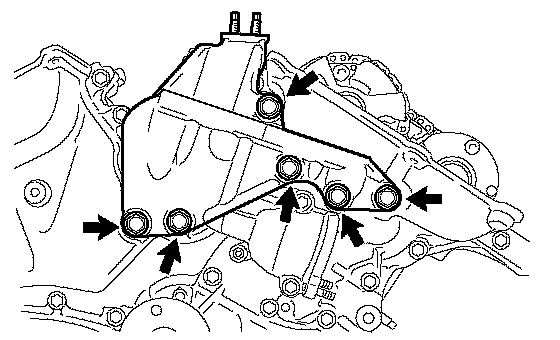
48. INSTALL FRONT NO. 1 ENGINE MOUNTING BRACKET
a. Install the engine mounting bracket with the 6 bolts.
Torque: 54 Nm (551 kgf-cm, 40 ft. lbs.)
NOTICE:
^ Install the water inlet and mounting bracket within 15 minutes after installing the chain cover.
^ Do not start the engine for at least 2 hours after the installation.
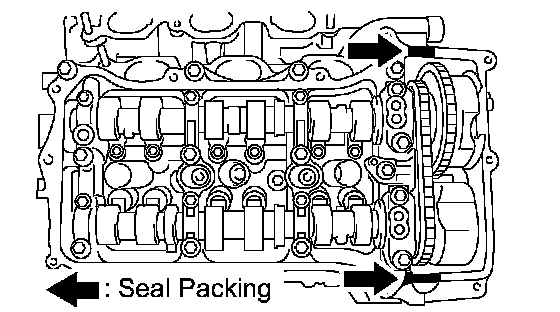
49. INSTALL CYLINDER HEAD COVER SUB-ASSEMBLY (for Bank 1)
a. Apply seal packing as shown in the illustration.
Seal packing: Toyota Genuine Seal Packing Block, Three Bond 1207B or Equivalent
NOTICE:
^ Remove any oil from the contact surface.
^ Install the crankcase within 3 minutes after applying seal packing.
^ Do not start the engine for at least 2 hours after the installation.
b. Install the gasket to the head cover.
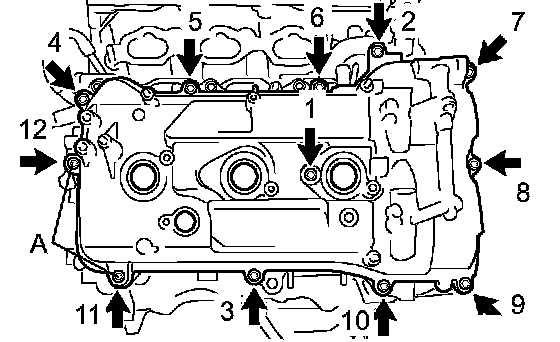
c. Install the head cover with the 12 bolts in the order shown in the illustration.
Torque:
21 Nm (214 kgf-cm, 15 ft. lbs.) for bolt A
10 Nm (102 kgf-cm, 7 ft. lbs.) for except bolt A
HINT: Make sure the tightening torque of bolt 1 and 11 is correct.
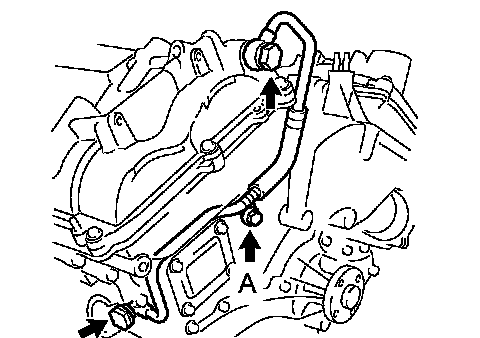
50. INSTALL OIL PIPE
a. Make sure that there is no foreign matter on the mesh of the oil control valve filter.
b. Install the oil control valve filter to the oil pipe union. Install 2 new gaskets and temporarily install the oil pipe (on the head cover side) with the oil pipe union.
NOTICE: Remove any oil from the contact surface.
c. Install a new gasket and temporarily install the oil pipe (on the cylinder head side) with the oil pipe union.
NOTICE: Remove any oil from the contact surface.
d. Install bolt A to the cylinder head.
Torque: 10 Nm (102 kgf-cm, 7 ft. lbs.)
e. Tighten the 2 oil pipe union bolts.
Torque: 65 Nm (663 kgf-cm, 48 ft. lbs.)
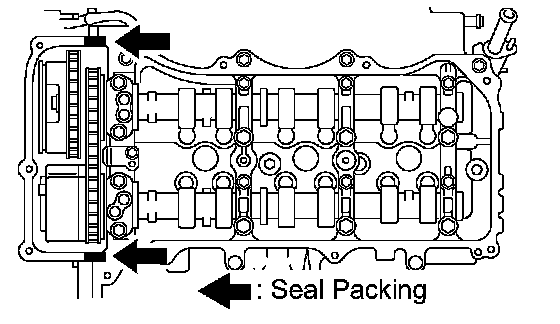
51. INSTALL CYLINDER HEAD COVER SUB-ASSEMBLY (for Bank 2)
a. Apply seal packing as shown in the illustration.
Seal packing: Toyota Genuine Seal Packing Block, Three Bond 1207B or Equivalent
NOTICE:
^ Remove any oil from the contact surface.
^ Install the crankcase within 3 minutes after applying seal packing.
^ Do not start the engine for at least 2 hours after the installation.
b. Install the gasket to the head cover.
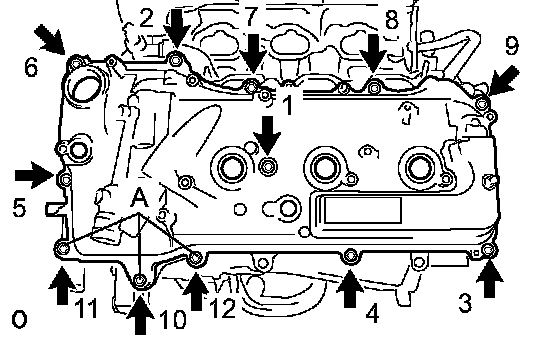
c. Install the head cover with the 12 bolts in the order in the illustration.
Torque:
21 Nm (214 kgf-cm, 15 ft. lbs.) for bolt A
10 Nm (102 kgf-cm, 7 ft. lbs.) for except bolt A
HINT: Make sure the tightening torque of bolts 1 and 10 is correct.
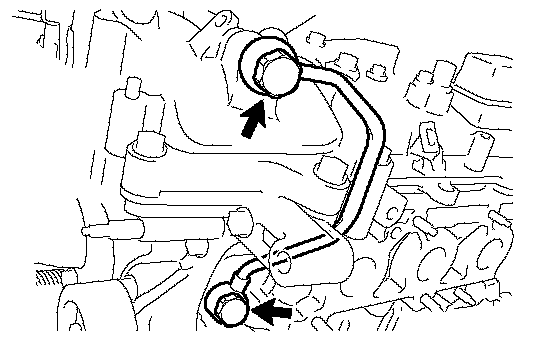
52. INSTALL NO. 1 OIL PIPE
a. Make sure that there is no foreign matter on the mesh of the oil control valve filter.
b. Install the oil control valve filter to the oil pipe union. Install 2 new gaskets and temporarily install the oil pipe (on the head cover side) with the oil pipe union.
c. Install a new gasket and temporarily install the oil pipe (on the cylinder head side) with the oil pipe union.
NOTICE: Remove any oil from the contract surface.
d. Tighten the 2 oil pipe union bolts.
Torque: 65 Nm (663 kgf-cm, 48 ft. lbs.)
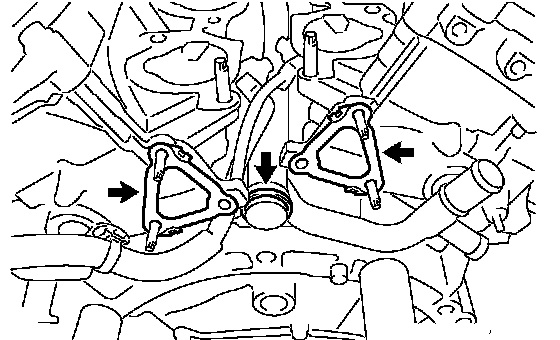
53. INSTALL WATER OUTLET
a. Install 2 new gaskets and a new O-ring.
b. Apply soapy water to the O-ring.
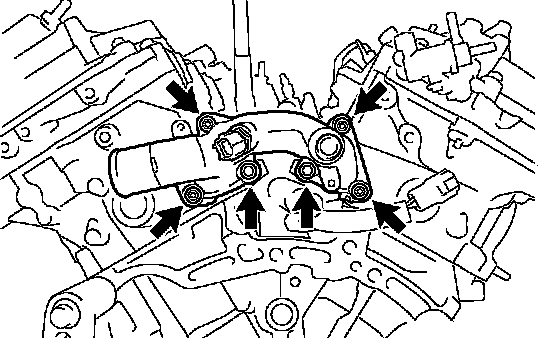
c. Install the water outlet with the 2 bolts and 4 nuts.
Torque: 10 Nm (102 kgf-cm, 7 ft. lbs.)
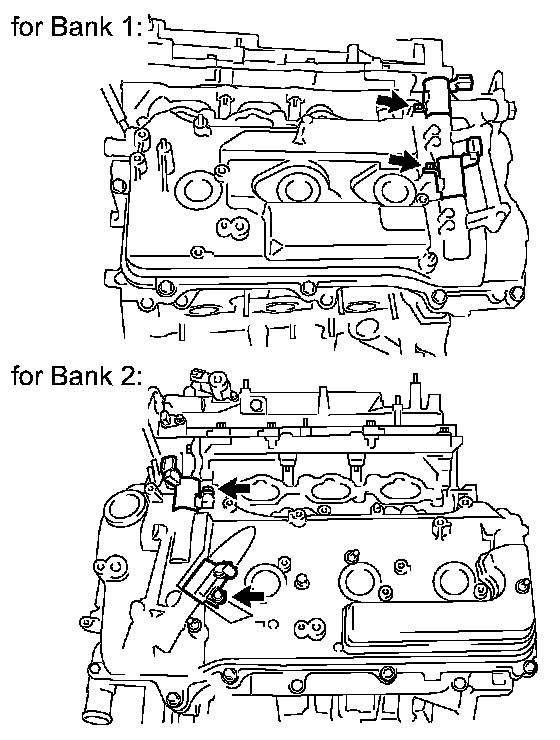
54. INSTALL CAMSHAFT TIMING OIL CONTROL VALVE ASSEMBLY
a. Install the 4 camshaft timing oil control valves with the 4 bolts.
Torque: 10 Nm (102 kgf-cm, 7 ft. lbs.)
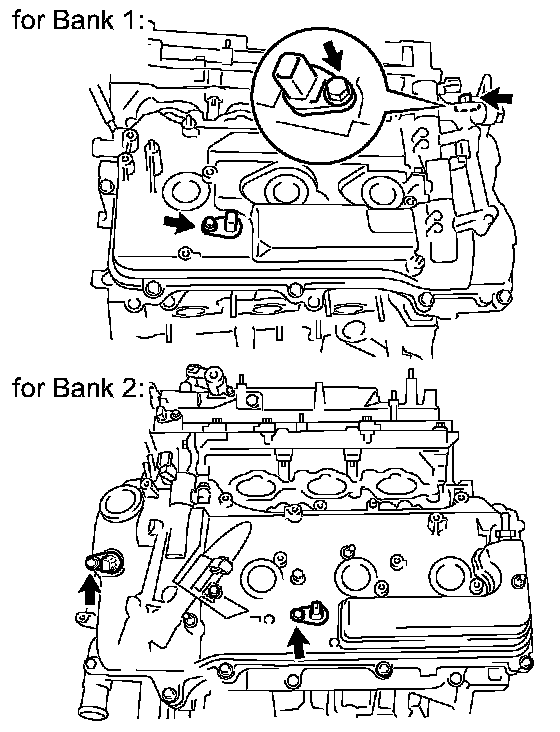
55. INSTALL VVT SENSOR
a. Install the 4 VVT sensors with the 4 bolts.
Torque: 10 Nm (102 kgf-cm, 7 ft. lbs.)
56. INSTALL SPARK PLUG
a. Install the 6 spark plugs.
Torque: 18 Nm (184 kgf-cm, 13 ft. lbs.)