Removal
AIR CONDITIONING: AIR CONDITIONING PANEL ASSEMBLY: REMOVAL
1. DISCONNECT CABLE FROM NEGATIVE BATTERY TERMINAL
2. REMOVE INSTRUMENT PANEL FINISH PANEL END LH Removal
3. REMOVE INSTRUMENT PANEL FINISH PANEL END RH Removal
4. REMOVE INSTRUMENT CLUSTER FINISH PANEL NO.1 Removal
5. REMOVE INSTRUMENT CLUSTER FINISH PANEL SUB-ASSEMBLY CENTER
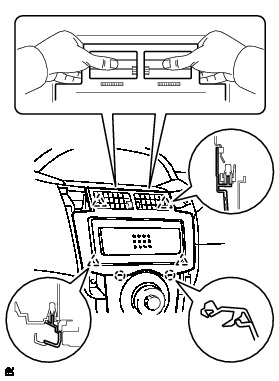
(a) Disengage the 2 claws and then remove the 4 clips and the instrument cluster finish panel center.
NOTICE:
Pull the instrument cluster finish panel center out, while holding the register, to disengage the claws on the upper portion. Do not hold the decorative panel.
6. REMOVE AIR CONDITIONING PANEL ASSEMBLY

(a) Disengage the 3 clips and 2 claws and remove the air conditioning panel.
(b) Disconnect the 3 connectors and the clamp.

7. DISCONNECT AIR MIX DAMPER CONTROL CABLE SUB-ASSEMBLY

(a) Disconnect the air mix control cable from the clamp.
(b) Disengage the 2 claws and disconnect the air mix damper control cable.
8. DISCONNECT DEFROSTER DAMPER CONTROL CABLE SUB-ASSEMBLY

(a) Disengage the 2 claws and disconnect the defroster damper control cable.
9. DISCONNECT AIR INLET DAMPER CONTROL CABLE SUB-ASSEMBLY

(a) Disengage the 2 claws and disconnect the air inlet damper control cable.