Compressor HVAC: Service and Repair
Electric Inverter Compressor:
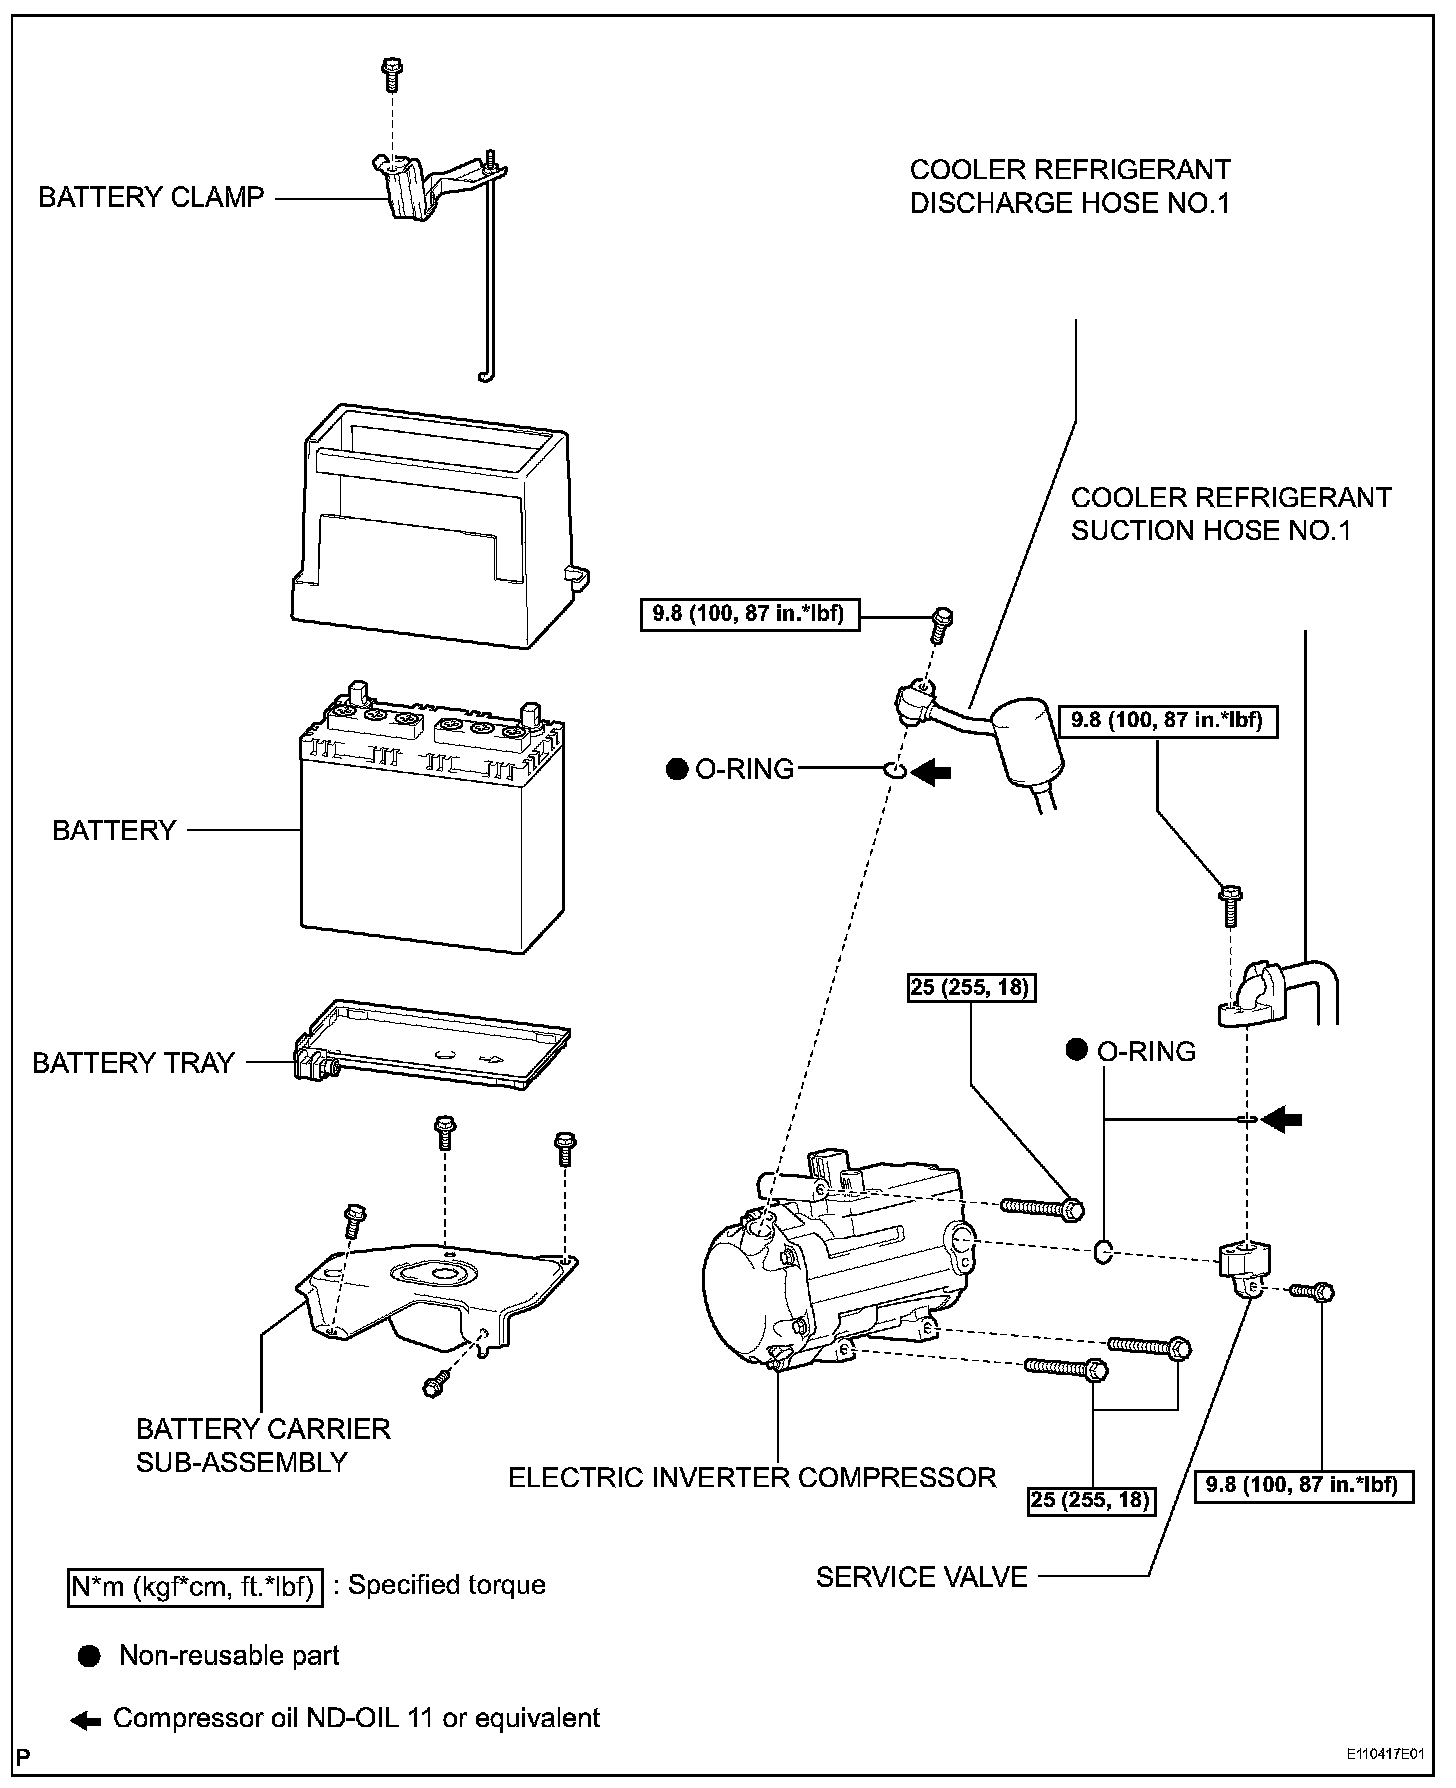
ELECTRIC INVERTER COMPRESSOR
REMOVAL
1. DISCHARGE REFRIGERANT FROM REFRIGERATION SYSTEM
2. REMOVE SERVICE PLUG GRIP
3. REMOVE BATTERY
4. REMOVE BATTERY CARRIER SUB-ASSEMBLY
5. DISCONNECT COOLER REFRIGERANT DISCHARGE HOSE NO.1
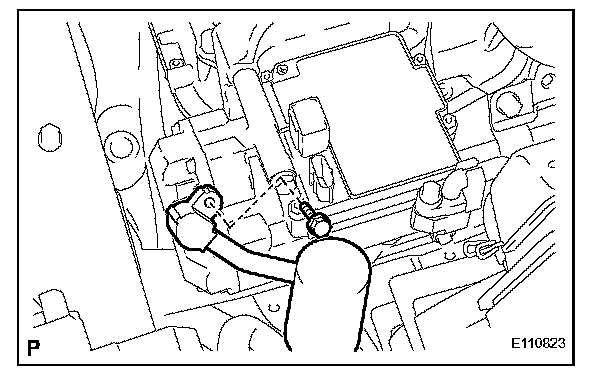
a. Remove the bolt and disconnect the cooler refrigerant discharge hose No.1 from the electric inverter compressor.
b. Remove the O-ring from the cooler refrigerant discharge hose No.1.
NOTE: Seal the openings of the disconnected parts using vinyl tape to prevent moisture and foreign matter from entering.
6. DISCONNECT COOLER REFRIGERANT SUCTION HOSE NO.1
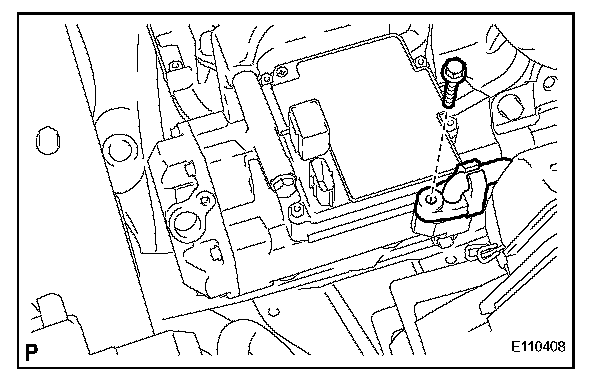
a. Remove the bolt and disconnect the cooler refrigerant suction hose No.1 from the electric inverter compressor.
b. Remove the O-ring from the cooler refrigerant suction hose No.1.
NOTE: Seal the openings of the disconnected parts using vinyl tape to prevent moisture and foreign matter from entering.
7. REMOVE ELECTRIC INVERTER COMPRESSOR
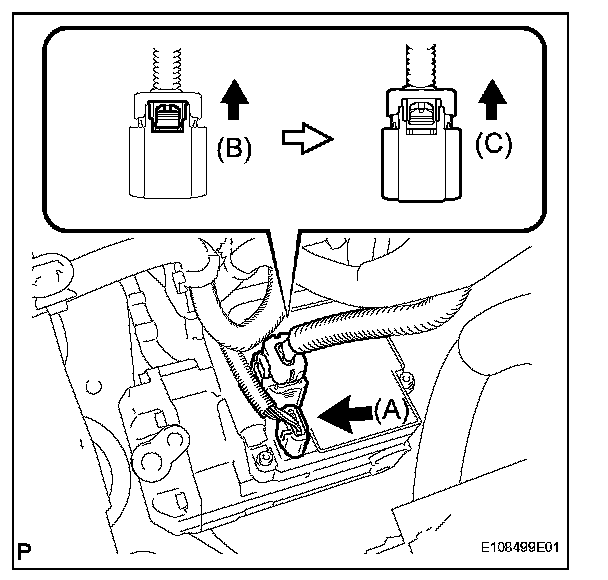
a. Disconnect the connector (A).
b. Release the green-colored lock (B).
CAUTION: Wear insulated gloves when performing the procedures.
c. Disconnect the connector(C).
NOTE: Insulate the connector by sealing it with tape.
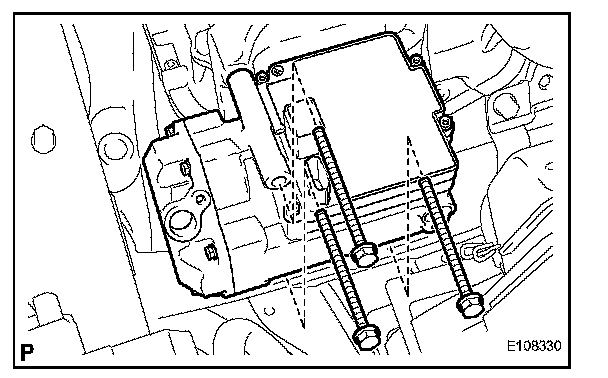
d. Remove the 3 bolt and electric inverter compressor.
8. REMOVE SERVICE VALVE
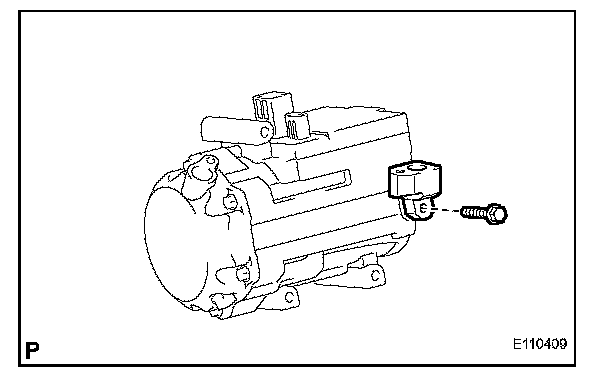
a. Remove the bolt and service valve.
b. Remove the O-ring from the service valve.
INSTALLATION
1. ADJUST COMPRESSOR OIL
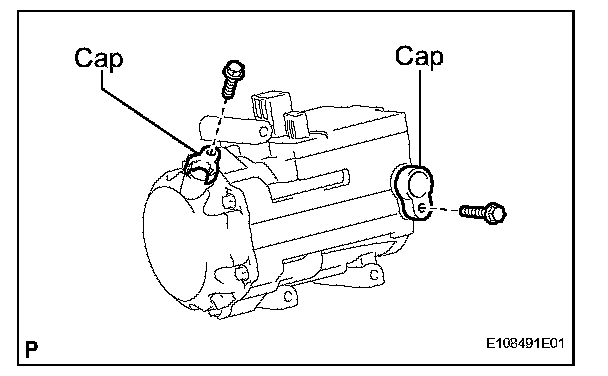
a. When replacing the electric inverter compressor with a new one, gradually discharge the refrigerant gas from the service valve, and drain the following amount of oil from the new electric inverter compressor before installation.
Standard: (Oil capacity inside the new electric inverter compressor: 120 to 135 cc (4.2 to 4.8 fl. oz.)) - (Remaining oil amount in the removed electric inverter compressor) = (Oil amount to be removed from the new compressor when replacing)
NOTE:
- When checking the compressor oil level, observe the precautions on the cooler removal/installation.
- If a new electric inverter compressor installed without removing some oil remaining in the pipes of the vehicle, the oil amount will be too large. This prevents heat exchange in the refrigerant cycle and caused refrigerant failure.
- If the volume of oil remaining in the removed electric inverter compressor is too small, check for oil leakage.
- Be sure to use ND-OIL 11 for compressor oil.
- If any compressor oil other than ND-OIL 11 is used, compressor motor insulation performance may decrease, resulting in a leakage of electric power.
2. INSTALL SERVICE VALVE
a. Apply sufficient compressor oil (ND-OIL 11) to a new O-ring and the fitting surface of the electric inverter compressor.
Compressor oil: ND-OIL 11 or equivalent.
NOTE:
- Do not use any compressor oil other than ND-OIL 11 or equivalent.
- If any compressor oil other than ND-OIL 11 or equivalent is used, compressor motor insulation performance may decrease, resulting in a leakage of electric power.
b. Install the O-ring onto the service valve.
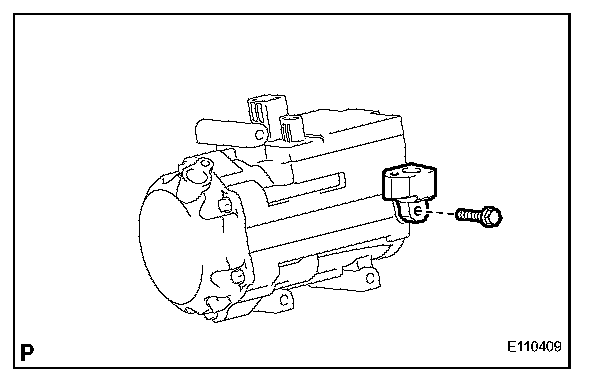
c. Install the service valve with the bolt.
Torque: 9.8 N.m (100 kgf.cm, 87 in.lbf)
3. INSTALL ELECTRIC INVERTER COMPRESSOR
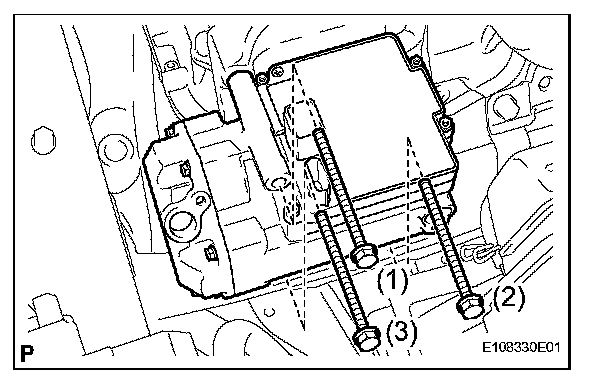
a. Install the electric inverter compressor with the 3 bolts.
Torque: 25 N.m (255 kgf.cm, 18 ft.lbf)
NOTE: Tighten them in the order indicated in the illustration.
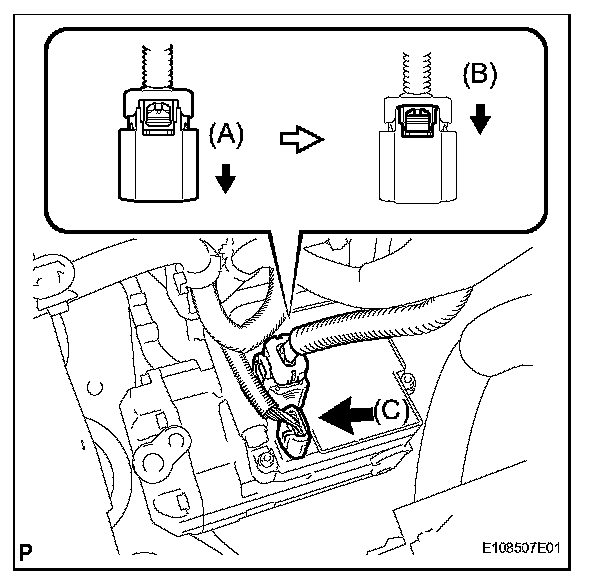
b. Connect the connector (A).
NOTE: Wear insulated gloves when performing the procedures.
c. Lock the green-colored lock (B).
d. Connect the connector (C).
4. INSTALL COOLER REFRIGERANT SUCTION HOSE NO.1
a. Remove the attached vinyl tape from the hose.
b. Apply sufficient compressor oil (ND-OIL 11 or equivalent) to a new O-ring and the fitting surface of the electric inverter compressor.
Compressor oil: ND-OIL 11 or equivalent
NOTE:
- Do not use any compressor oil other than ND-OIL 11 or equivalent.
- If any compressor oil other than equivalent is used, compressor motor insulation performance may decrease, resulting in a leakage of electric power.
c. Install the O-ring onto the cooler refrigerant suction hose No.1.
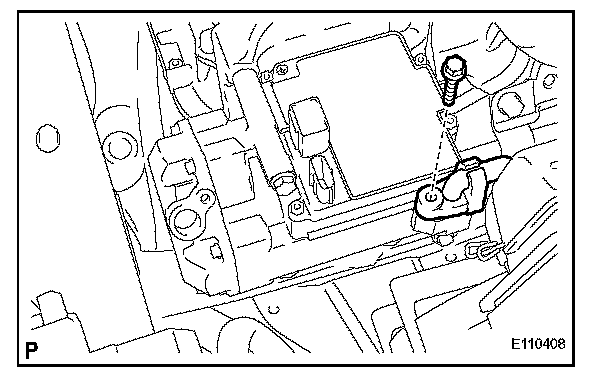
d. Install the cooler refrigerant suction hose No.1 onto the electric inverter compressor with the bolt.
Torque: 9.8 N.m (100 kgf.cm, 87 in.lbf)
5. INSTALL COOLER REFRIGERANT DISCHARGE HOSE NO.1
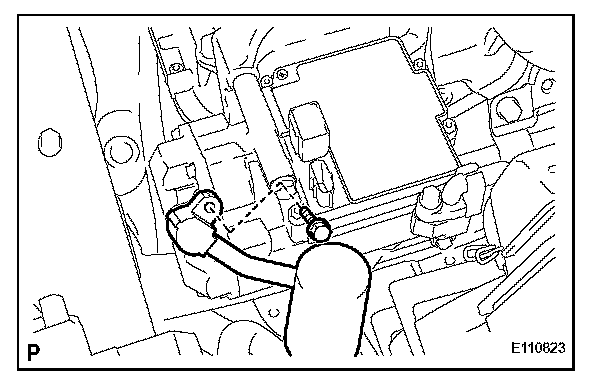
a. Remove the attached vinyl tape from the hose.
b. Apply sufficient compressor oil ( equivalent) to a new O-ring and the fitting surface of the electric inverter compressor.
Compressor oil: ND-OIL 11 or equivalent
NOTE:
- Do not use any compressor oil other than ND-OIL 11 or equivalent.
- If any compressor oil other than ND-OIL 11 or equivalent is used, compressor motor insulation performance may decrease, resulting in a leakage of electric power.
c. Install the O-ring onto the cooler refrigerant discharge hose No.1.
d. Install the cooler refrigerant discharge hose No.1 onto the electric inverter compressor with the bolt.
Torque: 9.8 N.m (100 kgf.cm, 87 in.lbf)
6. CONNECT CABLE TO NEGATIVE BATTERY TERMINAL
7. ADD CHARGE REFRIGERANT
8. WARM UP COMPRESSOR
9. INSPECT FOR REFRIGERANT LEAK
10. PERFORM INITIALIZATION
NOTE: Some systems need initialization when disconnecting the cable from the negative battery terminal.