Quarter Window Glass: Service and Repair
REMOVALHINT:
- Use the same procedures for the LH side and RH side.
- The procedures listed below are for the LH side.
1. REMOVE REAR DOOR SCUFF PLATE LH
2. REMOVE REAR DOOR OPENING TRIM WEATHER STRIP LH
3. REMOVE PACKAGE TRAY TRIM POCKET SUB-ASSEMBLY (w/o Rear No. 2 Seat)
4. REMOVE TONNEAU COVER ASSEMBLY (w/o Rear No. 2 Seat)
5. REMOVE REAR FLOOR NO. 1 BOARD (w/o Rear No. 2 Seat)
6. REMOVE DECK BOARD ASSEMBLY (w/o Rear No. 2 Seat)
7. REMOVE NO. 2 SEAT HINGE COVER LH (w/ Rear No. 2 Seat)
8. REMOVE NO. 2 SEAT HINGE COVER RH (w/o Rear No. 2 Seat)
9. REMOVE NO. 2 SEAT LEG COVER LH (w/ Rear No. 2 Seat)
10. REMOVE NO. 2 SEAT LEG COVER RH (w/o Rear No.2 Seat)
11. REMOVE REAR NO. 2 SEAT ASSEMBLY LH (w/ Rear No. 2 Seat)
12. REMOVE REAR NO. 2 SEAT ASSEMBLY RH (w/ Rear No. 2 Seat)
13. REMOVE REAR FLOOR NO. 2 BOARD
14. REMOVE REAR FLOOR NO. 3 BOARD
15. REMOVE REAR FLOOR NO. 1 MAT SUPPORT SIDE PLATE
16. REMOVE BACK DOOR WEATHERSTRIP
17. REMOVE REAR FLOOR FINISH PLATE
18. REMOVE RECLINING REMOTE CONTROL LEVER BEZEL LH (w/ Rear No. 2 Seat)
19. DISCONNECT REAR NO. 1 SEAT BELT ASSEMBLY OUTER LH
20. DISCONNECT REAR NO. 2 SEAT BELT ASSEMBLY (w/ Rear No. 2 Seat)
21. REMOVE DECK TRIM SIDE PANEL ASSEMBLY LH (w/ Rear No. 2 Seat)
22. REMOVE DECK TRIM SIDE PANEL ASSEMBLY LH (w/o Rear No. 2 Seat)
23. REMOVE REAR NO. 2 SEAT BELT ASSEMBLY OUTER LH (w/ Rear No. 2 Seat)
24. REMOVE INNER ROOF SIDE GARNISH ASSEMBLY LH (w/ Rear No. 2 Seat)
25. REMOVE INNER ROOF SIDE GARNISH ASSEMBLY LH (w/o Rear No. 2 Seat)
26. REMOVE ROOF HEADLINING ASSEMBLY
a. Partially remove the roof headlining
HINT: It is not necessary to completely remove the roof headlining. Slightly lower the rear section of the roof headlining so that the quarter window glass can be removed.
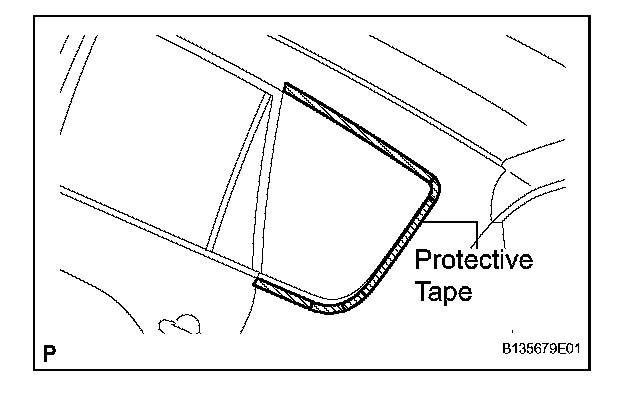
27. REMOVE QUARTER WINDOW ASSEMBLY LH
HINT: Apply protective tape to the outer surface of the vehicle body to prevent scratches.
NOTE: When separating the quarter window glass from the vehicle, be careful not to damage the vehicle's paint or interior/exterior ornaments.
a. Disconnect the connector.
b. From the interior, insert a piano wire between the vehicle body and the quarter window glass as shown in the illustration.
c. Tie objects that can serve as handles (for example, wooden blocks) to both wire ends.
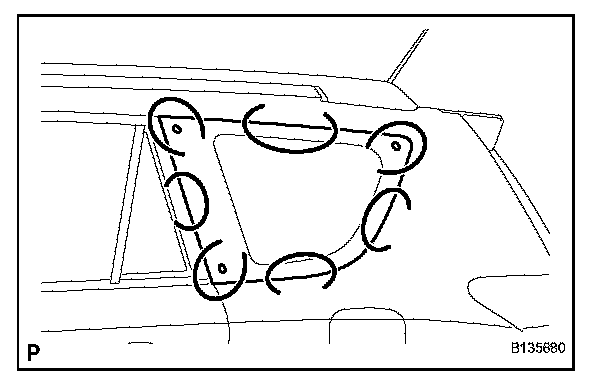
d. Cut through the adhesive by pulling the piano wire around the quarter window glass.
NOTE: Leave as much adhesive on the vehicle body as possible when removing the quarter window glass.
e. Using suction cups, remove the quarter window glass.
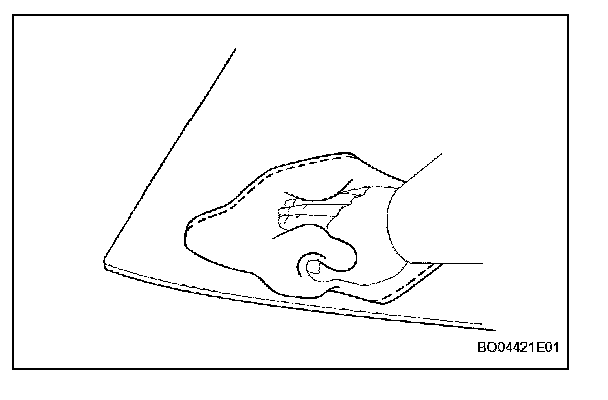
28. CLEAN QUARTER WINDOW ASSEMBLY
a. Clean the outer edges of the glass with white gasoline.
NOTE:
- Do not touch the glass surface after cleaning it.
- Be careful not to damage the glass.
- Ever if using new glass, clean the glass with white gasoline.
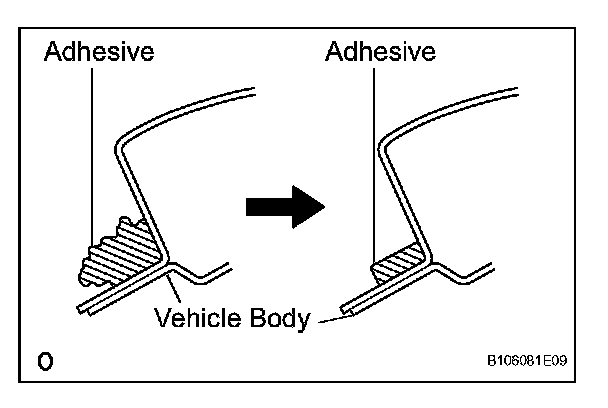
29. CLEAN VEHICLE BODY
a. Clean and shape the contact surface of the vehicle body.
1. On the contact surface of the vehicle body, use a knife to cut away excess adhesive as shown in the illustration.
HINT: Leave as much adhesive on the vehicle body as possible.
NOTE: Be careful not to damage the vehicle body.
2. Clean the contact surface of the vehicle body with cleaner.
HINT: Even if all the adhesive has been removed, clean the vehicle body.
INSTALLATION
HINT:
- Use the same procedures for the LH side and RH side.
- The procedures listed below are for the LH side.
- A bolt without a torque specification is shown in the standard bolt chart.
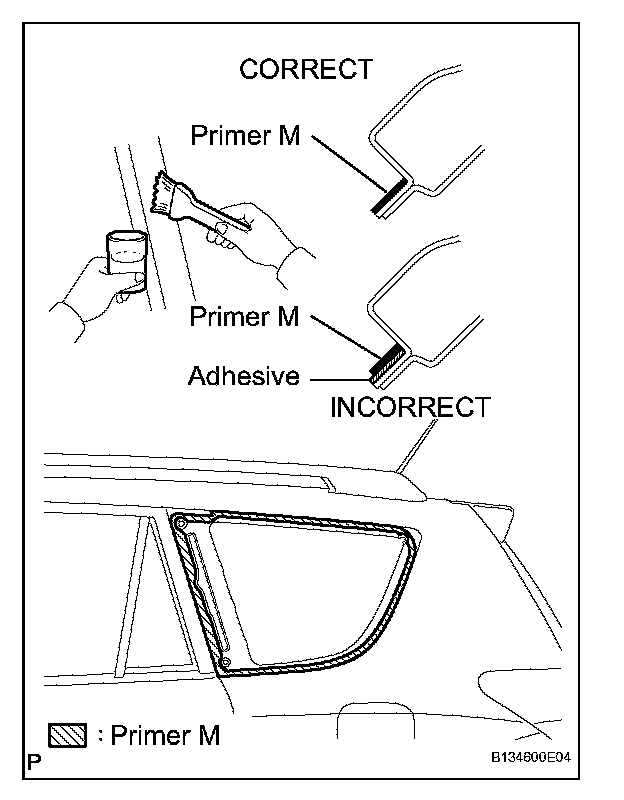
1. INSTALL QUARTER WINDOW ASSEMBLY LH
a. Using a brush or sponge, apply primer M to the exposed part of the vehicle body.
NOTE:
- Allow the primer coating to dry for 3 minutes or more.
- Throw away any leftover primer.
- Do not apply too much primer.
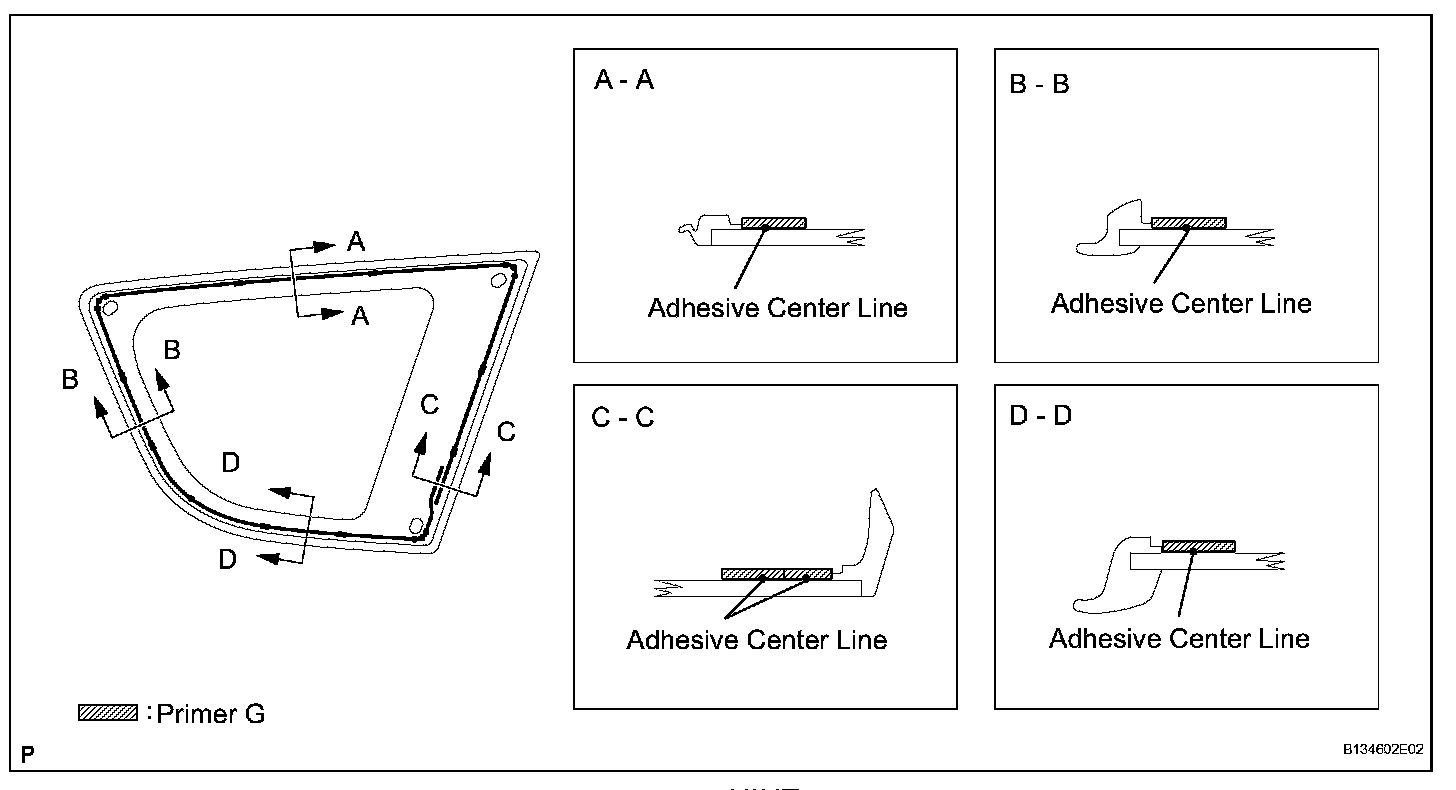
b. Using a brush or sponge, apply primer G to the contact surface of the glass.
HINT: If primer is applied to an area that is specified, wipe off the primer with white gasoline before it dries.
NOTE:
- Allow the primer to dry for 3 minutes or more.
- Throw away any leftover primer.
- Do not apply too much primer.
c. Apply adhesive to the quarter window glass.
Adhesive: Toyota Genuine Windshield Glass Adhesive or Equivalent or equivalent
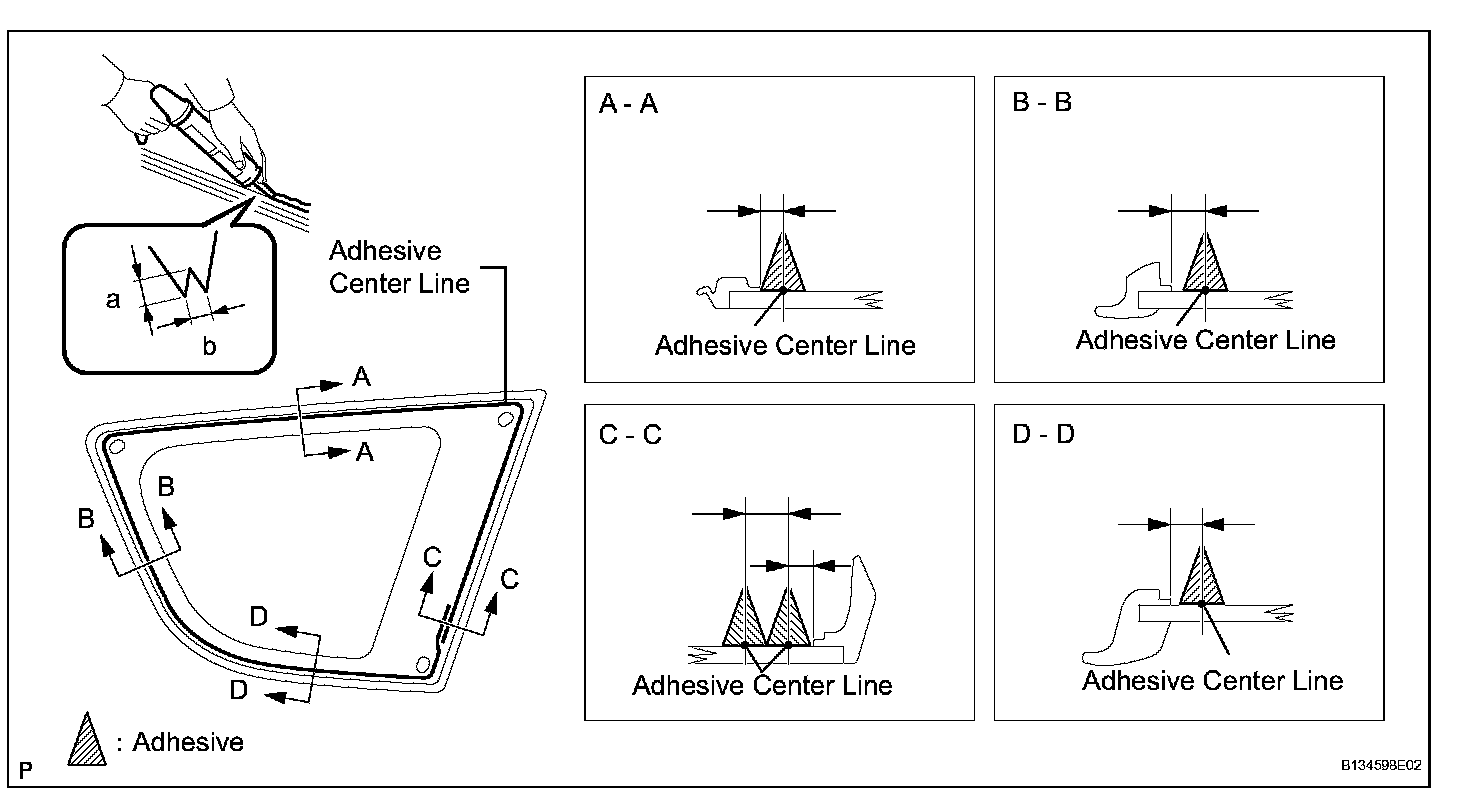
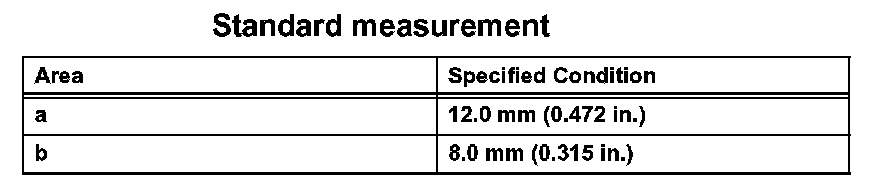
1. Cut off the tip of the cartridge nozzle as shown in the illustration.
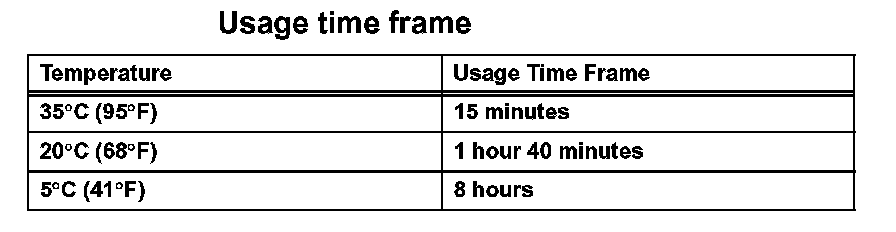
HINT: After cutting off the tip, use all adhesive within the time written in the table.
2. Load the sealer gun with the cartridge.
3. Apply adhesive to the quarter window glass as shown in the illustration.
d. Install the quarter window glass to the vehicle body.
1. Hold the quarter window glass in place securely with protective tape or equivalent until the adhesive hardens.
NOTE:
- Allow the primer coating to dry for 3 minutes or more.
- Check that the clips are attached to the body correctly.
- Check the clearance between the body and glass.
2. Lightly press the front surface of the glass to ensure a close fit.
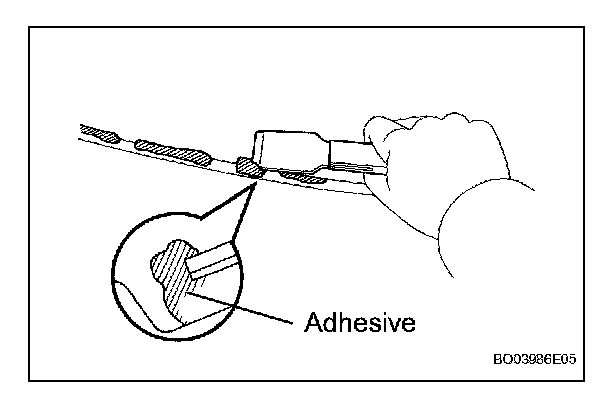
3. Using a scraper, remove any excess or protruding adhesive.
HINT: Apply adhesive onto the glass rim.
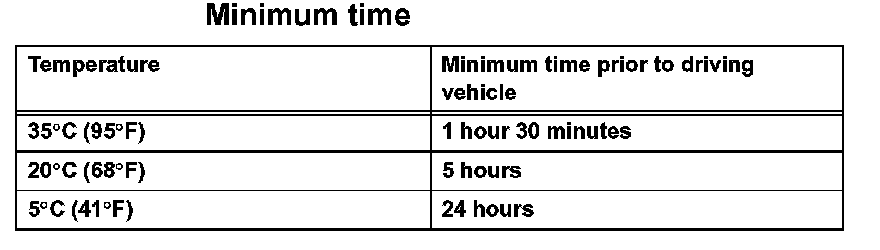
NOTE: Do not drive the vehicle within the time written in the table.
2. CHECK FOR LEAKS AND REPAIR
a. Conduct a leak test after the adhesive has completely hardened.
b. Seal any leaks with auto glass sealer.
3. INSTALL ROOF HEADLINING ASSEMBLY
a. Install the roof headlining
4. INSTALL REAR NO. 1 SEAT BELT ASSEMBLY OUTER LH
5. INSTALL INNER ROOF SIDE GARNISH ASSEMBLY LH (w/ Rear No. 2 Seat)
6. INSTALL INNER ROOF SIDE GARNISH ASSEMBLY LH (w/o Rear No. 2 Seat)
7. INSTALL REAR NO. 2 SEAT BELT ASSEMBLY OUTER LH (w/ Rear No. 2 Seat)
8. INSTALL DECK TRIM SIDE PANEL ASSEMBLY LH (w/ Rear No. 2 Seat)
9. INSTALL DECK TRIM SIDE PANEL ASSEMBLY LH (w/o Rear No. 2 Seat)
10. CONNECT REAR NO. 2 SEAT BELT ASSEMBLY OUTER LH (w/ Rear No. 2 Seat)
11. CONNECT REAR NO. 1 SEAT BELT ASSEMBLY OUTER LH
12. INSTALL RECLINING REMOTE CONTROL LEVER BEZEL LH (w/o Rear No. 2 Seat)
13. INSTALL REAR FLOOR FINISH PLATE
14. INSTALL BACK DOOR WEATHERSTRIP
15. INSTALL REAR FLOOR NO. 1 MAT SUPPORT SIDE PLATE
16. INSTALL REAR NO. 3 FLOOR BOARD
17. INSTALL REAR NO. 2 FLOOR BOARD
18. INSTALL REAR NO. 2 SEAT ASSEMBLY LH (w/ Rear No. 2 Seat)
19. INSTALL REAR NO. 2 SEAT ASSEMBLY RH (w/ Rear No. 2 Seat)
20. INSTALL NO. 2 SEAT LEG COVER LH (w/ Rear No. 2 Seat)
21. INSTALL NO. 2 SEAT LEG COVER RH (w/o Rear No. 2 Seat)
22. INSTALL NO. 2 SEAT HINGE COVER LH (w/ Rear No. 2 Seat)
23. INSTALL NO. 2 SEAT HINGE COVER RH (w/o Rear No. 2 Seat)
24. INSTALL DECK BOARD ASSEMBLY (w/o Rear No. 2 Seat)
25. INSTALL REAR NO. 1 FLOOR BOARD (w/o Rear No. 2 Seat)
26. INSTALL TONNEAU COVER ASSEMBLY (w/o Rear No. 2 Seat)
27. INSTALL PACKAGE TRAY TRIM POCKET SUBASSEMBLY (w/o Rear No. 2 Seat)
28. INSTALL REAR DOOR OPENING TRIM WEATHERSTRIP LH
29. INSTALL REAR DOOR SCUFF PLATE LH
30. CONNECT CABLE TO NEGATIVE BATTERY TERMINAL