Installation
AIR CONDITIONING: CONDENSER: INSTALLATION
INSTALLATION
1. INSTALL COOLER CONDENSER CORE
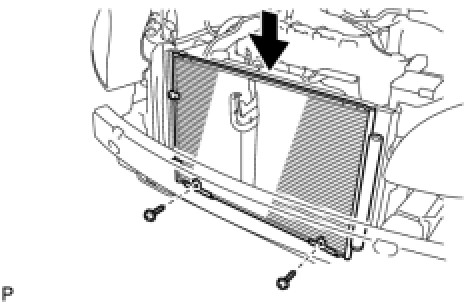
(a) Install the cooler condenser core with the 2 screws.
Torque: 3.9 Nm (40 kgf-cm, 35in-lbf)
HINT: If the condenser is replaced with a new one, add compressor oil to the new condenser.
Capacity:
40 cc (1.4 fl.oz.)
Compressor oil:
ND-OIL 8 or equivalent
2. INSTALL NO. 1 RADIATOR SUPPORT Installation
3. INSTALL RADIATOR SUPPORT CUSHION Installation
4. CONNECT NO. 2 OIL COOLER OUTLET TUBE SUB-ASSEMBLY
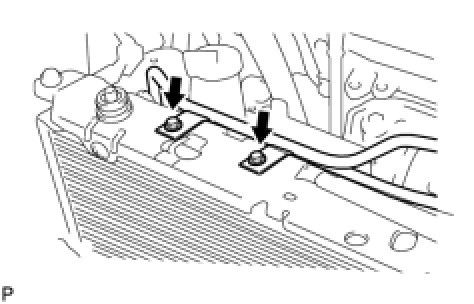
(a) Install the No. 2 oil cooler outlet tube sub-assembly with the 2 bolts.
Torque: 6.0 Nm (61 kgf-cm, 53in-lbf)
5. INSTALL UPPER RADIATOR SUPPORT SUB-ASSEMBLY Installation
6. CONNECT COOLING FAN ECU Installation
7. INSTALL HOOD LOCK SUPPORT SUB-ASSEMBLY Installation
8. INSTALL HOOD LOCK ASSEMBLY Installation
9. INSTALL HOOD LOCK RELEASE LEVER PROTECTOR Installation
10. INSTALL NO. 1 AIR CLEANER INLET Installation
11. INSTALL COOLER REFRIGERANT LIQUID PIPE A
(a) Remove the attached vinyl tape from the pipe and the connecting part of the cooler condenser core.
(b) Sufficiently apply compressor oil to a new O-ring and the fitting surface of the pipe joint.
Compressor oil:
ND-OIL 8 or equivalent
(c) Install the O-ring on the cooler refrigerant liquid pipe A.
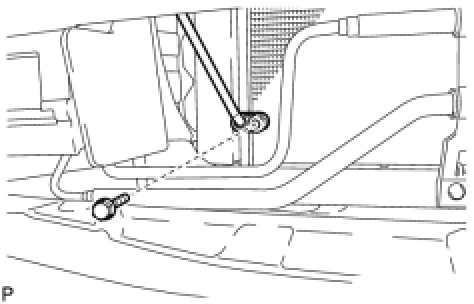
(d) Install the cooler refrigerant liquid pipe A on the cooler condenser core with the bolt.
Torque: 5.4 Nm (55 kgf-cm, 47in-lbf)
12. INSTALL DISCHARGE HOSE SUB-ASSEMBLY
(a) Remove the attached vinyl tape from the tube and the connecting part of the cooler condenser core.
(b) Sufficiently apply compressor oil to a new O-ring and the fitting surface of the hose joint.
Compressor oil:
ND-OIL 8 or equivalent
(c) Install the O-ring on the discharge hose sub-assembly.
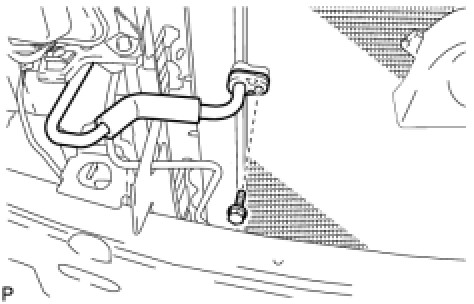
(d) Install the discharge hose sub-assembly on the cooler condenser core with the bolt.
Torque: 5.4 Nm (55 kgf-cm, 47in-lbf)
13. INSTALL FRONT BUMPER ASSEMBLY Installation
14. INSTALL NO. 2 AIR CLEANER INLET Installation
15. CHARGE WITH REFRIGERANT Removal and Replacement
16. WARM UP ENGINE
17. INSPECT FOR REFRIGERANT LEAK Removal and Replacement
18. VEHICLE PREPARATION FOR FOG LIGHT AIMING (w/ Fog Light) Adjustments
19. PREPARATION FOR FOG LIGHT AIMING (w/ Fog Light) Adjustments
20. FOG LIGHT AIMING INSPECTION (w/ Fog Light) Adjustments
21. FOG LIGHT AIMING ADJUSTMENT (w/ Fog Light) Adjustments