Removal
WINDSHIELD / WINDOWGLASS: WINDSHIELD GLASS: REMOVAL
1. REMOVE FRONT DOOR OPENING TRIM WEATHERSTRIP LH
2. REMOVE FRONT DOOR OPENING TRIM WEATHERSTRIP RH
3. REMOVE FRONT PILLAR GARNISH LH
4. REMOVE FRONT PILLAR GARNISH RH
5. REMOVE VISOR ASSEMBLY LH
6. REMOVE VISOR ASSEMBLY RH
7. REMOVE ASSIST GRIP SUB-ASSEMBLY Removal
8. REMOVE VISOR HOLDER Removal
9. REMOVE ROOF CONSOLE BOX ASSEMBLY
10. REMOVE SUN ROOF OPENING TRIM MOULDING (W/ SLIDING ROOF)
11. REMOVE INNER REAR VIEW MIRROR ASSEMBLY
12. REMOVE ROOF HEADLINING ASSEMBLY Removal
13. REMOVE FRONT WIPER ARM HEAD CAP
14. REMOVE FRONT WIPER ARM LH Removal
15. REMOVE FRONT WIPER ARM RH Removal
16. REMOVE FRONT FENDER TO COWL SIDE SEAL LH
17. REMOVE FRONT FENDER TO COWL SIDE SEAL RH
18. REMOVE COWL TOP VENTILATOR LOUVER SUB-ASSEMBLY
19. REMOVE WINDSHIELD MOULDING OUTER UPPER
(a) Using a knife, cut off the moulding, as shown in the illustration.
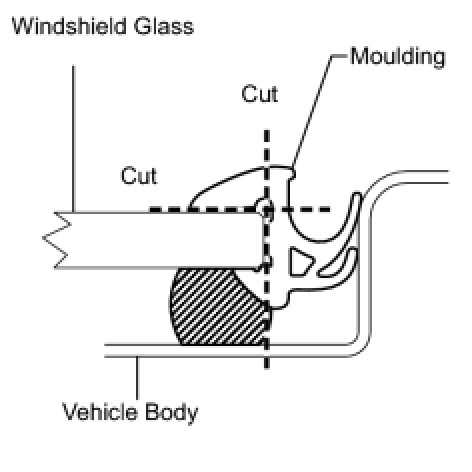
NOTICE:
Do not damage the vehicle body with the knife.
(b) Remove the remaining moulding.
HINT
When removing, make a partial a cut, then pull and remove it by hand.
(c) w/ Deicer:
Disconnect the connector, as shown in the illustration.
20. REMOVE WINDSHIELD GLASS
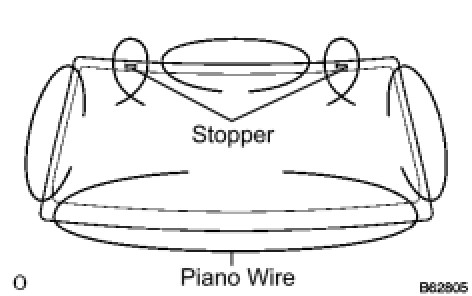
(a) Pass a piano wire between the vehicle body and glass from the interior.
(b) Tie both wire ends to wooden blocks or similar objects.
HINT
Apply protective tape to the outer surface of the vehicle body to prevent its surface from being scratched.
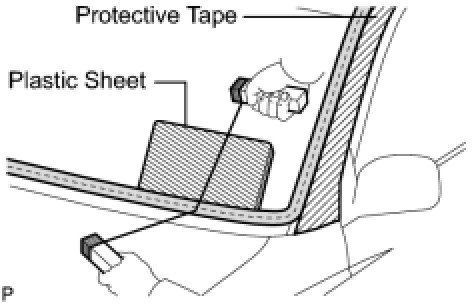
NOTICE:
* When separating the glass from the vehicle, be careful not to damage the vehicle's paint or interior/exterior ornaments.
* To prevent the safety pad from being scratched when removing the glass, place a plastic sheet between the piano wire and safety pad.
(c) Cut off the adhesive by pulling piano wire around the glass.
(d) Disengage the stoppers.
(e) Using a suction cup, remove the glass.
NOTICE:
Leave as much adhesive on the vehicle body as possible when removing the glass.
21. CLEAN WINDSHIELD GLASS
(a) Using a scraper, remove the damaged stoppers, dams and adhesive sticking to the glass.
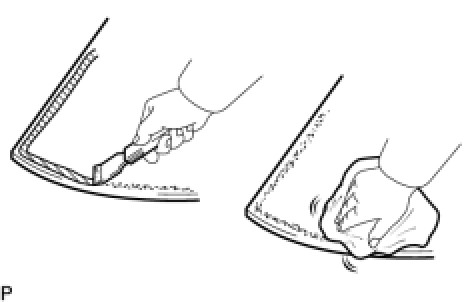
(b) Clean the outer circumference of the glass with white gasoline.
NOTICE:
Do not touch the glass surface after cleaning it.