Speaker Circuit
NAVIGATION / MULTI INFO DISPLAY: NAVIGATION SYSTEM (w/o USB Audio System): Speaker Circuit
- Speaker Circuit
DESCRIPTION
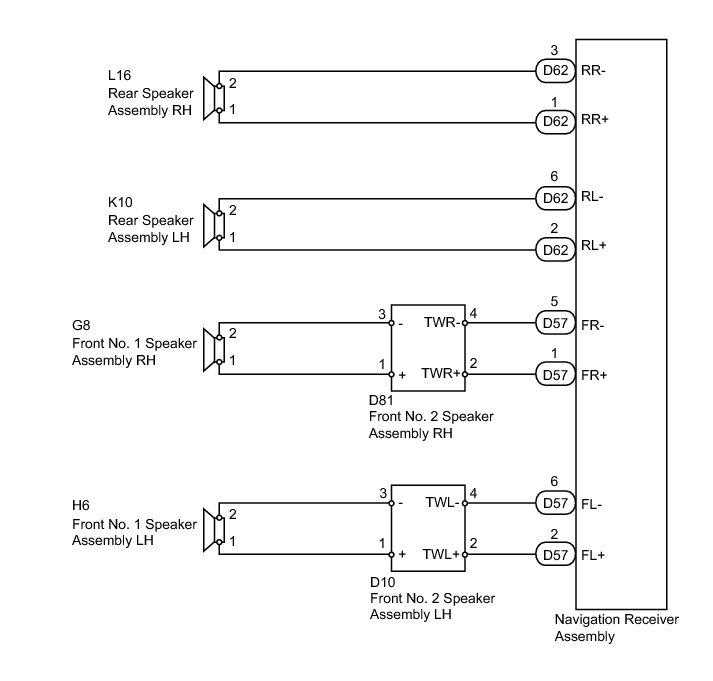
The navigation receiver assembly sends sound signals to the speaker.
WIRING DIAGRAM
INSPECTION PROCEDURE
PROCEDURE
1. CHECK SPEAKER
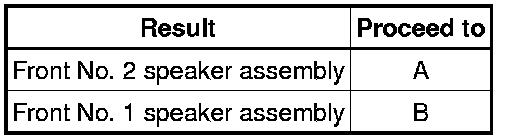
(a) Check the malfunctioning speakers.
Result

B -- INSPECT REAR SPEAKER ASSEMBLY
A -- Continue to next step.
2. CHECK FRONT SIDE SPEAKER
(a) Check the malfunctioning speakers.
Result
B -- INSPECT FRONT NO. 1 SPEAKER ASSEMBLY
A -- Continue to next step.
3. INSPECT FRONT NO. 2 SPEAKER ASSEMBLY
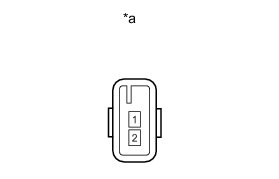
(a) Disconnect the D81 and/or D10 front No. 2 speaker assembly connector.
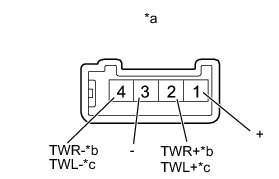
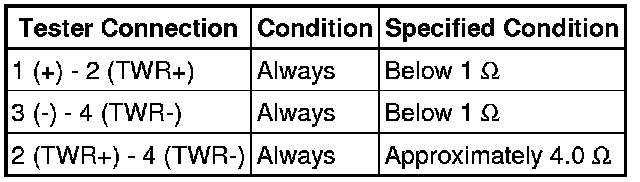
(b) Measure the resistance according to the value(s) in the table below.
Standard Resistance:
for RH
for LH
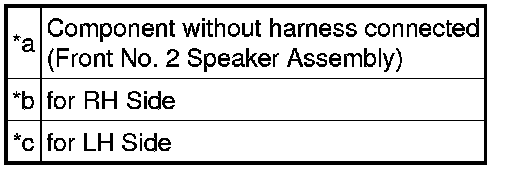
Text in Illustration
NG -- REPLACE FRONT NO. 2 SPEAKER ASSEMBLY Removal
OK -- Continue to next step.
4. CHECK HARNESS AND CONNECTOR (NAVIGATION RECEIVER ASSEMBLY - FRONT NO. 2 SPEAKER ASSEMBLY)
(a) Disconnect the D57 navigation receiver assembly connector.
(b) Disconnect the D81 and/or D10 front No. 2 speaker assembly connector.
(c) Measure the resistance according to the value(s) in the table below.
Standard Resistance (Check for Open (RH Side)):

Standard Resistance (Check for Short (RH Side)):

Standard Resistance (Check for Open (LH Side)):

Standard Resistance (Check for Short (LH Side)):

NG -- REPAIR OR REPLACE HARNESS OR CONNECTOR
OK -- REPLACE NAVIGATION RECEIVER ASSEMBLY Removal
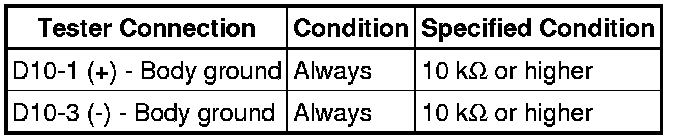
5. INSPECT FRONT NO. 1 SPEAKER ASSEMBLY
(a) Disconnect the G8 and/or H6 front No. 1 speaker assembly connector.
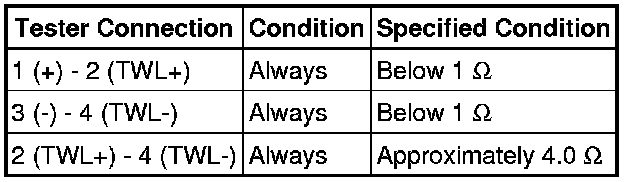
(b) Measure the resistance according to the value(s) in the table below.
Standard Resistance:

Text in Illustration

NG -- REPLACE FRONT NO. 1 SPEAKER ASSEMBLY Removal
OK -- Continue to next step.
6. CHECK HARNESS AND CONNECTOR (FRONT NO. 2 SPEAKER ASSEMBLY - FRONT NO. 1 SPEAKER ASSEMBLY)
(a) Disconnect the D81 and/or D10 front No. 2 speaker assembly connector.
(b) Disconnect the G8 and/or H6 front No. 1 speaker assembly connector.
(c) Measure the resistance according to the value(s) in the table below.
Standard Resistance (Check for Open (RH Side):

Standard Resistance (Check for Short (RH Side):

Standard Resistance (Check for Open (LH Side):
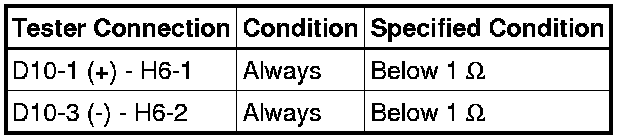
Standard Resistance (Check for Short (LH Side):
NG -- REPAIR OR REPLACE HARNESS OR CONNECTOR
OK -- REPLACE NAVIGATION RECEIVER ASSEMBLY Removal
7. INSPECT REAR SPEAKER ASSEMBLY
(a) Disconnect the L16 and K10 rear speaker assembly connectors.
(b) Measure the resistance according to the value(s) in the table below.
Standard Resistance:

Text in Illustration

NG -- REPLACE REAR SPEAKER ASSEMBLY Removal
OK -- Continue to next step.
8. CHECK HARNESS AND CONNECTOR (NAVIGATION RECEIVER ASSEMBLY - REAR SPEAKER ASSEMBLY)
(a) Disconnect the D62 navigation receiver assembly connector.
(b) Disconnect the L16 and/or K10 rear speaker assembly connector.
(c) Measure the resistance according to the value(s) in the table below.
Standard Resistance (Check for Open (RH Side):
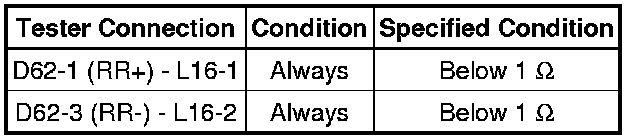
Standard Resistance (Check for Short (RH Side):

Standard Resistance (Check for Open (LH Side):
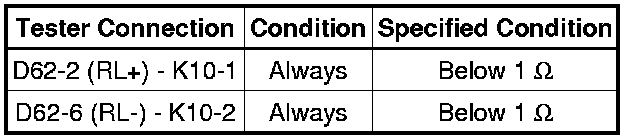
Standard Resistance (Check for Short (LH Side):

NG -- REPAIR OR REPLACE HARNESS OR CONNECTOR
OK -- REPLACE NAVIGATION RECEIVER ASSEMBLY Removal