Removal
WINDSHIELD / WINDOWGLASS: BACK WINDOW GLASS (for Sedan): REMOVAL
CAUTION:
Some of these service operations affect the SRS airbag system. Read the precautionary notices concerning the SRS airbag system before servicing Service Precautions.
NOTICE:
Always use "Torx" socket wrench E10 when removing the rear seat.
1. DISCONNECT CABLE FROM NEGATIVE BATTERY TERMINAL
Wait for at least 90 seconds after disconnecting the cable to prevent the airbag from working.
2. REMOVE REAR SEAT CUSHION COVER PAD SUB-ASSEMBLY Removal
3. REMOVE REAR SEATBACK ASSEMBLY RH (for 60/40 Split Seat Type) Removal
4. REMOVE REAR SEATBACK ASSEMBLY LH (for 60/40 Split Seat Type) Removal
5. REMOVE REAR SEATBACK ASSEMBLY (for Fixed Seat Type) Removal
6. REMOVE SPARE WHEEL COVER ASSEMBLY (for 60/40 Split Seat Type) Luggage Compartment Door (for Sedan)
7. REMOVE LUGGAGE COMPARTMENT FLOOR MAT (for 60/40 Split Seat Type) Luggage Compartment Door (for Sedan)
8. REMOVE LUGGAGE COMPARTMENT TRIM INNER PAD (for 60/40 Split Seat Type) Luggage Compartment Door (for Sedan)
9. REMOVE REAR DOOR SCUFF PLATE RH Removal
10. REMOVE REAR DOOR SCUFF PLATE LH Removal
11. REMOVE REAR DOOR OPENING TRIM WEATHERSTRIP RH Removal
12. REMOVE REAR DOOR OPENING TRIM WEATHERSTRIP LH Removal
13. REMOVE REAR SEAT SIDE COVER RH Removal
14. REMOVE REAR SEAT SIDE COVER LH Removal
15. REMOVE ROOF SIDE INNER GARNISH RH Removal
16. REMOVE ROOF SIDE INNER GARNISH LH Removal
17. REMOVE ASSIST GRIP COVER Removal
18. REMOVE ASSIST GRIP SUB-ASSEMBLY Removal
19. REMOVE HIGH MOUNTED STOP LIGHT ASSEMBLY (w/o Rear Spoiler) Removal
20. REMOVE PACKAGE TRAY TRIM PANEL ASSEMBLY Removal
21. REMOVE ROOF HEADLINING ASSEMBLY
HINT
It is not necessary to remove the roof headlining completely. Slightly lower the rear section of the roof headlining.
22. REMOVE BACK WINDOW OUTSIDE MOULDING
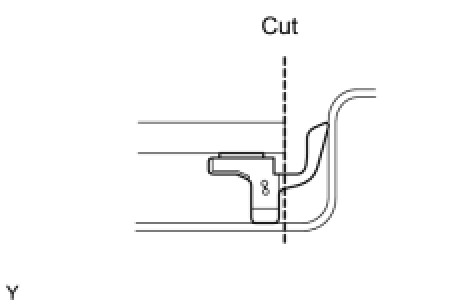
(a) Using a knife, cut off the back window outside moulding, as shown in the illustration.
NOTICE:
Do not damage the vehicle body with the knife.
(b) Remove the back window outside moulding.
HINT
Make a partial cut in the back window outside moulding. Then pull and remove it by hand.
23. REMOVE BACK WINDOW GLASS
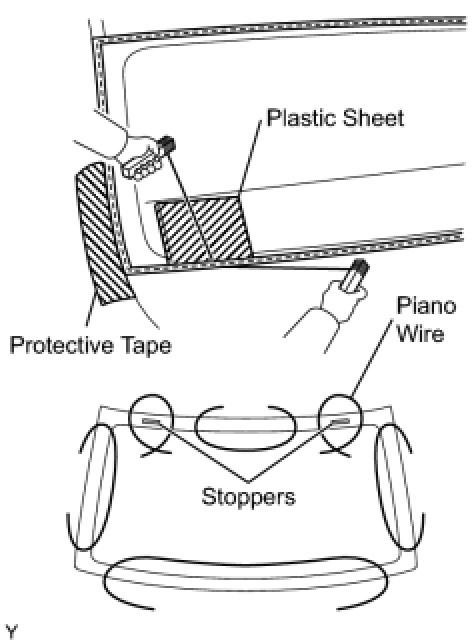
(a) Apply protective tape to the outer circumference of the back window glass, as shown in the illustration.
(b) From the interior, insert piano wires between the vehicle body and the back window glass, as shown in the illustration.
(c) Tie objects that can serve as handles (for example, wooden blocks) to all wire ends.
NOTICE:
* When separating the back window glass from the vehicle, do not damage the vehicle's paintwork or exterior/interior ornaments.
* To prevent the safety pad from being scratched when removing the back window glass, place a plastic sheet between the piano wire and safety pad.
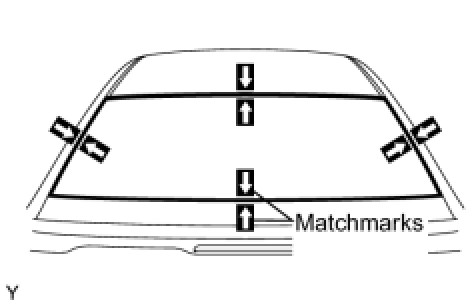
(d) Place matchmarks on the back window glass and vehicle body in the locations indicated in the illustration.
HINT
Matchmarks do not need to be placed unless the back window glass is going to be reused.
(e) Cut through the adhesive by pulling the piano wire around the back window glass.
(f) Disengage the 2 stoppers.
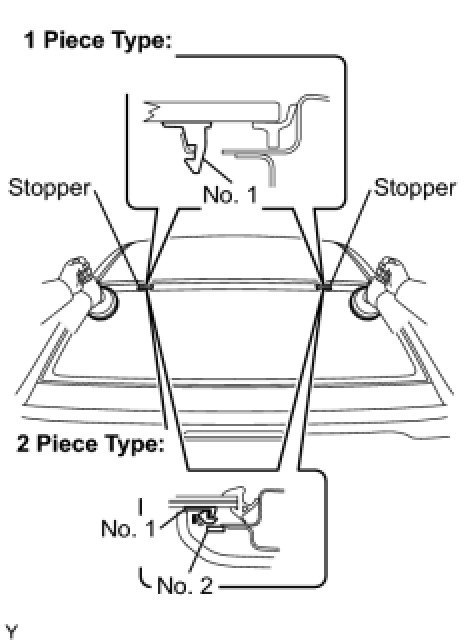
(g) Using suction cups, remove the back window glass.
NOTICE:
Leave as much adhesive on the vehicle body as possible when removing the back window glass.