Electrical - EV And Auxiliary Battery Maintenance

T-SB-O109-12
July 26, 2012
Maintenance for EV & Auxiliary Batteries
Service Category
General
Section
Pre-Delivery Service
Market
USA

Applicability
Introduction
The RAV4 EV is equipped with 2 types of batteries:
^ Electric Vehicle (EV) Traction Battery
^ 12-volt Auxiliary Battery
If the RAV4 EV is put into storage the state of charge (SOC) of the EV battery and auxiliary battery will gradually decrease. To prevent the auxiliary battery from becoming discharged during storage, proper maintenance is necessary.
Please perform the following maintenance service for the EV battery and 12-volt auxiliary battery.
NOTE
Before disconnecting the auxiliary battery, confirm the shift lever is in the "P" position and apply the parking brake completely. The shift lever CANNOT be shifted from the"P" position with the 12-volt auxiliary battery disconnected.
^ When the negative (-) terminal of the auxiliary battery is reconnected, the EV system may not operate if the vehicle is already in "Ready On" state. If this occurs, push the Start/Stop switch to re-initiate the "Ready On" mode. The "Ready" light should illuminate on the Instrument Panel. If the EV system will not "Ready On" refer to the repair manual for diagnosis.

Warranty Information
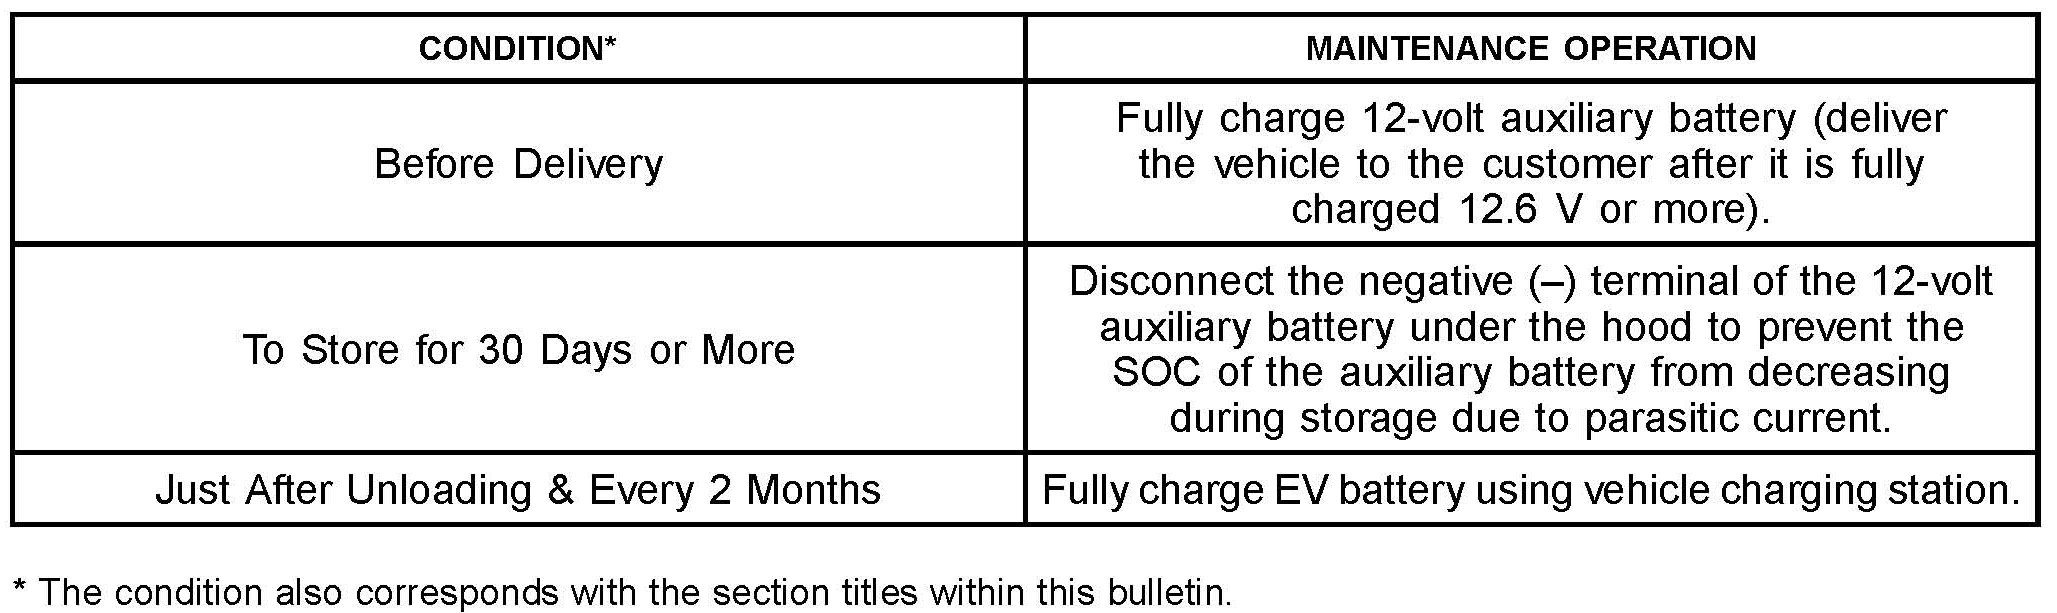
Maintenance Items
Required Tools & Equipment
Before Delivery
Fully charge the 12-volt auxiliary battery:
1. Before charging the auxiliary battery turn OFF vehicle, lights, and accessories.
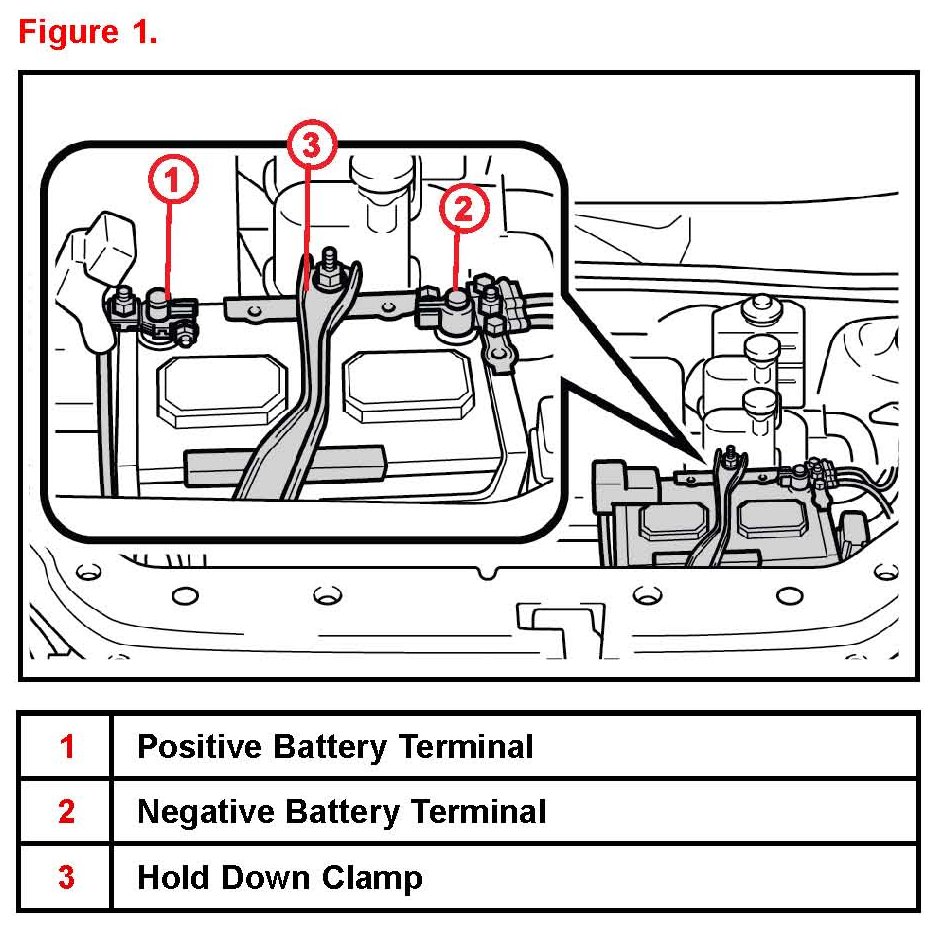
2. Open the hood.
3. Remove the positive (+) terminal cover.
4. Check the battery SOC.
^ If the battery voltage is LESS THAN 12.6 V, then continue to step 5.
^ If the battery voltage is 12.6 V or MORE, replace the positive (+) terminal cover and close the hood.
NOTE
If measuring the voltage with the negative (-) terminal connected, turn vehicle OFF and turn ON the headlights for 20 to 30 seconds. This will remove the surface charge from the battery.
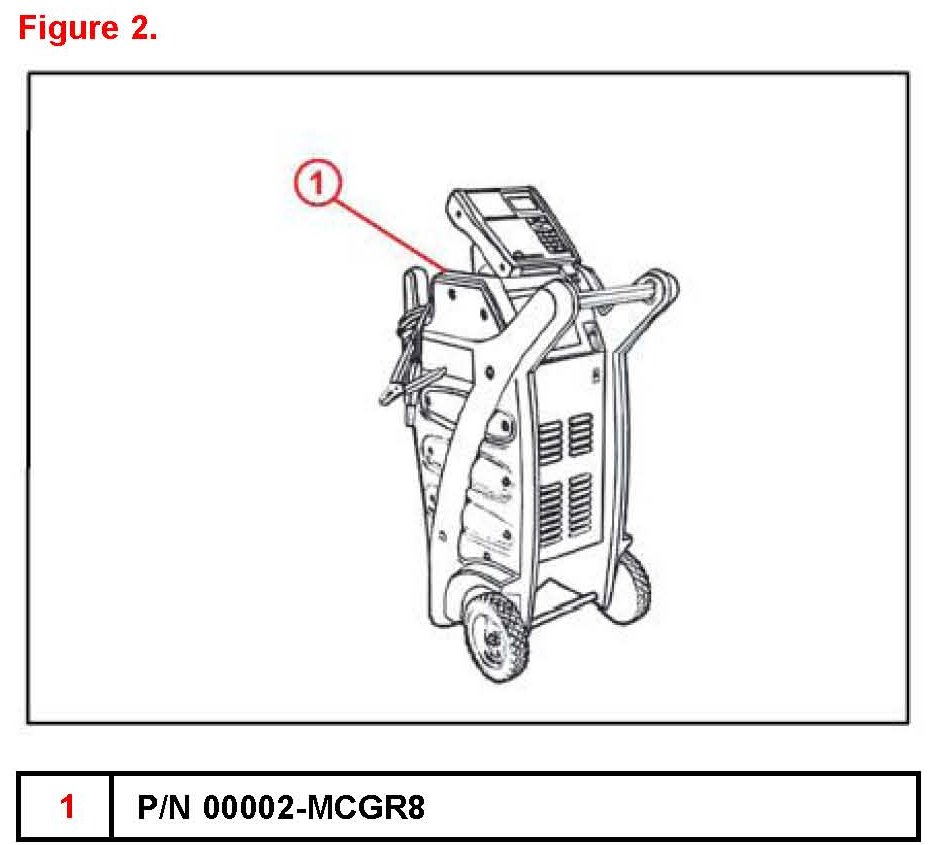
5. Test/charge the 12-volt auxiliary battery using the GR8 Battery Diagnostic Station.
A. Connect the red charger clamp to the positive (+) battery terminal and the black charger clamp to the negative (-) battery terminal.
B. Plug the charger into a grounded 110-volt nominal outlet and flip the power switch to the "ON" position.
C. Once the charger is properly turned ON, perform a diagnostic charge.
The GR8 Battery Diagnostic Station will indicate result when complete.
If the battery tests bad ("Replace Battery"), then replace the auxiliary battery.
NOTE
If the auxiliary battery was stored at 32°F (0°C) or below, charge the auxiliary battery in a room above 32°F (0°C).
CAUTION
^ Charge in a well-ventilated area.
^ Do NOT allow sparks or fire near the auxiliary battery.
If the GR8 Battery Diagnostic Station is NOT available, you may charge the 12-volt battery by cycling the vehicle on to "READY"
^ Run time will vary depending on the state of charge.
^ If this method is used, you must confirm that the battery is charged to 12.8 volts using a DVOM.
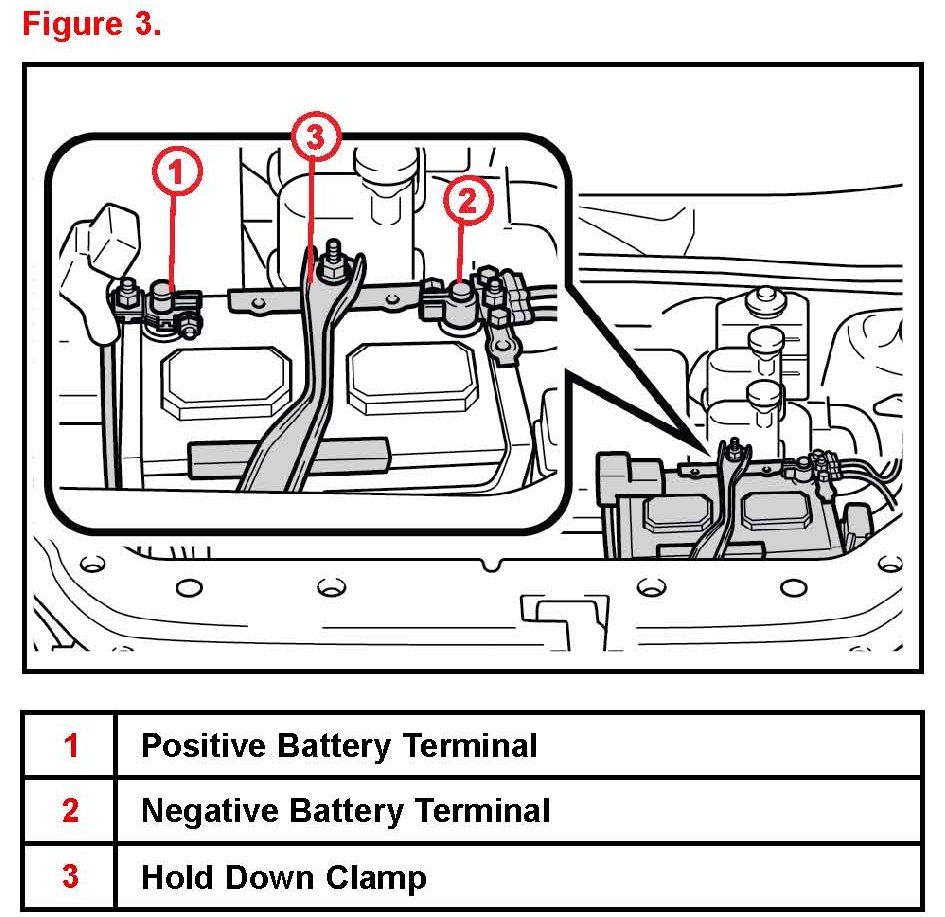
6. After charging the auxiliary battery install the positive (+) terminal cover.
7. Close the hood.
To Store for 30 Days or More
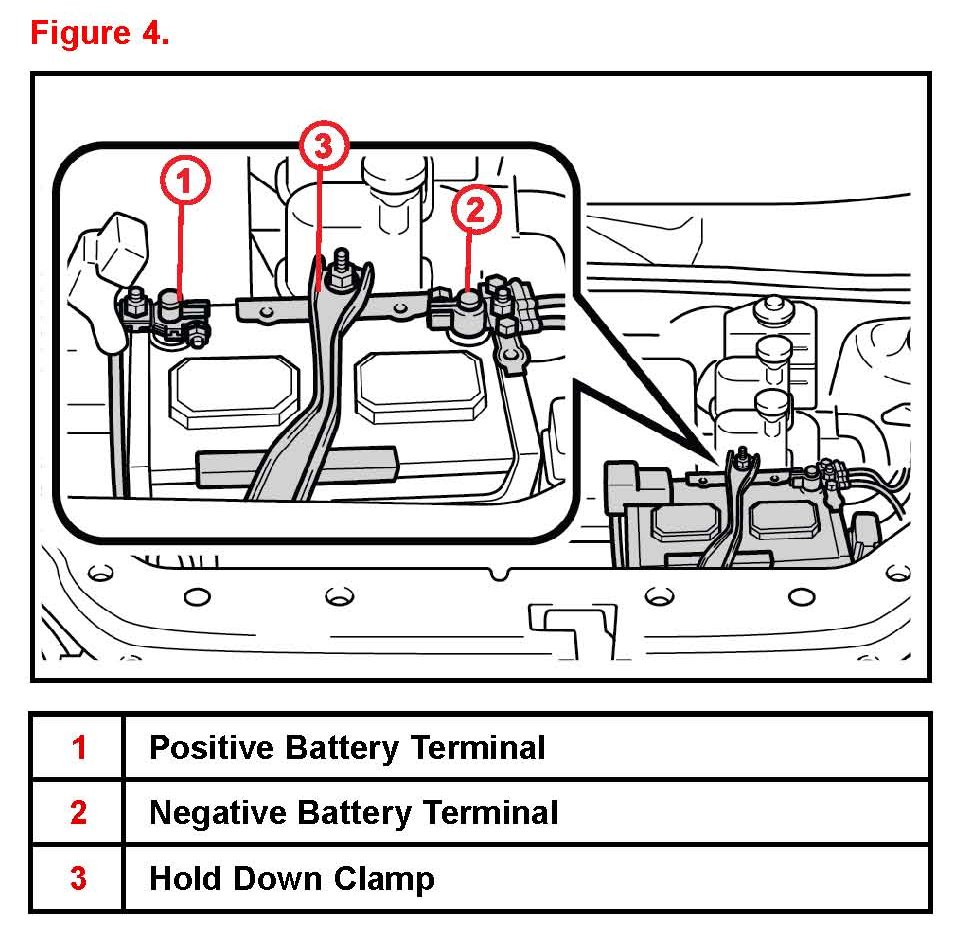
Disconnect the negative (-) terminal:
1. Turn OFF vehicle lights and accessories.
2. Open the hood.
3. Disconnect the negative (-) terminal.
4. Close the hood.
NOTE
When it is necessary to move the vehicle, reconnect the negative (-) terminal.
When removing the vehicle from storage, connect the negative (-) terminal:
1. Open the hood.
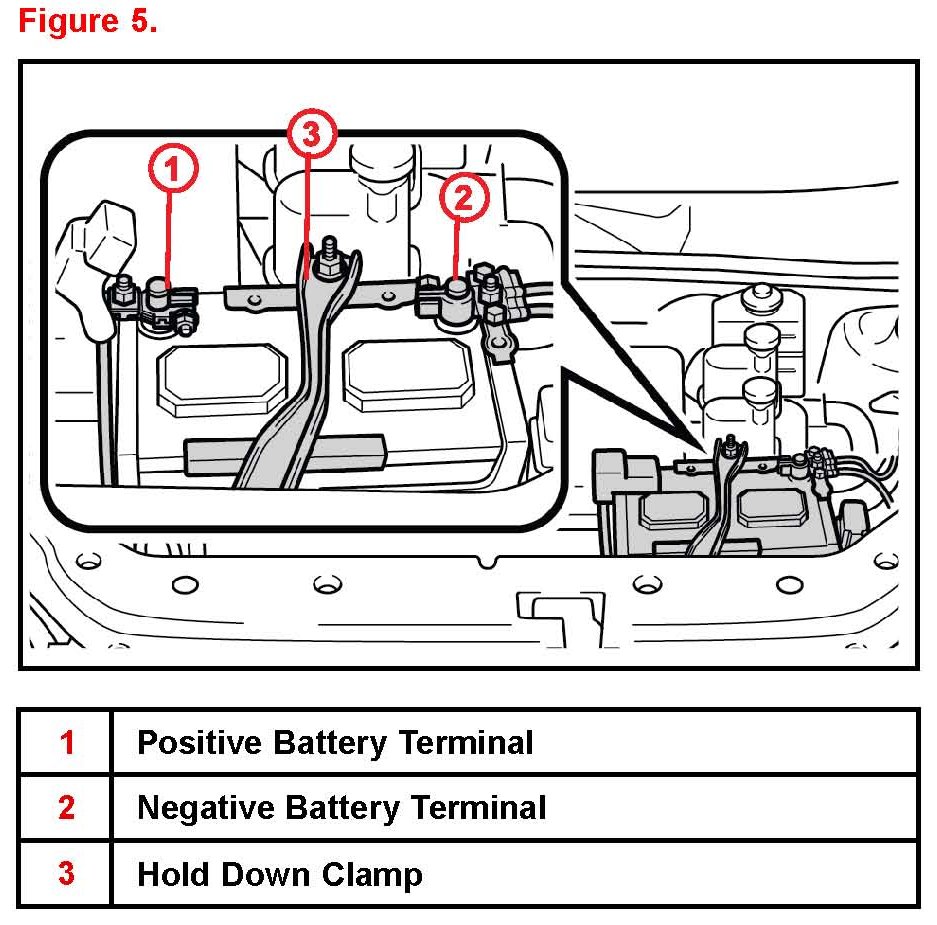
2. Connect the negative (-) terminal.
Torque: 6.0 N*m (61 kgf*cm, 4.4 ft*lbf)
3. Close the hood.
NOTE
When the negative (-) terminal of the auxiliary battery is reconnected, the EV system may not operate if the vehicle is already in "Ready On" state. If this occurs, push the Start/Stop switch to re-initiate the "Ready On" mode. The "Ready" light should illuminate on the Instrument Panel. If the EV system will not "Ready On" refer to the repair manual for diagnosis.
Every Two Months
NOTE
Be sure to reconnect the negative (-) terminal of the auxiliary battery BEFORE performing this procedure.
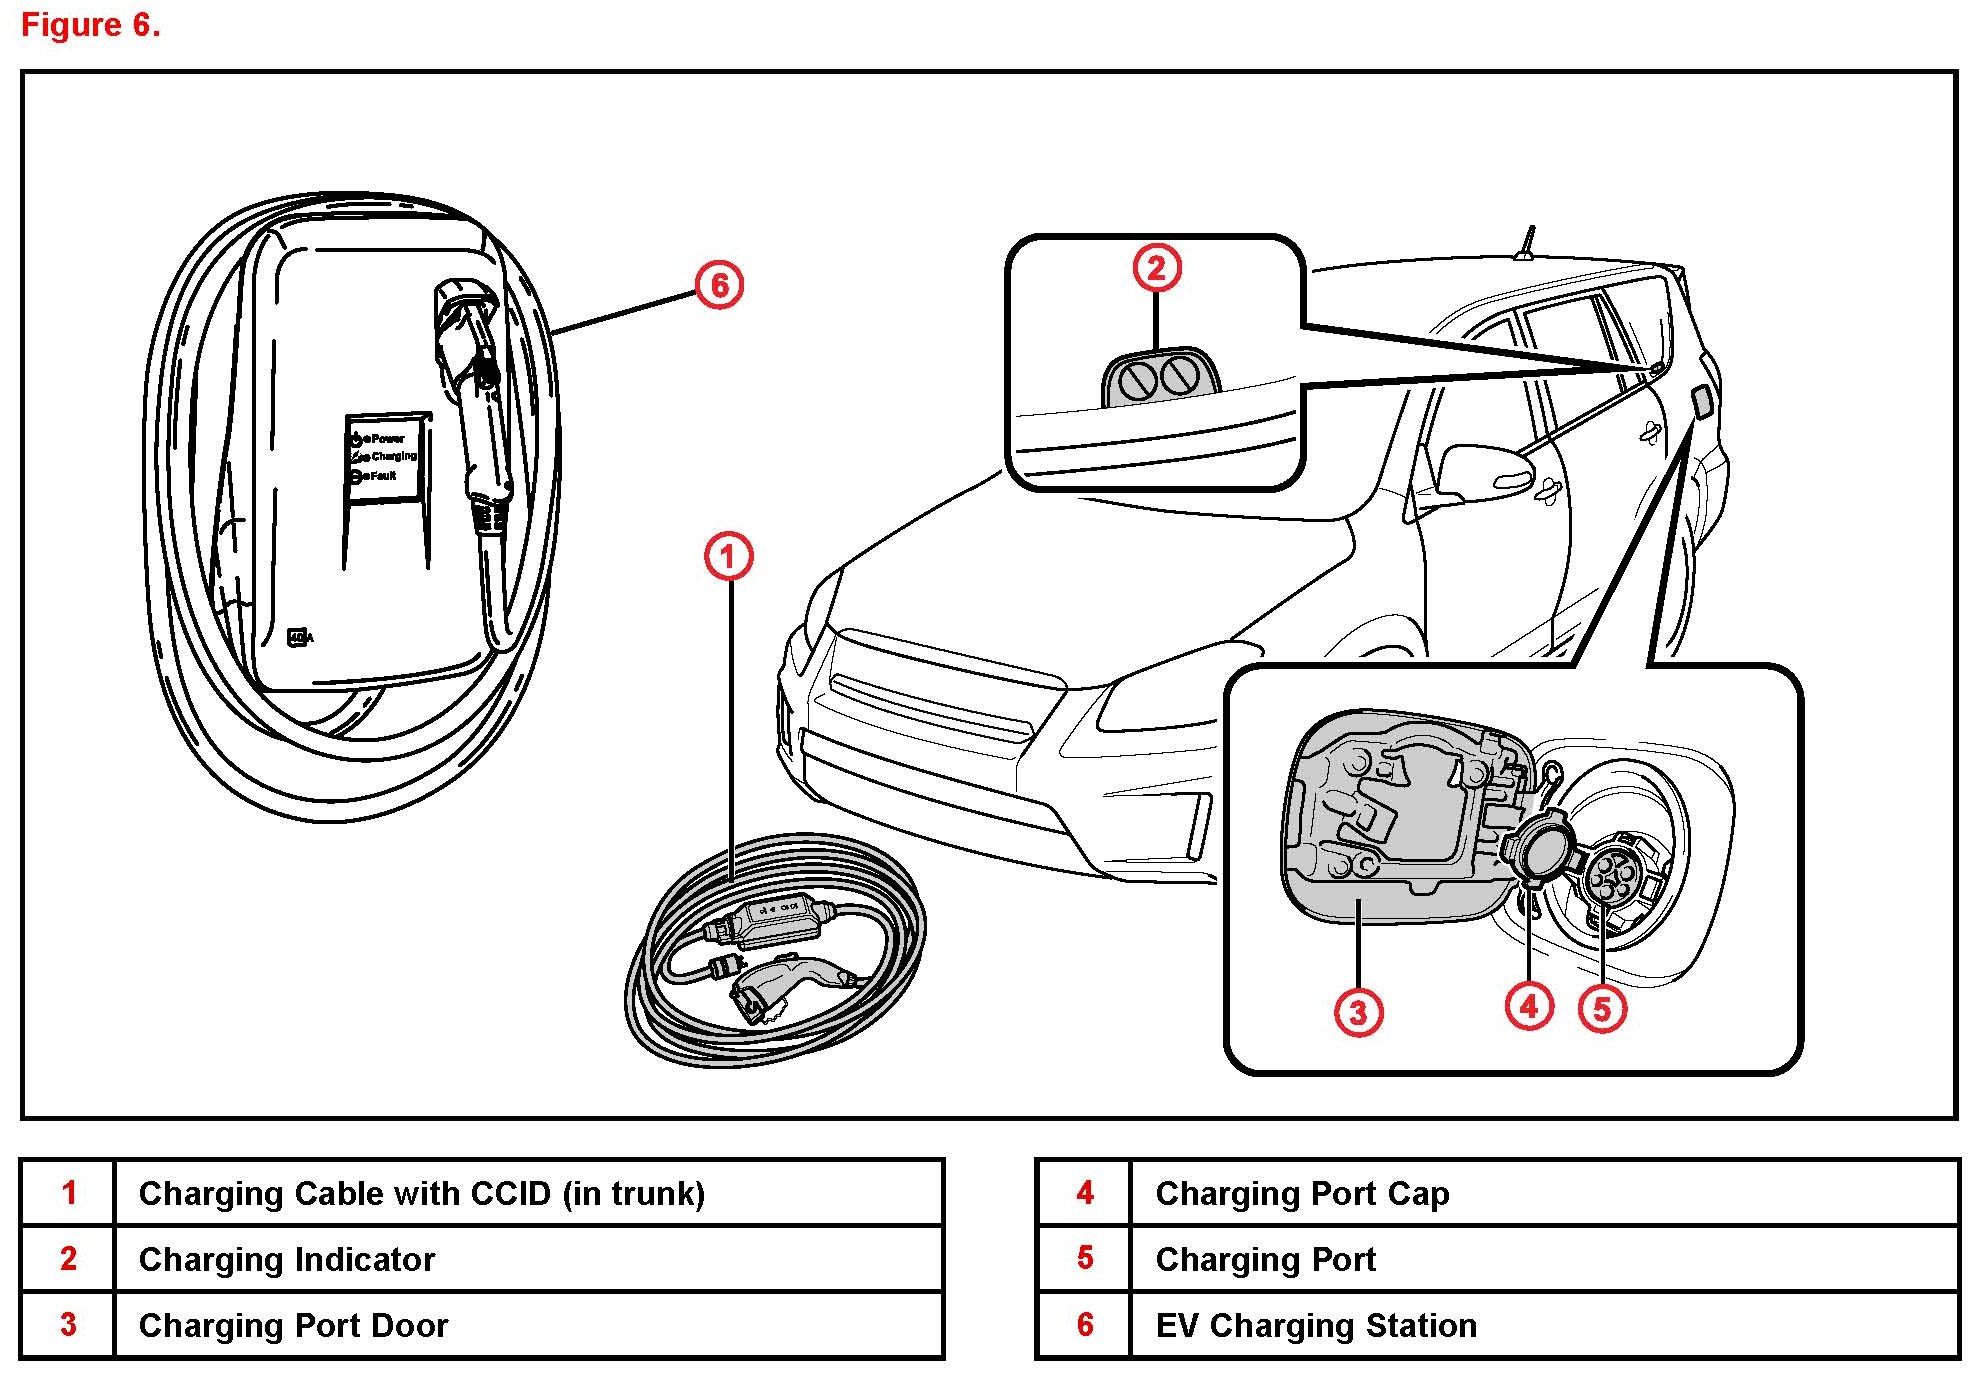
1. Park the vehicle next to the EV Charging Station.
2. Apply the parking brake.
3. Turn OFF vehicle, lights, and accessories.
4. Check that the shift lever is in the "P" position.
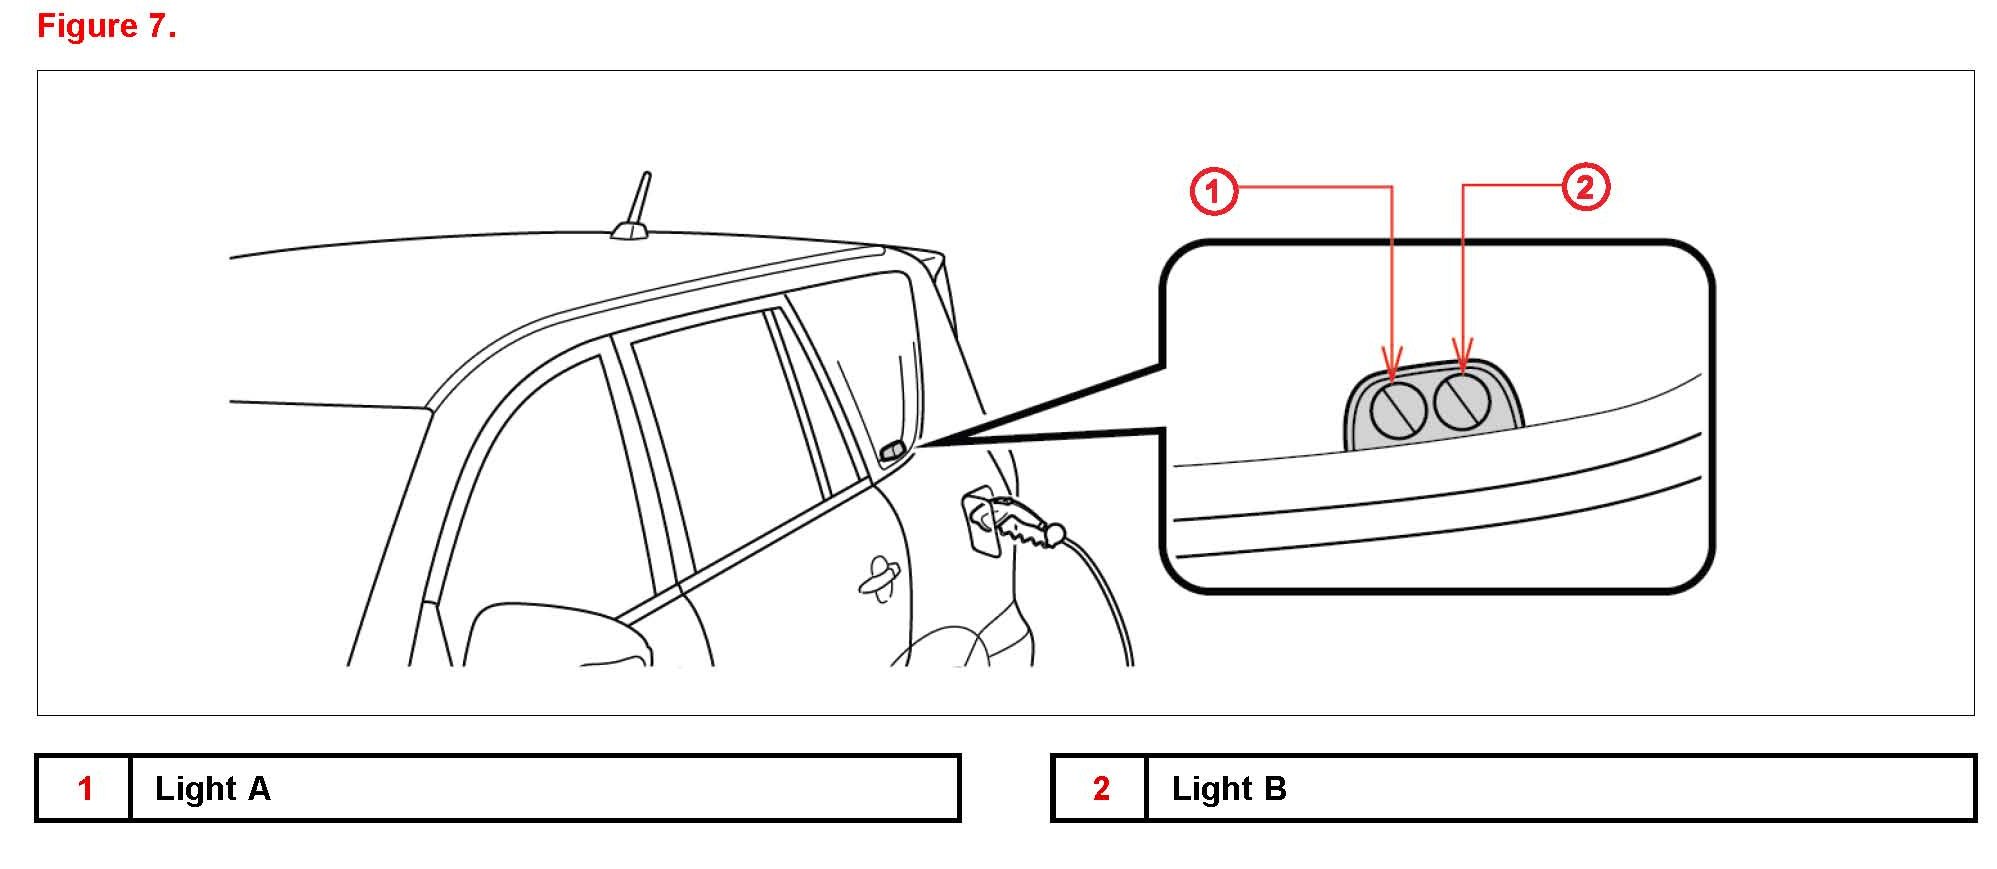
5. Connect the charging station plug to the vehicle. Confirm that both lights above the charge plug illuminate. Fully charge EV battery.
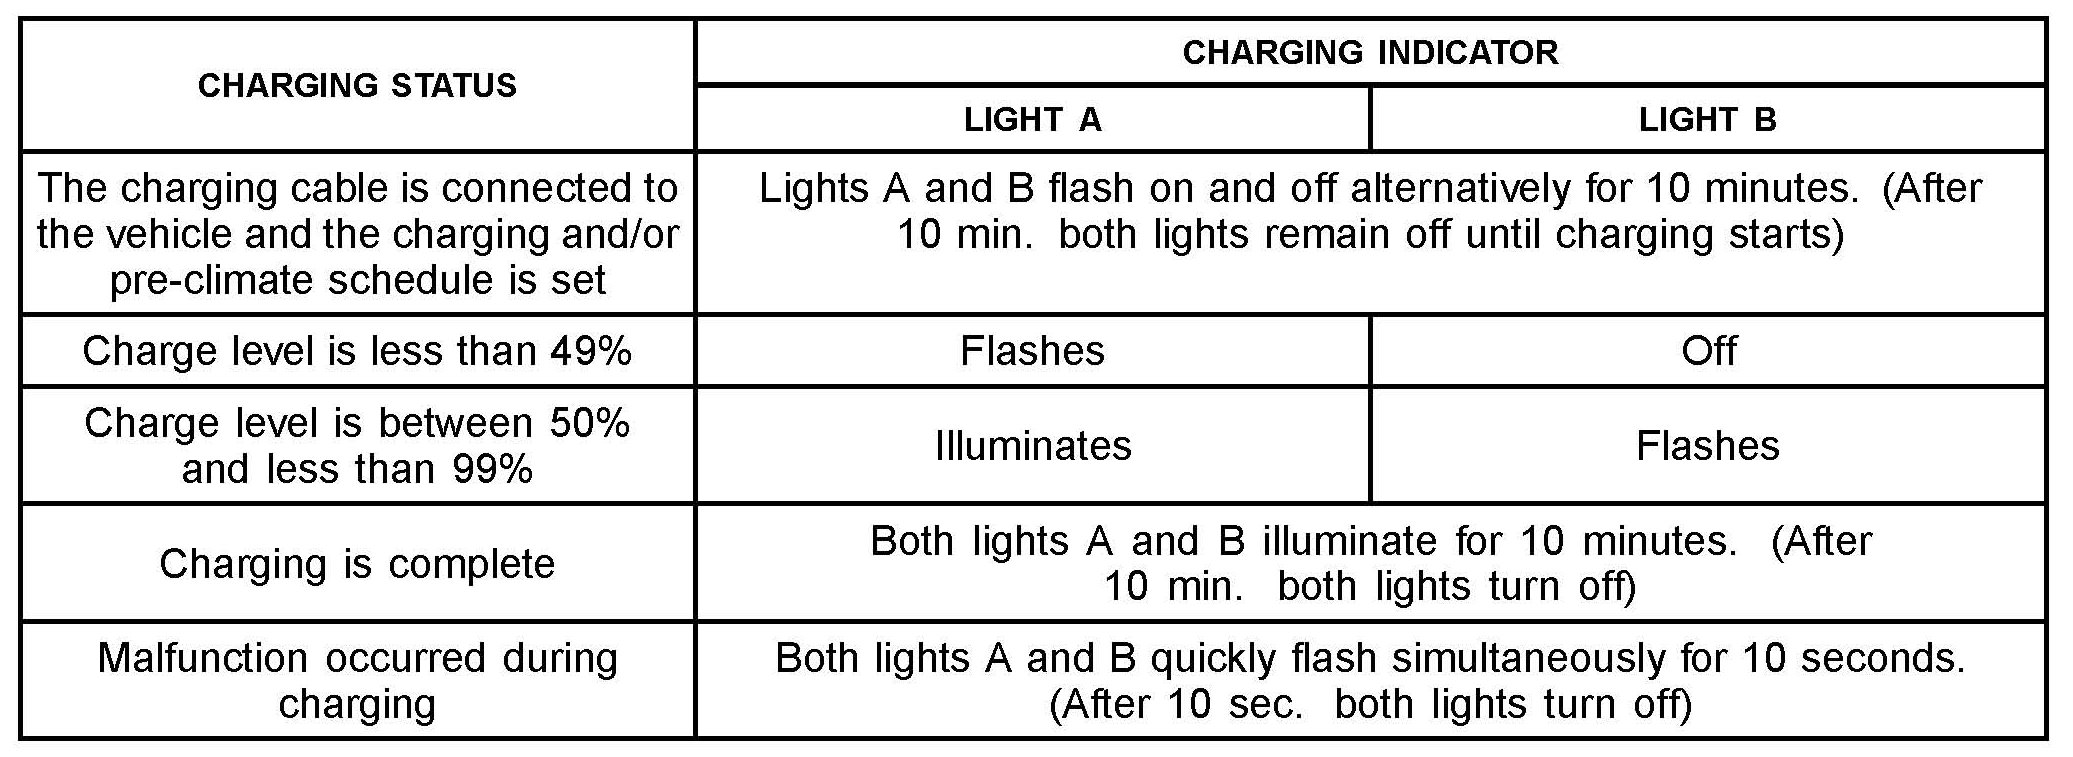
Check the status of the charging indicator. The charging indicator consists of 2 lights that display charging status by illuminating flashing and turning off.
The indicator lights will not flash or turn on when the charging cable is not connected properly.
8| 2012 Toyota Motor Sales, USA