Removal
WINDOW / GLASS: POWER WINDOW REGULATOR MOTOR: REMOVAL
HINT
* Use the same procedure for both the RH and LH sides.
* The procedure described below is for the RH side.
1. PRECAUTION
NOTICE:
After turning the ignition switch off, waiting time may be required before disconnecting the cable from the battery terminal. Therefore, make sure to read the disconnecting the cable from the battery terminal notice before proceeding with work Service Precautions.
2. DISCONNECT CABLE FROM NEGATIVE BATTERY TERMINAL
NOTICE:
When disconnecting the cable, some systems need to be initialized after the cable is reconnected Repair Instruction - Initialization.
3. REMOVE FRONT DOOR LOWER FRAME BRACKET GARNISH Disassembly
4. REMOVE FRONT DOOR INSIDE HANDLE BEZEL PLUG Disassembly
5. REMOVE FRONT ARMREST BASE UPPER PANEL Disassembly
6. REMOVE FRONT DOOR TRIM BOARD SUB-ASSEMBLY Disassembly
7. REMOVE OUTER REAR VIEW MIRROR ASSEMBLY
HINT
Use the same procedure as for the LH side Removal.
8. REMOVE FRONT DOOR GLASS OUTER WEATHERSTRIP ASSEMBLY
HINT
Use the same procedure as for the LH side .
9. REMOVE NO. 1 FRONT DOOR TRIM BRACKET Disassembly
10. REMOVE FRONT DOOR SERVICE HOLE COVER Disassembly
11. REMOVE FRONT DOOR GLASS RUN Disassembly
12. REMOVE FRONT DOOR GLASS SUB-ASSEMBLY Disassembly
13. REMOVE FRONT DOOR WINDOW REGULATOR SUB-ASSEMBLY Disassembly
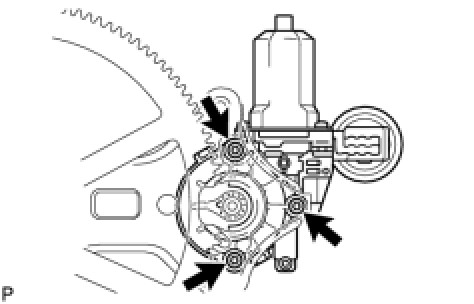
14. REMOVE POWER WINDOW REGULATOR MOTOR ASSEMBLY
(a) Using "TORX" socket wrench T25, remove the 3 screws and the power window regulator motor.
15. REMOVE REAR DOOR FRAME GARNISH Disassembly
16. REMOVE REAR DOOR ARMREST BASE UPPER PANEL Disassembly
17. REMOVE REAR DOOR INSIDE HANDLE BEZEL PLUG Disassembly
18. REMOVE REAR DOOR TRIM BOARD SUB-ASSEMBLY Disassembly
19. REMOVE REAR DOOR TRIM NO. 2 BRACKET Disassembly
20. REMOVE REAR DOOR SERVICE HOLE COVER Disassembly
21. REMOVE REAR DOOR WINDOW FRAME REAR MOULDING
HINT
Use the same procedure as for the LH side .
22. REMOVE REAR DOOR GLASS OUTER WEATHERSTRIP
HINT
Use the same procedure as for the LH side .
23. REMOVE REAR DOOR GLASS RUN Disassembly
24. REMOVE REAR DOOR WINDOW REAR LOWER FRAME SUB-ASSEMBLY Disassembly
25. REMOVE REAR DOOR WINDOW FRONT GUIDE SUB-ASSEMBLY Disassembly
26. REMOVE REAR DOOR GLASS SUB-ASSEMBLY Disassembly
27. REMOVE REAR DOOR WINDOW REGULATOR SUB-ASSEMBLY Disassembly
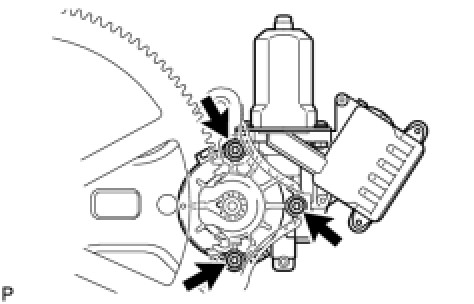
28. REMOVE POWER WINDOW REGULATOR MOTOR ASSEMBLY
(a) Using "TORX" socket wrench T25, remove the 3 screws and the power window regulator motor.