Relay Panel and 13-Pin Relay Carrier
Fuse Panel and Relay Carrier
CAUTION!
When disconnecting and connecting the Battery ( A), the procedure must be followed as described in the Repair Information. Refer to => [ Battery A, Disconnecting and Connecting ] Battery A, Disconnecting and Connecting.
Relay Panel and 13-Pin Relay Carrier
CAUTION!
When disconnecting and connecting the Battery ( A), the procedure must be followed as described in the Repair Information. Refer to => [ Battery A, Disconnecting and Connecting ] Battery A, Disconnecting and Connecting.
Removing
- Disconnect the Battery (A). Refer to => [ Battery A, Disconnecting and Connecting ] Battery A, Disconnecting and Connecting.
- Remove the instrument panel trim panel on the driver side.
- Loosen both nuts - C - and all connectors - D -.
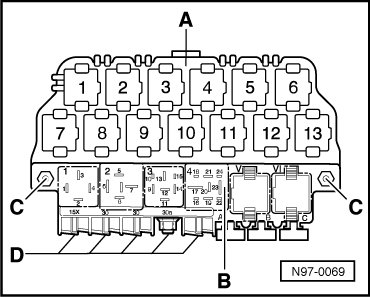
- Remove the relay panel - B - and relay carrier - A - downward.
Installing
Install in reverse order of removal, noting the following:
- Tighten the nuts - C - to 3 Nm and the threaded connections - D - to 9 Nm.
Current relay assignments.