CO% Adjustment Using Test Diode
CO-Adjustment Using Test Diode 999 5280
- Connect test diode green/white wire to test point at right wheel house (connector with pink wire).
- Connect test diode red wire to battery (+).

- Connect tachometer.
- Connect stroboscope.
Check/Adjust Idle Speed
- Warm-up engine
- Run engine at 1500 rpm.
NOTE: Warm-up engine until radiator thermostat opens and then for a further 10 minutes.

- Ground blue-white wire to close idle air control valve.
NOTE: Switch off AC as applicable.
- Check idle speed.

- Adjust engine speed with idle adjustment screw to 700 rpm.
- Disconnect ground from test point.
Engine speed should increase to 750±20 rpm
If values are incorrect: check/adjust Throttle Body and/or Throttle Cable/Linkage.
Check/Adjust Ignition Setting
Idle speed fluctuations can affect ignition setting. Make sure that fluctuations are not greater than 25 rpm.
If greater, check air control valve hoses for blockages.
- Check ignition timing with stroboscope.
Ignition setting should be 12° BTDC at idle.

- Adjust setting by turning distributor body.
Check CO
Fig. 342 CHECK AND ADJUST CO:

Test diode should flash if CO is correct.
If test diode remains ON = CO is too high (rich air/fuel mixture).
If test diode remains OFF = CO is too low (lean air/fuel mixture).
Adjusting CO
CO should only be adjusted after all possible faults have been checked/rectified.
- Turn off engine.

- Drill two 2 mm (0.08 in.) holes in plug.
- Withdraw plug with circlip pliers.
- Start engine.
- Adjust CO content. CO screw should be turned until test diode starts to flash.
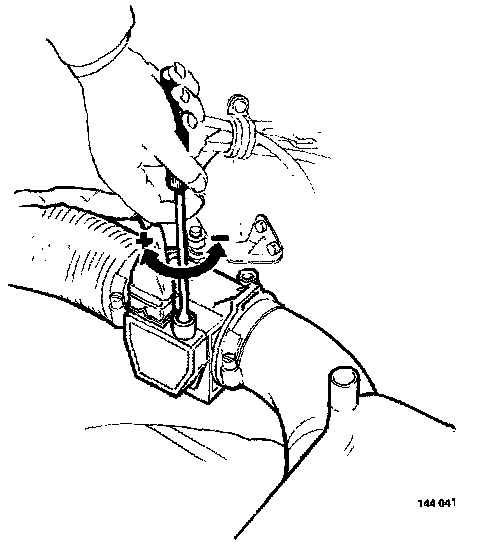
Counterclockwise reduces CO
Clockwise increases CO
Adjustment range = 15 turns.

- Seal CO adjustment screw
Always use a new plug.
- Push plug into position.
- Disconnect test instruments.