Procedures
Crankcase ventilation, cleaning
Note! Some variation in the illustrations may occur, but the essential information is always correct.
Removing
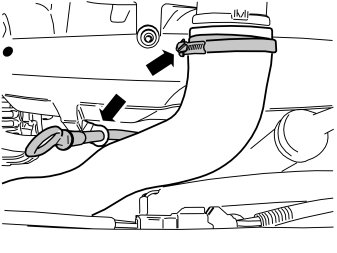
Remove:
- the dip stick pipe to facilitate access
- the charge air hose from the charge air pipe.
The banjo nipple is located on the underneath of the intake manifold behind the mounting for the dip stick pipe.
Cleaning
Note! For tightening torques, see: Tightening torque Tightening Torque
Cleaning crankcase ventilation

Remove the pipe screws from intake manifold.
Disconnect the hose (1) from the nipple.
Remove the oil filler cap.
Blow the hose (1) clean with compressed air.
Clean the hose with an electrical cable - 2.0 mm.
Note! If the hose is clogged, use a welding rod (max - 2.0 mm , approximately 250 mm long) to clean the hose.
Clean the nipple (2) using a - 2.0 mm drill or a welding rod.
Install:
- the hose on the nipple
- the pipe screws with new gaskets
- the oil filler cap.
Raise the vehicle.
Remove the splashguard under the engine.
Tighten the pipe screws.
Install the splashguard under the engine.
Lower the vehicle.
Installing
Install:
- the dipstick tube
- the charge air hose to the charge air pipe.