Fuel Pressure and Residual Pressure, Checking, Vehicles With FSI Engines or TFSI Engines Through MY 2012
Fuel Pressure and Residual Pressure, Checking, Vehicles with FSI Engines or TFSI Engines through MY 2012
Special tools, testers and auxiliary items required
• Fuel Inj. Pressure Gauge-CIS (V.A.G 1318)
• Adapter (V.A.G 1318/10-12) and Adapter (V.A.G 1318/15)
• Remote Control (V.A.G 1348/3A) with Remote Control for VAG 1348 (V.A.G 1348/3-3)
• Connector Test Set (V.A.G 1594C)
• Measuring container, fuel-resistant
Procedure

- Follow all test requirements. Refer to => [ Test Conditions ] Initial Inspection and Diagnostic Overview.
- Remove the rear seat bench.
- Remove the locking flange cover - arrows -.
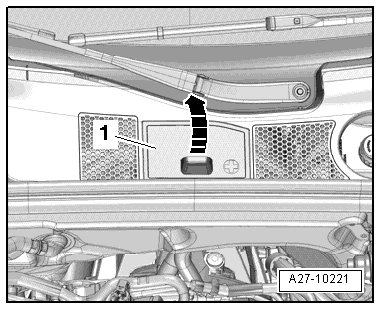
- Disconnect the connector - 1 - on the locking flange.

- Connect the (V.A.G 1348/3A) using the (V.A.G 1348/3-3) and cable from the (V.A.G 1594C) to the terminal - 1 -.

- Tape (V.A.G 1348/3-3) with insulating tape - arrow - to prevent a short circuit.
- Connect the connector terminal - 5 - to the chassis ground with an adapter cable from the (V.A.G 1594C).
- Route (V.A.G 1348/3A) toward front in engine compartment.
- Remove the center plenum chamber cover.
- Release the retainer - arrow A - and open the cover - arrow B -.

- Connect the alligator clip to the battery jump start terminal (U6) - A - in the terminal 30 wire junction 2 (TV22) in the plenum chamber.
- Open the fuel filler door.

- Remove the fuel filler cap - arrow -.
- Remove the air duct - arrows -.

- Remove the vacuum hose - 3 - from the connection on the air guide pipe.

- Remove the air guide pipe by loosening the hose clamp - 4 - and opening the clips - arrows -.
• Ignore - 1 and 2 -.
- Disconnect the vacuum line - 1 -.

- Remove the air filter housing and, if applicable, disconnect the electrical connector - 2 - on the rear side at the intake air switch-over valve (N335).

There is a risk of injury because the fuel is under high pressure.
• To reduce pressure in the fuel system, lay a clean cloth around the connector and carefully loosen connector.
- Remove the fuel supply line from the high pressure pump - arrow -.
- Connect the (V.A.G 1318) with the (V.A.G 1318/11) and (V.A.G 1318/15) in the fuel line.

- Push an assisting hose - arrow - onto it and hold it into a measuring container.
- Open the shut-off valve on the pressure gauge.
• The lever points in the direction of flow.
- Press the switch for the remote control and slowly close the shut-off valve for the pressure gauge.
- If the fuel flows without bubbles, close the drain, so that the fuel pressure increases.
• The level is perpendicular to the direction of flow.
- Read the fuel pressure on the (V.A.G 1318) :
• Specified value: 5.0 to 8.0 bar (72 to 116 psi).
If the specification is not attained:
- Check the fuel delivery quantity for the fuel pump. Refer to => [ Fuel Delivery Rate, Checking, Vehicles with FSI Engines or TFSI Engines through MY 2012 ] Fuel Delivery Rate, Checking, Vehicles With FSI Engines or TFSI Engines Through MY 2012.
Checking Holding Pressure
- Check for leaks and constant pressure. Watch the (V.A.G 1318) for a drop in pressure while doing this:
• After 10 minutes there must be a residual pressure of at least 3 bar.
If the holding pressure drops below 3 bar:
• Check the connections between the (V.A.G 1318) and the fuel supply line for leaks.
• Check the (V.A.G 1318) for leaks.
• Check fuel lines and their connections for leaks.
If no faults are detected:
• Replace the locking flange with the fuel filter and fuel pressure regulator. Refer to => [ Fuel Delivery ] Fuel Delivery.
- Repeat the residual pressure check.
If there are still leaks:
• There is a leak at the check valve in the fuel pump: Replace the fuel delivery unit, refer to => [ Fuel Delivery ] Fuel Delivery.
Assemble in reverse order of disassembling. Note the following:
• The ignition must be off.
• Decrease the fuel pressure by opening the drain and letting the fuel run into the measuring container before removing the pressure gauge.
- Remove the pressure gauge K-Jetronic (V.A.G 1318) and the hose lines.
- Attach the fuel line so that it clicks into place.
- Press the fuel line on again and pull to make sure the connection is engaged correctly.