Connectors, Disconnecting
Connectors, Disconnecting
CAUTION!
• Observe safety precautions for work on airbags.
• Before handling any airbag units (for example, when disconnecting the connector), the person handling them must "discharge static electricity". For example, by briefly touching the door striker pin.
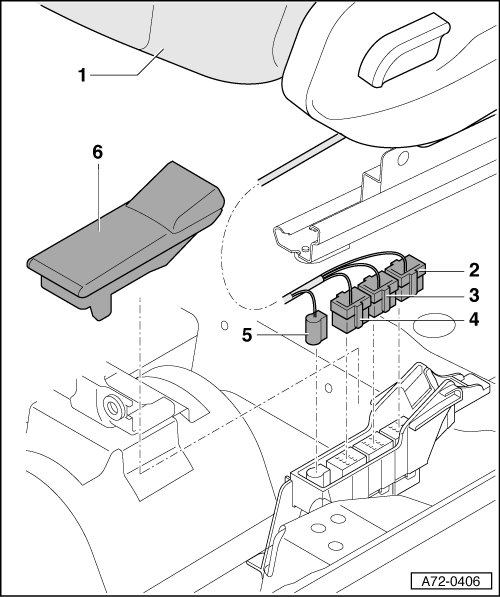
1 Front Seat
2 Belt Buckle Sensor Connector (Black)
3 Seat Heating Connector (Green)
4 Current Supply Connector (Red)
5 Airbag Connector (Yellow)
6 Panel or Cover
• for connector station
• Removing
- Tip front seat - 1 - back.
Vehicles without modular wiring routing through 07.2006
- Remove coupling station cover - 6 - upward.
Vehicles with modular wiring routing from 07.2006
- Remove connector station cover. Refer to => [ Modular Wire Routing with Corrugated Tube on Front Seat ] Modular Wire Routing with Corrugated Tube on Front Seat.
Procedure for all vehicles
- Press in tab on airbag connector - 5 - on tunnel side and disconnect airbag connector - 5 -.
- Press in tab on connector for voltage supply - 4 - on tunnel side and disconnect connector for voltage supply - 4 -.
- Press in tab on airbag connector for heated seat - 3 - on tunnel side and disconnect connector for heated seat - 3 -.
- On vehicles with belt fastened detection: press the tab on the belt fastened detection connector - 2 - on the tunnel side in and remove the connector - 2 -.
- Connect airbag adapter. Refer to => [ Airbag Adapter, Connecting ] Airbag Adapter, Connecting.
• Installing
To install, perform the steps used in removal in reverse order.
Vehicles with a DVD player

- Push the grommet - 3 - to the side.
- Disconnect and free up the electrical connectors - 1 - and - 2 - and free up the wiring harness.