Radio/Audio System Description and Operation
Radio/Audio System Description and Operation
The radio head includes the driver information display (DID). Driver information is provided to the radio head via GMLAN serial data link to the body control module (BCM).
The following list shows the radios available for this vehicle:
* Uplevel Radio (UN0)-AM/FM Stereo, CD, and RDS
* Uplevel Radio (US8)-AM/FM Stereo, CD, RDS, and MP3
Speaker System
There are 2 speaker systems available on this vehicle and consist of the following components:
Base UQ4 System
4 Speaker System
* Two 6-inch extended range speakers (ERS) mounted in both front doors
* Two 6 x 9 extended range speakers (ERS) mounted to the rear shelf
Premium UQ3 System
7 Speaker System
* Two 6-inch extended range speakers (ERS) mounted in both front doors
* Two 6 x 9 high sensitivity speakers (HSS) mounted to the rear shelf
* Two tweeter speakers mounted in the upper door trim on both front doors
* One dual voice coil subwoofer mounted in the LH side of the trunk compartment

Set Clock Uplevel (UN0, UP0, UC6) Radio
Set Hour Mode
Press and hold the CLOCK button for less than 3 seconds. The radio displays the clock icon, the time and the text ADJHOUR when it enters the Set Hour Mode. The hours will flash. Turn the ADJKNOB in increments to adjust the hour. Pressing and releasing the CLOCK button for less than 3 seconds exits the Set Hour Mode and enters the Set Minute Mode. Pressing and holding the CLOCK button for 3 seconds or more exits the Set Hour Mode and enters the radio data system (RDS) Auto Set Clock Mode.
Set Minute Mode
Press and hold the CLOCK button for less than 3 seconds. The radio displays the clock icon, the time and the text ADJMIN when it enters the Set Minute Mode. The minutes will flash. Turn the ADJKNOB in increments to adjust the minutes. Pressing and releasing the CLOCK button for less than 3 seconds exits the Set Clock Mode and turns OFF the clock icon. Pressing and holding the CLOCK button for 3 seconds or more exits the Set Minute Mode and enters the RDS Auto Set Mode.
RDS Auto Set Mode
Pressing and holding the CLOCK button for 3 seconds or more enters the RDS Auto Set Mode. When the radio enters the RDS Auto Set Mode an audible beep is heard. If time information is available from RDS, the radio displays the new RDS time and the text UPDATED. If time information is not available, the radio displays the unchanged time and the text NO UPDATE.
To exit RDS Auto Set Mode, press and release the CLOCK button for less than 3 seconds, press any other non-clock function, or wait 5 seconds after pressing the CLOCK button or turning the ADJKNOB.

Each item in the list below represents topics covered in detail below.
* AM/FM Reception
* Antenna System
* Theft Deterrent
* Radio Data System (RDS)
* Steering Wheel Audio Controls
* XM Satellite Radio
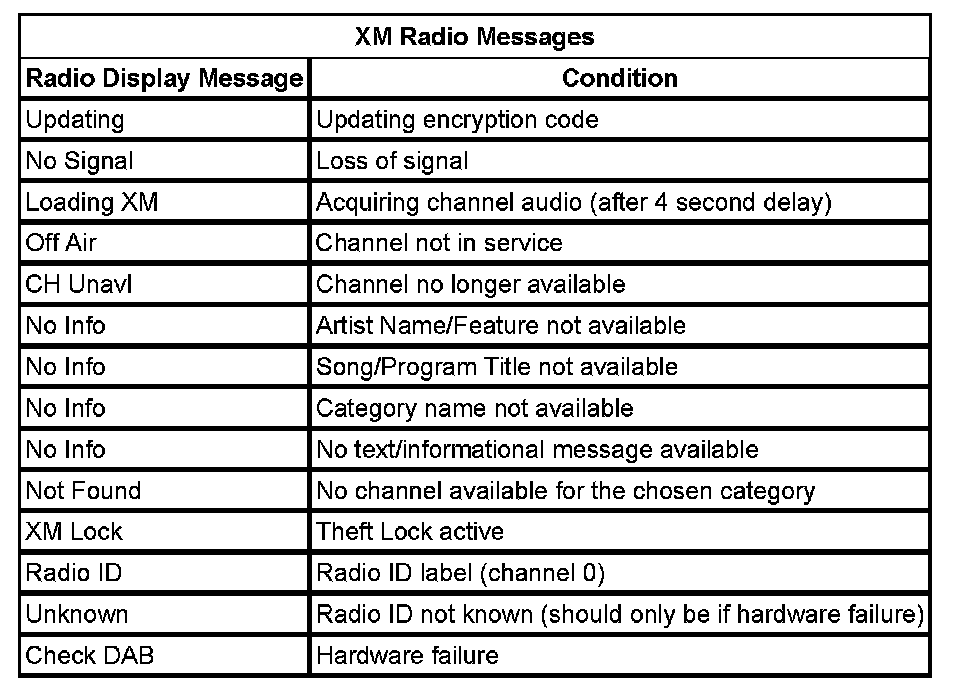
* XM Advisory Messages
* Radio Circuit Operation
AM/FM Reception
Radio Signal
A radio broadcast station uses a transmitter to send radio signals radiated from an antenna. A receiver uses an antenna to capture the radio signals. The strength of the signal depends on the following factors:
* The power output, or wattage of the broadcasting station
* The location of the vehicle, or receiver relative to the broadcast tower
* Obstacles between the tower and the receiver
* Atmospheric conditions
* What band, AM or FM the station is broadcasting
* Type of antenna and the ground plane
AM Reception
The AM band has a lower frequency range than the FM band. These longer wavelengths:
* Bend around obstacles
* Follow the curvature of the earth
* May reflect off the ionosphere-skip
The AM frequencies have longer range due to the ground wave. The ground wave follows the curvature of the earth and is affected by its conductivity. Greater conductivity equates to less signal loss thus transmission over water is better than over land. The AM band has a range of 80-320 km (50-200 miles).
FM Reception
The shorter wavelengths of the higher frequency FM band:
* Reflect off obstacles
* Are absorbed by the ground
* Penetrate the ionosphere
Broadcasts in the FM band are limited to "line of sight" reception which is typically 40 km (25 miles). Even when out of a direct line of sight, the signal may be reflected into areas that would be in a "shadow" otherwise. Factors which affect the line of sight include:
* Height of the broadcast antenna
* Height of the receiving antenna
* Terrain and buildings in the broadcast path
Theft Deterrent
The Theftlock theft deterrent system is a feature on all base and uplevel radios. The theft deterrent system utilizes GMLAN serial data to determine if the radio is in the appropriate vehicle. Each time the radio receives the VIN packet message and is in the RUN power mode, it compares the VIN information it has stored to the received VIN packet message containing VIN information. The radio receives this message from a module on the GMLAN serial data circuit responsible for transmitting that information. If a mis-match occurs, the radio display will indicate to the user the radio is locked. Once this takes place, the radio will not respond to any button presses and become inoperative. The 2 scenarios able to cause this condition are:
* A radio is installed from another vehicle.
* A module which communicates on the GMLAN serial data circuit which supplies VIN information to the radio is replaced and not properly setup with the correct VIN information for that vehicle.
The only way to unlock the radio is by using a scan tool. The scan tool sends the appropriate diagnostic message (relearn VIN) to reset the radio. Using a scan tool, select the radio VIN relearn procedure from the module replacement screen in Vehicle Control Systems.
Removing CDs
Use the eject button, the button labeled CD, to remove a disc.
To remove a single disc, press and release the EJECT button within 2 seconds. The message REMOVE CD is displayed.
Seek (SEEK)
Press the SEEK button in order to seek to the next higher or lower station. The sound will mute when seeking another frequency. The SEEK button is inactive when the front radio is in the SEEK mode.
Power (PWR)
Press the PWR push button in order to turn the rear seat audio system ON or OFF. The rear speakers mute when the power is turned ON. The rear seat audio functions are operable even when the primary radio power is OFF.
Band Switching (AM/FM)
Press the AM/FM push button in order to select between (AM and FM) or (AM, FM1 and FM2) for radios with 2 FM bands. The selection appears on the display. If the front passengers are already listening to AM-FM, the rear seat audio controller will not switch between the bands and cannot change the frequency.
Source Switching (TAPE CD)
Press the TAPE CD push button in order to activate the source switching feature. There must be a cassette tape and/or compact disc in the player.
Preset Program (P.SET PROG)
Press the P.SET PROG button in order to select between pre-programmed station presets. The front passenger must be listening to something different for the P.SET PROG to operate.
Volume (VOL)
Rotate the volume control in order to increase or decrease the volume. The top VOL knob controls the top headphone and the bottom VOL knob controls the bottom headphone.
Radio Data System (RDS)
All uplevel audio systems are equipped with technology known as the radio data system (RDS). RDS is a system that sends data along with the audio of the FM station you are currently tuned to. RDS is a standard that defines how a FM broadcast station may send digital data along with the audio program. Think of it as a one way wireless modem, allowing the broadcaster to send information about his program to your receiver.
RDS data is carried in what is known as a subcarrier. A subcarrier is a frequency that the FM broadcaster is authorized to use to send data or other audio programs that are not audible in the main audio program. RDS information can be used to display program information and to control the radio.
To receive the RDS signal, all that is needed is an FM receiver with a RDS circuit. A special integrated circuit capable of dealing with the RDS signal is in the RDS circuit and passes it along to the receiver's microprocessor where it is decoded and acted upon.
RDS Basic Information
* RDS functions are provided in the FM broadcast band only.
* RDS functions will only work with FM broadcast stations that are broadcasting RDS data.
* Not all FM Broadcast stations broadcast RDS data or offer all of the RDS services.
* RDS functions may not work properly when reception is weak, reception is of poor quality, or RDS is not implemented properly by the FM Broadcaster.
In some cases, a radio station broadcasting incorrect information may cause the RDS features of the radio to appear to work improperly.
Displaying RDS Information
The RDS feature is always ON. When tuned to a non-RDS station, the radio will display frequency information as you would normally expect. When tuned to a RDS station, the radio can operate as follows:
* The radio will change from displaying the frequency of the FM station to displaying the call letters of the station or display the nickname of the station.
* Display the type of program.
* Display general information such as artist and song title, call in phone numbers, etc.
Viewing and Selecting RDS Information for Display
Press the P-Type knob to enter the program type mode. The radio displays the last program type selected.
Using RDS Program Types to Tune Radio
Listed are several ways on how to tune your radio using RDS program types.
The radio will now be configured to tune based on RDS data rather than frequency.
A Fast Way to Find a RDS Station In Your Listening Area
1. Press the P-TYPE button, the radio displays the current P-Type to search for.
2. Rotating the ADJknob scrolls through a display of all available program types.
3. The program type selected becomes the active program type.
Finding a RDS Station By Specific Program Type
1. Press the PROG TYPE or P-TYPE button, the radio will display the current P-Type to search for.
2. Rotate the TUNE knob until the desired program type is shown in the display.
3. Press the PROG TYPE or P-TYPE button and the radio will now seek the first RDS Broadcaster of the selected P-Type.
If the radio cannot find the desired P-Type, the radio displays "NONE" and will return to the last station you were listening to.
Using the INFO Feature
When the INFO icon appears in the radio display, a new text message is available for viewing. These text messages are from the RDS broadcaster to the listening public and may be general information such as artist and song title, call in phone numbers, etc.
How to View the INFO Message
* To view the message when the INFO icon appears, press the INFO button to display the text message. If you do not press the INFO button again, the text message will automatically be displayed 8 characters at a time, 3 seconds between updates.
* To view the text message faster, press the INFO button for less than 1 second to scroll through the message at your own speed.
* The INFO icon disappears as soon as you press the INFO button. The INFO icon will appear when a new different message is received.
* To view the most recent received message, press the INFO icon at any time even if the icon does not appear in the display.
Controlling the Radio
RDS can control the radio when data the receiver can use responds to timely information performing the following:
* Interrupt the playback of your cassette or CD for traffic or emergency bulletins.
* Search for stations by type of program.
* Automatically follow network programming from transmitter to transmitter as you travel from one listening area to another.
* Set your clock to the time that the RDS broadcast station broadcasts.
Using the RDS Traffic Feature
Some RDS broadcasters may carry traffic information programming to inform you of current traffic conditions in your listening area and is indicated by the TRAF icon in the radio display. RDS enables the broadcaster to get this information to you even when you are listening to a tape or compact disc. This feature can be enabled or disabled by the listener. Press the TRAF button to find a station that claims to carry traffic information. You may do this even when playing a cassette tape or compact disc. This action will operate in the background without interrupting the current playback. If the radio is not currently tuned to an RDS traffic station, the radio will immediately seek an RDS traffic station. If the radio finds an RDS traffic station, the TRAF icon will appear on the radio display as will brackets around the [TRAF] icon. If the radio cannot find an RDS traffic station after searching through the entire FM band, the radio will display NO TRAFFIC.
Traffic Interrupt Feature
Whenever the TRAF icon is displayed, the current FM station may also broadcast traffic announcements. Traffic announcements are reports of the current traffic conditions in the listening area of the tuned FM broadcasters.
Your radio can interrupt the playback of a cassette or compact disc by use of the traffic interrupt feature. The traffic interrupt feature is enabled when the TRAF icon is displayed.
If the broadcaster sends out a traffic announcement while you are listening to FM or in the playback mode, TRAFFIC will be displayed on the radio and the audio from the broadcaster will be heard. At the conclusion of the traffic announcement, the radio will return to the previous playback mode.
During the time the radio displays TRAFFIC, you can adjust the volume of the traffic announcement. This will be the volume at which all future traffic announcements will be heard.
You can also interrupt a traffic announcement interrupt by pressing the TRAF button.
RDS Program Type Interrupts
When the program type feature is ON, all program types may be selected as interrupts. Perform the following to select a program type as an interrupt.
1. Turn ON the radio.
2. Select the program type.
3. Press and hold the program type button, labeled PROG TYPE or P-TYPE, for 2 seconds while the program type is displayed.
When an interrupt is set, the display shows the program type followed by an asterisk and the brackets around the [P-TYPE] icon are illuminated.
To turn an interrupt OFF:
1. Select a program type marked as an interrupt.
2. Press and hold the program type button, labeled PROG TYPE or P-TYPE, for 2 seconds. The program type will be unmarked by turning OFF the asterisk. If no other program type interrupts are set, the brackets around the [P-TYPE] icon are also turned OFF.
When a program type interrupt is set, the radio will wait for the current FM RDS station to change its program type to one of those selected as an interrupt. When the station program type changes to a program type interrupt setting then the interrupt is activated. If the radio is in a playback mode, an interrupt will cause the radio to switch to the FM band, display the program type followed by INT, and adjust the volume to the last active interrupt volume. If the radio is in the FM mode when an interrupt occurs, only the volume will change. The radio resumes the mode that was active prior to the interrupt, when an interrupt ends. An interrupt in progress may be canceled by pressing the program type button or a mode button.
During a national or local emergency, a special program type interrupt message ALERT! is displayed. This special announcement will cancel all other RDS features that are in progress, such as a traffic announcement.
Alternate Frequency (AF) Switching
RDS permits broadcasters to send information to the radio that allows the radio to automatically switch frequency to the best quality station in that broadcasters network.
Since the radio is displaying the broadcaster call letters or nickname, the listener will not see the frequency during an AF switch unless you have changed the default display to be frequency instead of Program Service name.
To enable or disable AF switching perform the following:
* Press and hold the AM/FM button for 2 seconds or more.
* The radio will display AF ON or AF OFF depending on the current condition of AF and a confirmation beep will be heard.
When AF is enabled and you recall a RDS station stored on preset, the radio determines if the station stored is of acceptable quality. If not, the radio checks all available AFs for your station. If the radio fails to locate your program, AF SEARCH will be displayed as the radio scans across the band looking for your program or an affiliated network. If the radio cannot find the original station or an acceptable alternate frequency NOT FOUND will be displayed and the radio returns to the original frequency for the preset.
RDS Clock Time
Broadcasters can choose to send clock time information in the RDS data. This information can be used to update the clock time on the radio. RDS clock time is broadcast once a minute. To set the clock using RDS clock data perform the following:
* Press and hold the HR and MIN buttons together for 2 or more seconds to update the time.
* The display will show UPDATED after receiving the broadcasted time data.
* If the broadcaster is not broadcasting the time data, the radio will display NO UPDATE and the time remains unchanged.
Steering Wheel Audio Controls
Some audio functions are available using the steering wheel controls. The steering wheel controls are actually a resistor network which consists of multiple momentary contact switches and a series of resistors. The switches and resistor network is arranged so that each switch has a different resistance value. When a switch is pressed, a voltage drop occurs in the resistor network which produces a specific voltage value unique to the switch selected. These specific voltage values allow the radio to identify which switch has been pressed. The radio responds just as if the corresponding radio front panel button had been pressed.
When the radio is ON, the radio supplies approximately 10 volts to the switches on the 10-volt reference circuit. The specific voltage signal from the switch is returned to the radio on the steering wheel controls signal circuit.
XM Satellite Radio
XM is a national satellite radio service that offers up to 100 coast to coast channels including music, news, sports, talk and children's programming. XM provides digital quality audio and text information, including song title and artist name. A service fee is required in order to receive the XM service. For more information, contact XM at www.xmradio.com or call 1-800-556-3600.
Digital Radio Receiver
The radio communicates with the digital radio receiver (DRR) via the GMLAN data bus. When the radio communicates with the DRR, the virtual network (VN INFOTAINMENT) is activated by the radio. During this communication phase, the radio sends a specific GMLAN frame message to establish a link with the DRR. The DRR responds with a specific frame message back to the radio confirming the link was successful. The scan tool can be used to check if any remote device is connected to the radio. In this case, observe the RSE parameter in the Radio Data Display. The scan tool will indicate RSE - Present. When a XMI or XM2 frequency setting is selected from pressing a button on the radio, a specific GMLAN frame message is sent to the DRR to change to the selected frequency. During XM operation the audio signals are sent over the left and right audio signal circuits from the DRR to the radio.
Viewing Messages
Press the DISP or RCL button while in XM mode to view various pieces of information related to the current song or channel. By pressing and releasing the DISP or RCL button, you may view four different categories of information: Artist Name/Feature, Song/Program Title, Channel Category, and other Additional Information that may be broadcast on that channel. Additional Information messages may not always be available. If an Additional Information message is being broadcast on the tuned channel, the INFO icon will appear on the display. Each of the four information types may have multiple pages of text. To reach a category, press and release the DISP or RCL button consecutively until the desired type is displayed. If there are multiple pages of text for the selected information type, the radio will automatically display all the pages for that type at a rate of approximately one page every three seconds before timing out and returning to the default display. You may override this feature by pressing the DISP or RCL button to review all of the pages at your own pace.
Radio Circuit Operation
Radio Power
- The main radio power is supplied by the 10-amp RADIO fuse located in the body control module (BCM).
The radio does not use a discrete ignition feed circuit for power moding. The power mode master (PMM) provides the system power mode to the radio via GMLAN signals. The PMM determines the system power mode by processing power mode information from ignition switch inputs. GMLAN vehicle power modes supported by the radio are OFF, ACCESSORY, RUN, and CRANK REQUEST.
Radio Grounds
- The main radio ground provides a ground for the radio circuits. The radio is also case grounded.
Radio Data Link Communication
- The radio communicates with other modules via the GMLAN data bus which is a CAN based protocol. This vehicle uses 2 variants of the GMLAN data bus. The variants are a low speed and high speed vehicle bus. The radio connects to the low speed vehicle bus which runs between 12.5-40 kbps.
Radio Head Unit Dimming
- Dimming and backlighting levels are determined by the GMLAN signal data the radio receives. The radio sets the backlight and VF display dimming to the value indicated by the interior dimming level and interior dimming display level signals in the GMLAN dimming information frame.
The radio provides faceplate and control/graphics backlighting in the OFF (RAP inactive) when the exterior lighting VN is activated. The radio display is consistent then with the surrounding devices that use analog PWM dimming to backlight their control/graphics when the power mode is OFF and the park lights are ON.