Radiator Replacement
Radiator Replacement
Special Tools
J 38185 Hose Clamp Pliers
Removal Procedure

1. Drain the cooling system. Refer to Cooling System Draining and Filling Service and Repair.
2. Lower the vehicle.
3. Remove the air cleaner outlet resonator. Refer to Air Cleaner Outlet Resonator Replacement, Air Cleaner Outlet Duct Replacement or Air Cleaner Inlet Duct Replacement Service and Repair.
4. Reposition the radiator inlet hose clamp at the radiator using J 38185.
5. Remove the radiator inlet hose from the radiator.

6. Reposition the radiator outlet hose clamp at the radiator using J 38185.
7. Remove the radiator outlet hose from the radiator.

8. If equipped with an automatic transmission, clean the upper transmission oil cooler line connection point and remove the line from the radiator.

9. If equipped with an automatic transmission, remove the left front wheelhouse liner. Refer to Front Fender Liner Replacement Service and Repair.

10. If equipped with an automatic transmission, remove the left engine splash shield. Refer to Engine Splash Shield Replacement - Left Side Service and Repair.

11. If equipped with an automatic transmission, clean the lower transmission oil cooler line connection point and remove the line from the radiator.
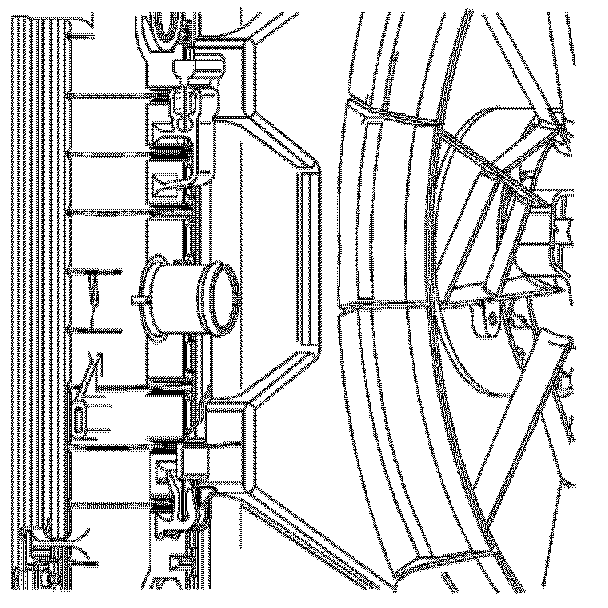
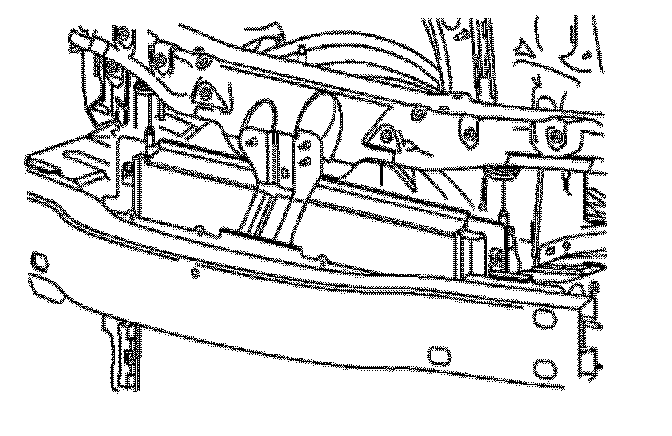
12. Remove the cooling fan assembly from the radiator by pushing up on the fan shroud to unsnap the retaining features. Position the cooling fan assembly away from the radiator and support the cooling fan assembly.

13. Remove the air dam push-in retainer.
14. Remove the air dam.
15. Remove the charge air cooler, if equipped. Refer to Charge Air Cooler Radiator Replacement Service and Repair.

16. If equipped with air conditioning, remove the condenser bolts.

Important: You are not required to discharge the A/C system.
17. Slide the condenser down to disengage the upper mounting tabs from the radiator. Position the condenser away from the radiator and support the condenser.
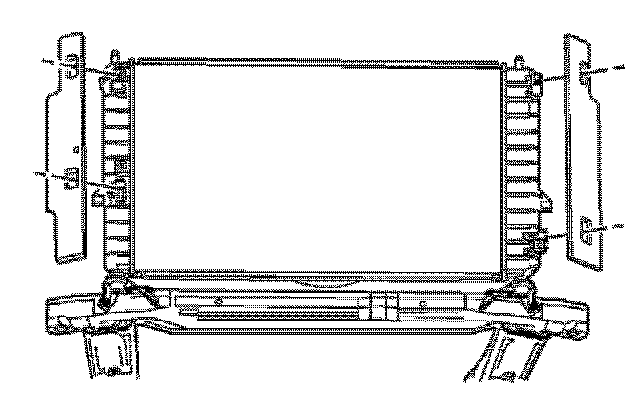
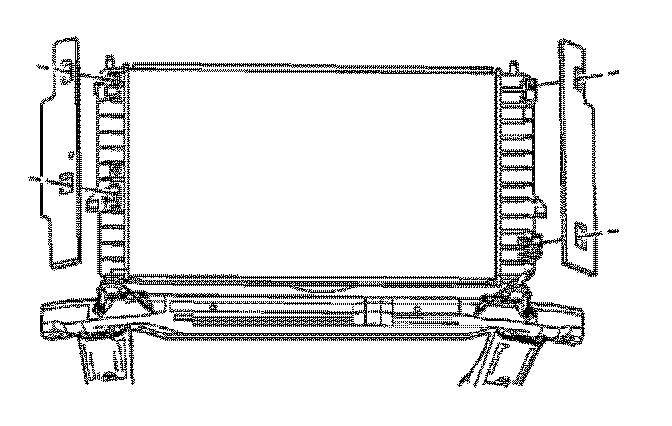
18. Remove the right and left radiator side baffles.
19. Remove the right engine splash shield to radiator mount push-in retainer.
20. If equipped with a manual transmission, remove the left engine splash shield to radiator mount push-in retainer.

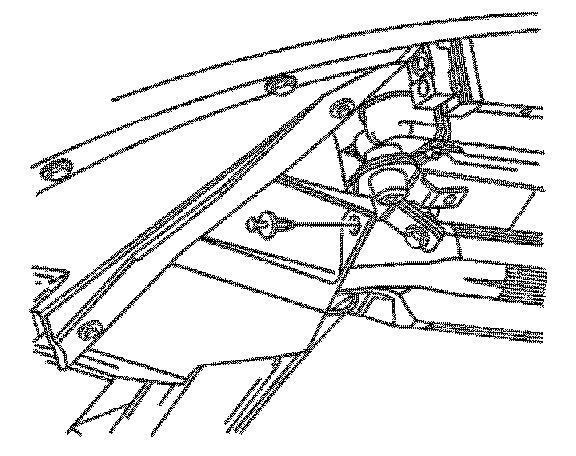
21. Remove the lower radiator mounts, brackets, and bolts.

22. Tilt the condenser forward in the vehicle. Tilt the cooling fan assembly rearward in the vehicle. Remove the radiator assembly from the vehicle.

23. Remove the upper radiator air baffle.
Installation Procedure

1. Verify that the upper radiator mounts are installed in the vehicle.

2. Install the upper radiator air baffle.
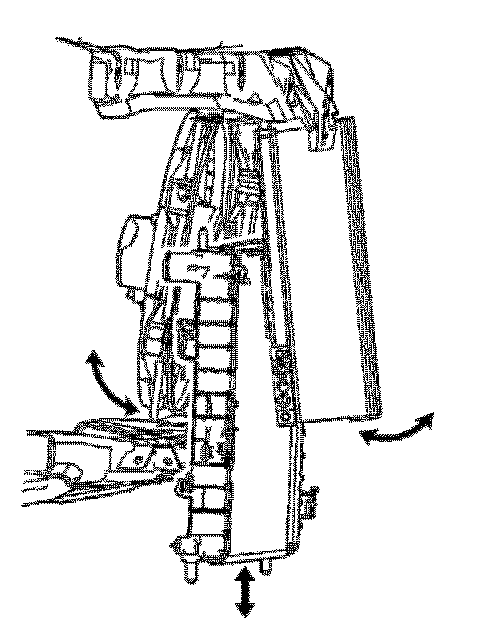
3. Tilt the condenser forward in the vehicle. Tilt the cooling fan assembly rearward in the vehicle. Install the radiator assembly into the vehicle.
4. Verify that the upper radiator mount pins align with the upper radiator mounts.
Notice: Use the correct fastener in the correct location. Replacement fasteners must be the correct part number for that application. Fasteners requiring replacement or fasteners requiring the use of thread locking compound or sealant are identified in the service procedure. Do not use paints, lubricants, or corrosion inhibitors on fasteners or fastener joint surfaces unless specified. These coatings affect fastener torque and joint clamping force and may damage the fastener. Use the correct tightening sequence and specifications when installing fasteners in order to avoid damage to parts and systems.

5. Install the lower radiator mounts, brackets, and bolts.
Tighten
Tighten the bolts to 25 Nm (18 lb ft).

6. Install the right engine splash shield to radiator mount push-in retainer.
7. If equipped with a manual transmission, install the left engine splash shield to radiator mount push-in retainer.
8. If equipped with air conditioning, install the right and left radiator side baffles.

9. Slide the condenser up to engage the upper mounting tabs into the radiator.

10. Install the condenser bolts.
Tighten
Tighten the bolts to 10 Nm (88 lb in).
11. Install the charge air cooler, if equipped. Refer to Charge Air Cooler Radiator Replacement Service and Repair.

12. Install the air dam and push-in retainers.

13. Align the cooling fan shroud retaining features to the radiator. Pull down on the cooling fan assembly to snap the fan shroud onto the radiator.

14. If equipped with an automatic transmission, install the lower transmission oil cooler line and seal the radiator.
Tighten
Tighten the transmission oil cooler line to 20 Nm (15 lb ft).

15. If equipped with an automatic transmission, install the left engine splash shield. Refer to Engine Splash Shield Replacement - Left Side Service and Repair.

16. If equipped with an automatic transmission, install the left front wheelhouse liner. Refer to Front Fender Liner Replacement Service and Repair.
17. Lower the vehicle.

18. If equipped with an automatic transmission, install the upper transmission oil cooler line and seal to the radiator.
Tighten
Tighten the transmission oil cooler line to 20 Nm (15 lb ft).

19. Install the radiator outlet hose to the radiator.
20. Reposition the hose clamp to secure the hose using J 38185.

21. Install the radiator inlet hose to the radiator.
22. Reposition the hose clamp to secure the hose using J 38185.
23. Install the air cleaner outlet resonator. Refer to Air Cleaner Outlet Resonator Replacement, Air Cleaner Outlet Duct Replacement or Air Cleaner Inlet Duct Replacement Service and Repair.
24. Fill the cooling system. Refer to Cooling System Draining and Filling Service and Repair.
25. If equipped with an automatic transmission, add fluid to the transmission as necessary. Refer to Transmission Fluid Check .