Brake Pad: Service and Repair
1. Remove and discard portion of brake fluid from larger master cylinder reservoir to avoid fluid overflow when caliper piston is depressed.
2. Raise and support vehicle, then remove front wheel and tire assemblies.
3. Working on either side of vehicle, place an eight inch C-clamp or equivalent on caliper and tighten clamp to bottom caliper piston in cylinder bore, then remove clamp. Do not use screwdriver or similar tool to pry piston away from rotor.
4. On 1983---84 models, three types of caliper pins are used: a single tang type, a double tang type, and a split-shell type. The pin removal process depends on bolt head direction of installed pin.Always remove upper caliper pin first.
5. On 1983---84 models, if bolt head is on outside of caliper, proceed as follows:
a. Tap caliper pin bolt on inner side of caliper until there is a gap between outer bolt head and caliper pin.
b. Using suitable cutter, remove bolt head from bolt.
c. Using screwdriver, depress tab on bolt head end of upper caliper pin, then tap on pin with hammer until tab is depressed by V-slot.
d. Using {1/2} inch or smaller punch placed against end of caliper pin, drive pin out of caliper toward inside of vehicle.Do not use screwdriver or other edged tool to drive out pin.
6. On 1983---84 models, if nut end of bolt is on outside of caliper, proceed as follows:
a. Remove nut from bolt.
b. Using screwdriver, depress lead tang on end of upper caliper pin, then tap pin with hammer until lead tang is depressed by V-slot.
c. Using {1/2} inch or smaller punch placed against end of caliper pin, drive pin out of caliper toward inside of vehicle. Do not use screwdriver or other edged tool to drive out pin.
7. On all 1985---86 models, proceed as follows:
a. Clean all excess dirt from area around pin tabs.
b. Tap upper caliper pin towards inboard side until pin tabs just touch spindle face.
c. Insert a screwdriver into slot provided behind pin tabs on inboard side of pin.
d. Compress outboard end of pin with needle nose pliers, while simultaneously prying with screwdriver until tabs slip into spindle groove.
e. Position one end of a {7/16} inch punch against end of caliper pin and drive caliper pin out of caliper slide groove.
Fig. 1 Exploded view of disc brake assembly. 4 x 2 models:
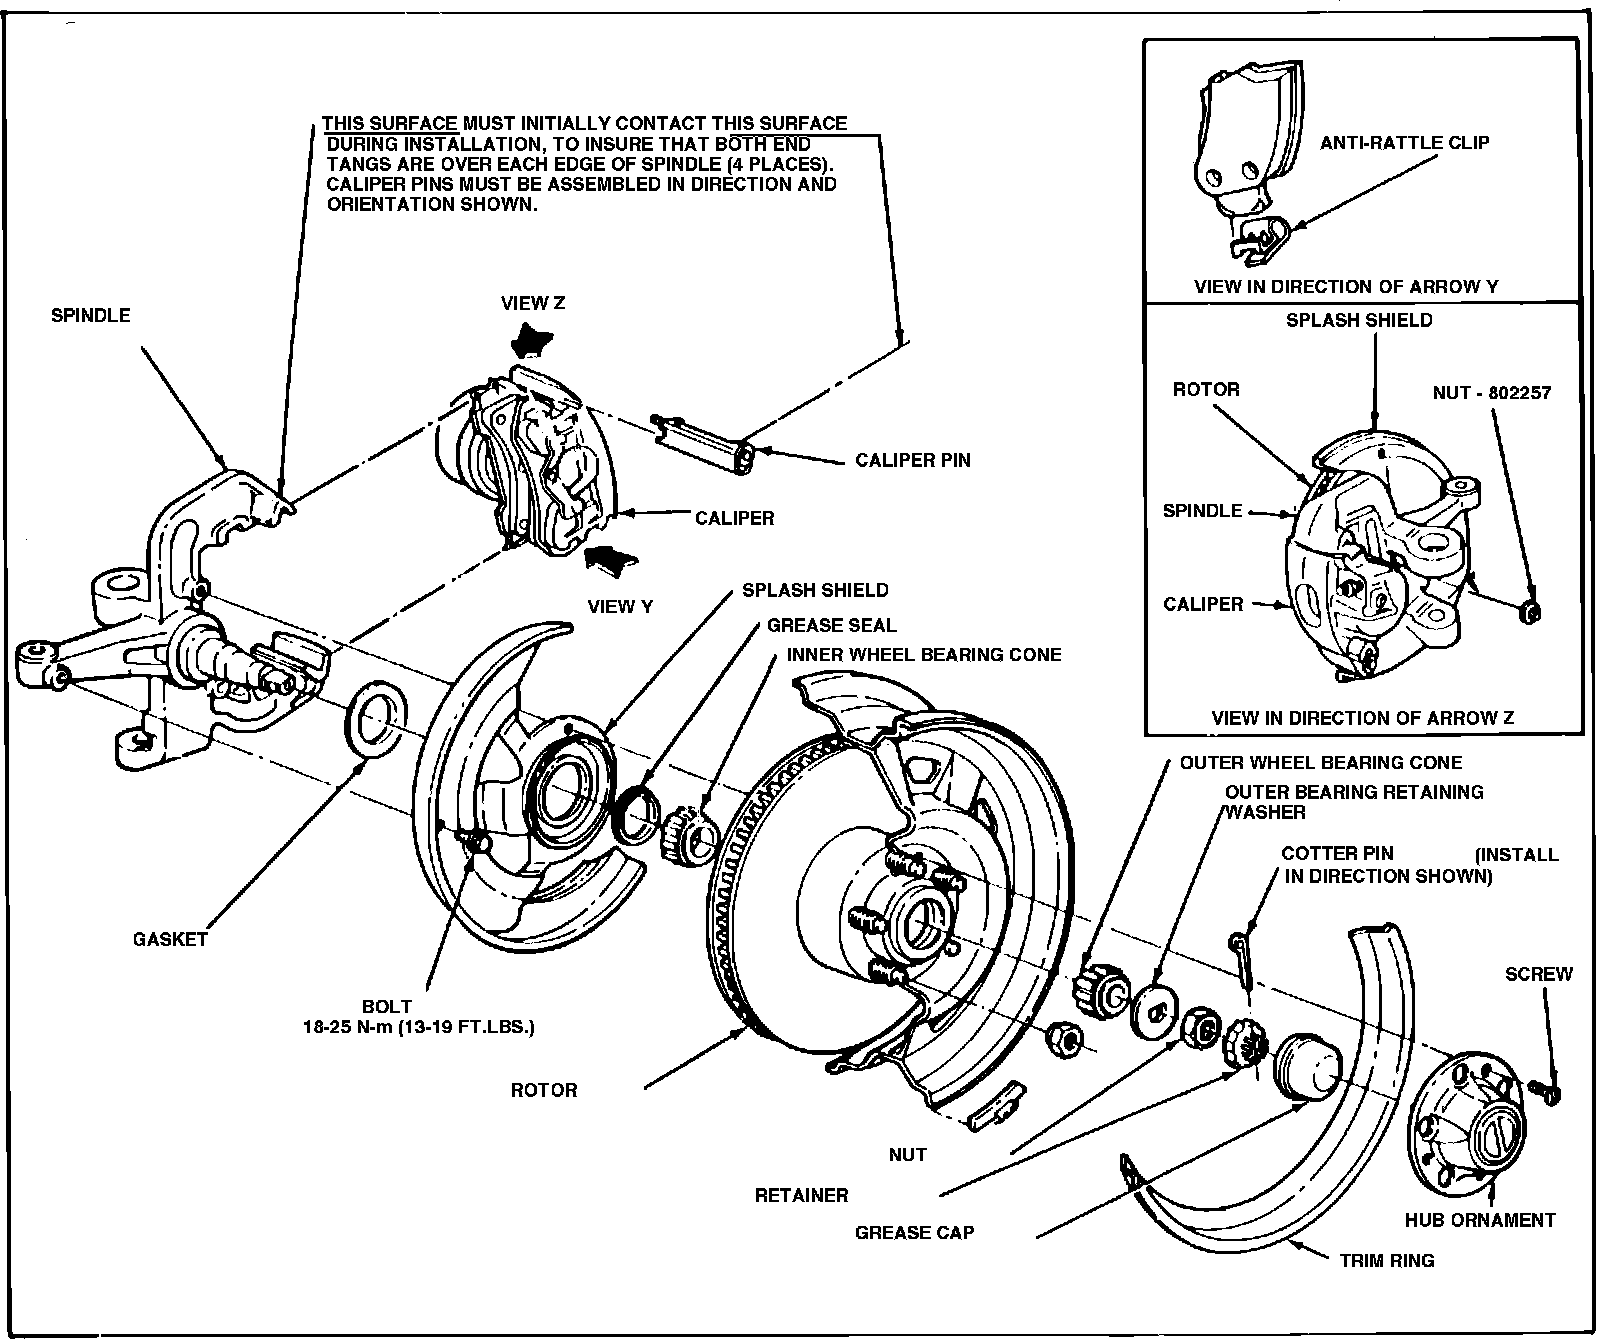
Fig. 2 Exploded view of disc brake assembly. 4 x 4 models:
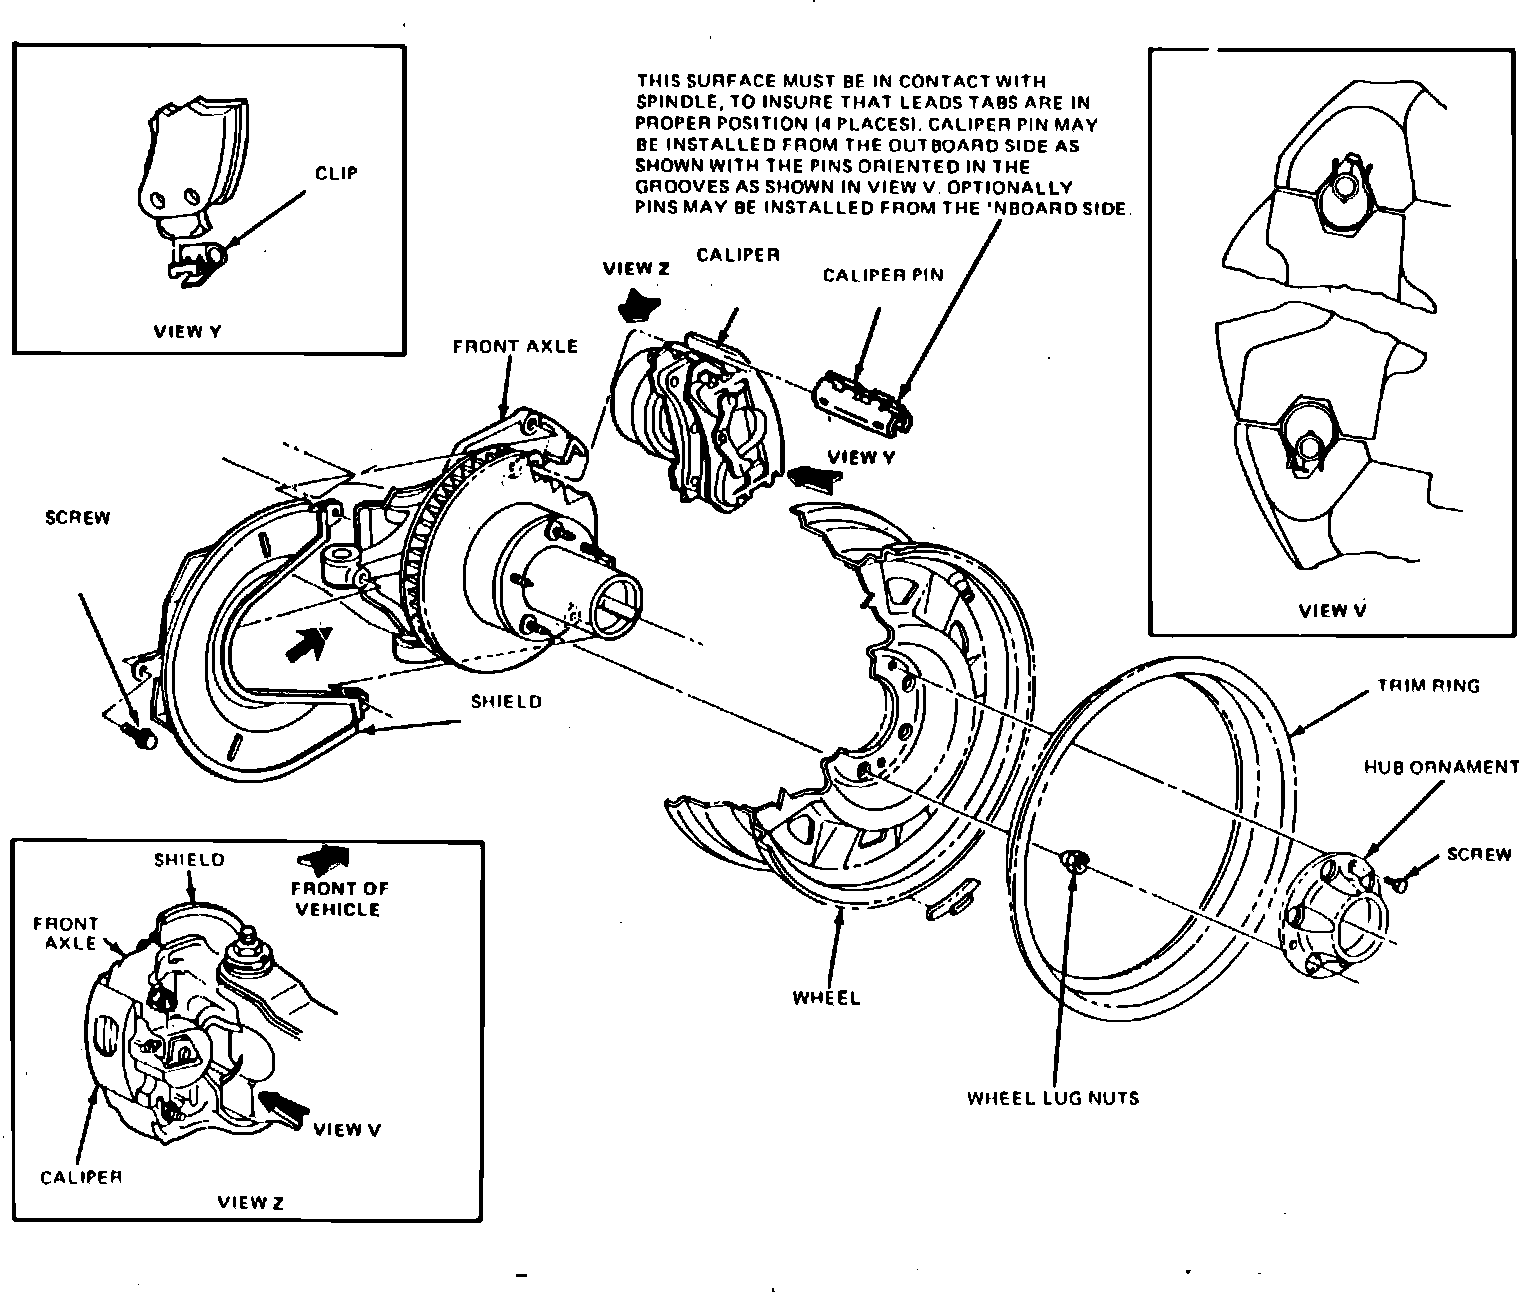
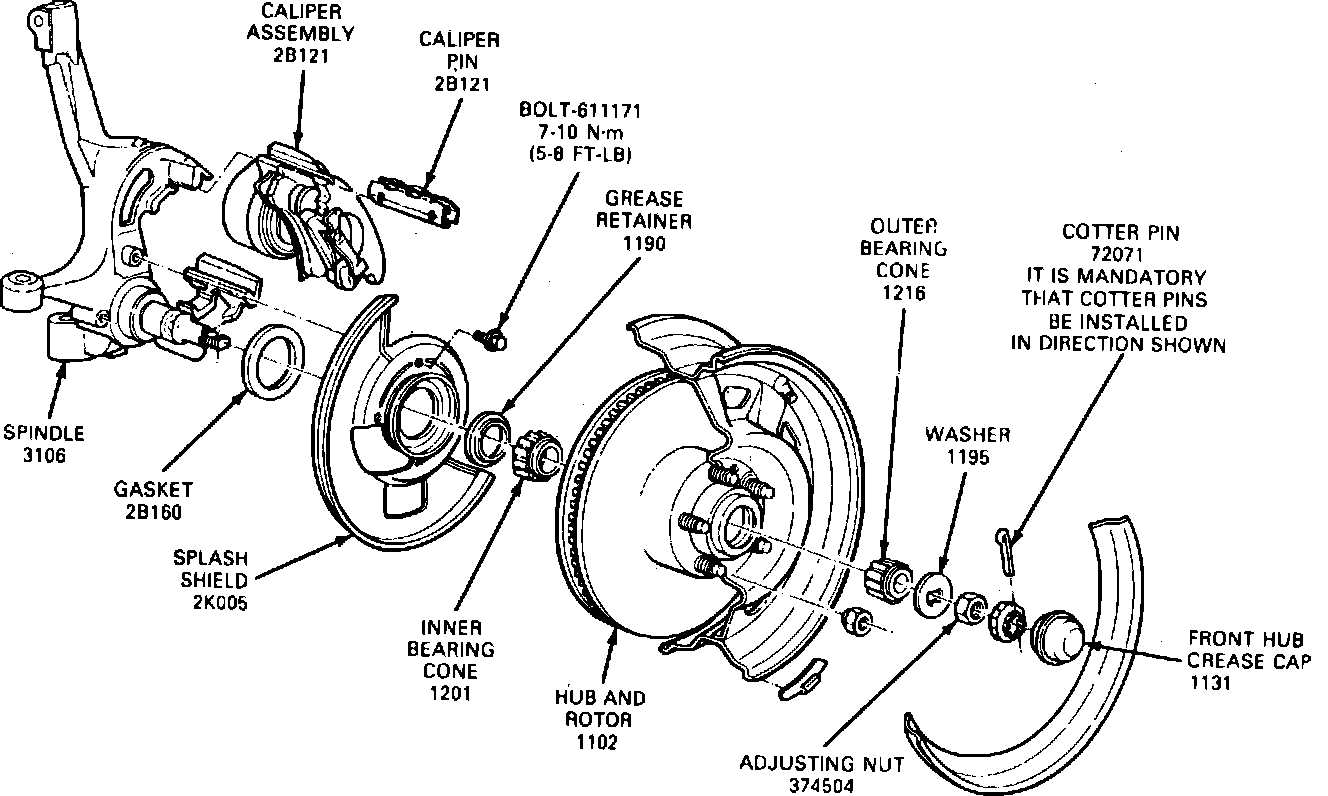
Fig. 3 Exploded view of disc brake assembly. 1986---87 Aerostar:
8. On all models, remove lower caliper pin using procedure in step 5, 6 or 7, as applicable.
9. Remove caliper from rotor, then the brake hose from caliper, Figs. 1, 2 and 3.
10. Remove outer lining, then the anti-rattle clips and inner lining.
FRONT CALIPER & LINING INSTALLATION
1. Place new anti-rattle clip on lower end of inner shoe, being sure tabs on clip are properly positioned and clip is fully seated.
2. Place inner shoe and anti-rattle clip in shoe abutment with anti-rattle clip tab against shoe abutment and loop type spring away from rotor. Compress anti-rattle clip and slide upper end of shoe into position.
3. Install outer shoe, ensure that torque buttons on shoe spring clip are firmly seated in matching holes in caliper.
4. On 1983---84 models, clean mounting surfaces of caliper and, using suitable lubricant, lubricate caliper grooves, then install new caliper pins. Pin must be installed with lead tang in first, bolt head facing outward. Place lead tang in V-slot mounting surface and drive into caliper until drive tang is flush with caliper assembly, then install nut and torque to 32---47 ft. lbs.
5. On 1985---87 models, clean caliper mounting surfaces, then apply suitable lubricant to caliper grooves and install caliper on spindle. Position pin with pin retention tabs adjacent to spindle groove. Tap pin on outboard end with a hammer until tabs contact spindle face. Repeat procedure for lower pin. Do not install bolt and nut with new pins.
6. On all models, install brake hose on caliper.
7. Repeat steps 3---10 of removal procedure and steps 1---6 of installation procedure on opposite side of vehicle.
8. Perform brake bleeding procedures, then install wheel and tire assemblies and torque nuts to 85---115 ft. lbs.
9. Lower vehicle, check brake fluid level and replenish as necessary, then check brakes for proper operation.