Timing Chain: Service and Repair
REMOVAL
1. Remove crankshaft pulley/damper/front cover assemblies.
Timing Gear Timing Marks:

2. Rotate crankshaft until No. 1 piston is at TDC on compression stroke and the timing marks are aligned.
3. Remove camshaft sprocket attaching bolt and washer. Slide both sprockets and timing chain forward and remove as an assembly.
4. Check timing chain and sprockets for excessive wear. Replace if necessary.
INSTALLATION
1. Clean and inspect all parts before installation. Clean gasket material and dirt from oil pan, cylinder block and front cover.
Timing Chain And Sprockets:
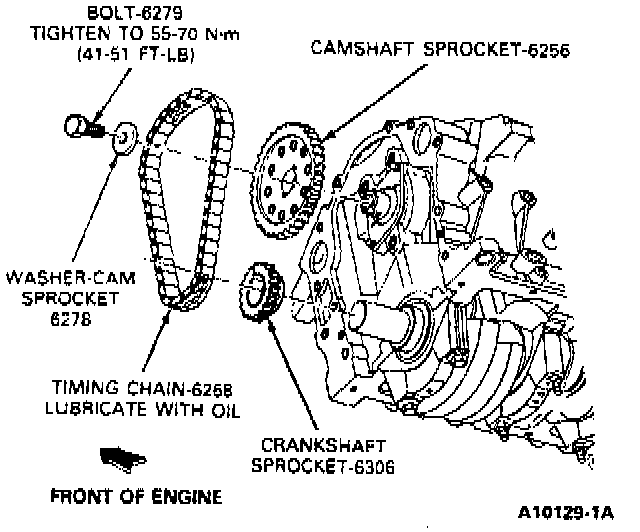
2. Slide both sprockets and timing chain onto the camshaft and crankshaft with timing marks aligned. Install camshaft gear bolt and washer and tighten to 55-70 Nm (41-45 ft lb). Apply oil to timing chain and sprockets after installation.
NOTE: The camshaft bolt has a drilled oil passage in it for timing chain lubrication. If damaged, do not replace with standard bolt.
3. Cut a new oil pan gasket and install on oil pan using Gasket and Seal Contact Adhesive D7AZ-19B508-A (ESR-M11P17-A and ESEM2G52-A) or equivalent to hold in place. Apply a bead of RTV using Rotunda RTV Dispenser 021-00031 or equivalent on the gap at the cylinder block.
4. Apply Oil Resistant Sealer B5A-19554-A or equivalent to a new front cover gasket and position gasket into front cover.
5. Position the front cover on the engine, taking care not to damage front seal.
6. Ensure cover is installed over alignment dowels.
7. Bolt front cover to engine. Ensure oil pan seal is dislodged.
8. If front cover seal is damaged or worn, replace seal. Install seal using Front Cover Seal Installer T70P-6B070-A or equivalent.
9. Install water pump.
10. Install crankshaft pulley/damper/front seal.
11. Fill crankcase with the correct viscosity and amount of engine oil.
12. Fill and bleed cooling system.