Engine: Service and Repair
NOTE: The engine removal and installation procedures are for the engine only (transmission not attached).
REMOVAL
1. Disconnect both battery ground cables.
2. Drain coolant.
3. Remove air intake hoses and air filter assembly and install T83T-9424-A over air intake opening.
4. Recover air conditioning system if equipped.
5. Remove front bumper, air deflector, and stone guard.
6. Remove air deflector and grille.
7. Remove headlamp and side lamp assemblies and housings.
8. Remove transmission oil cooler if auxiliary oil cooler is used.
9. Remove grille support and lower grille panel.
10. Remove hood latch from upper radiator support and set aside with cable attached.
11. Remove radiator and fan shroud. Leave upper and lower radiator hoses attached to engine.
12. Disconnect air conditioning lines to condenser using A/C Spring Lock Coupling Disconnect Tool Set T84L-19623-B.
13. Remove air conditioning condenser.
14. Remove oil cooler lines and bracket.
15. Remove accessory drive belt.
16. Remove upper radiator support.
17. Remove fan and fan clutch as outlined using Fan Clutch Pulley Holder T83T-6312-A and Fan Clutch Nut Wrench T83T-6312-B.
18. Disconnect electrical connection, hoses and tubes from air conditioning compressor. Remove bracket with assembled compressor.
19. Disconnect power steering hoses at steering gear and remove bracket with assembled power steering pump.
20. Disconnect alternator electrical connectors.
21. Remove alternator and bracket assembly.
22. Remove upper and lower radiator hoses from engine.
23. Disconnect electrical connections to engine from main wiring harness. Tag wires to aid in installation.
24. Remove transmission oil cooler line bracket from front of engine.
25. Remove ground cable from engine.
26. Disconnect vacuum pump hose from main junction.
27. Disconnect bleeder hose from heater hose and disconnect heater hoses from heater core.
28. Disconnect fuel hose from fuel pump. Remove fuel filter assembly.
29. Remove throttle cable bracket and dipstick tube bracket.
30. Remove inside engine cover.
31. Remove fuel return hose and transmission dipstick tube.
32. Remove three top transmission-to engine bolts.
33. Raise vehicle.
34. Disconnect starter electrical and transmission electrical connections.
35. On vehicles with automatic transmission, remove flywheel housing cover and torque converter-to-flywheel nuts.
36. Remove four engine mount nuts.
37. Lower vehicle and support transmission with suitable transmission jack.
Engine Removal:
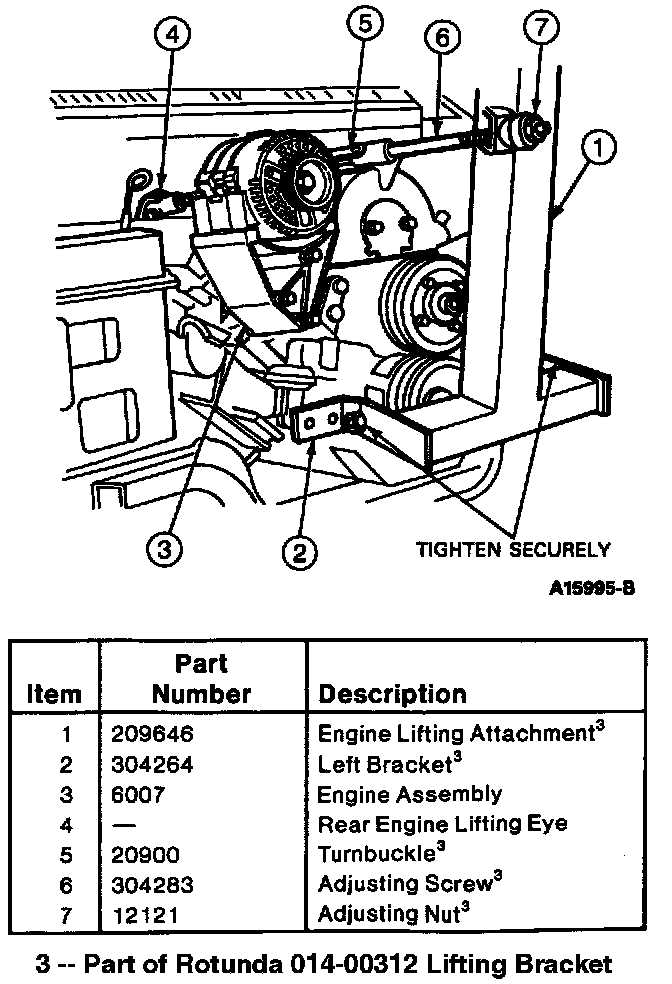
38. Attach Rotunda Floor Crane and Lifting Attachment 01-0071 or equivalent according to instructions with crane.
39. Remove remaining transmission-to-engine bolts.
40. Raise floor crane boom until the crane supports the weight of the front of the engine.
41. Adjust nut on floor crane turnbuckle until turnbuckle supports weight of rear of engine.
42. Remove engine, adjusting floor crane turnbuckle as necessary to tilt engine as removal requires.
43. Mount engine on repair stand and remove crane and lifting attachment.
INSTALLATION
CAUTION: If engine to be installed has been overhauled or has been in storage, take the following precaution to prevent piston and bearing scuffing. Prime entire engine lubricating system to fill oil cooler, oil filter and cylinder block galleries with the specified type and grade of oil.
1. Attach Rotunda Floor Crane and Lifting Attachment 014-00071 or equivalent to engine according to instructions with crane. Remove engine from repair stand.
2. On vehicles equipped with automatic transmission, raise the engine and position it into the vehicle aligning the transmission converter to the flex plate and the engine dowels to the transmission. Lower the engine to the chassis brackets, align the through-bolt holes on the engine supports and insert through-bolts.
NOTES:
^ On vehicles equipped with manual transmission, start the transmission pinion shaft into the clutch disc.
^ It may be necessary to adjust the position of the transmission in relation to the engine if the input shaft will not enter the clutch disc. If the engine hangs up after the shaft enters, turn the crankshaft slowly until the shaft splines mesh with the clutch disc splines.
^ Align the housing on the engine and insert the housing-to-engine bolts. Alternately tighten bolts.
3. On vehicles equipped with an automatic transmission, install converter housing-to-cylinder block bolts. Alternately tighten bolts.
4. Remove floor crane lifting attachment and transmission jack.
5. Raise vehicle.
6. Install engine mount nuts.
7. Connect starter and transmission electrical connections.
8. Install new gaskets and connect exhaust pipes to exhaust manifolds. Install sound shield bolts.
9. Lower vehicle.
10. Install transmission dipstick tube.
11. Install fuel return hose.
12. Install inside engine cover.
13. Install bracket for dipstick tube and throttle cable bracket.
14. Install fuel filter assembly and fuel hose to fuel pump.
15. Connect heater hoses to heater core. Install bleeder hose to heater hose.
16. Connect vacuum pump hose to main junction.
17. Install transmission oil line bracket to front of engine block.
18. Install alternator and bracket assembly.
19. Connect electrical connections to alternator and engine.
20. Install assembled power steering pump and bracket and connect power steering pump hoses to steering gear.
21. Install assembled air conditioning compressor and bracket. Connect manifold tubes and electrical connection to compressor.
22. Install fan and clutch using Fan Clutch Pulley Holder T83T-6312-A and Fan Clutch Nut Wrench T83T-6312-B.
23. Install oil filler tube.
24. Install upper radiator support.
25. Install air conditioning condenser and attach lines.
26. Install radiator and fan shroud.
27. Install hood latch and adjust.
28. Install lower grille panel and grille support
29. Install transmission oil cooler.
30. Install headlamp housings, turn signal/parking lamp assemblies, and headlamp assemblies.
31. Install grille and air deflector.
32. Install front bumper, air deflector and stone guard
33. Install accessory drive belt.
34. Recharge air conditioning system.
35. Fill cooling system. Fill engine with proper grade of engine oil. Start engine and bleed power steering system. Check for leaks and engine and accessories operation.