Check Fluid Level and Condition
Transmission Fluid Level CheckUnder normal circumstances, you do not need to check the fluid level of the transmission, since your vehicle does not use up transmission fluid. However, if the transmission is not working properly, for instance, the transmission may slip or shift slowly, or you may notice some sign of fluid leakage, the fluid level should be checked.
CAUTION: Your vehicle should not be driven with transmission cold if the fluid level is below the bottom hole on the oil level indicator and outside temperatures are above 10°C (50°F).
It is preferable to check the transmission fluid level at normal operating temperature, after approximately 32 km (20 miles) of driving. However, if necessary, you can check the fluid level without having to drive any distance to obtain a normal operating temperature if outside temperatures are above 10°C (50° F).
Transmission Hot - Operating Temperature
NOTE: If the vehicle has been operated for an extended period at high speeds or in city traffic during hot weather, or pulling a trailer, the vehicle should be turned off for about 30 minutes to allow the fluid to cool before checking.
With the vehicle on a level surface, start the engine and set the parking brake. With foot on brake pedal, move the transmission gearshift selector lever through all of the gear ranges allowing sufficient time for each position to engage. Securely latch the transmission gearshift selector lever in the park position and leave the engine running.
Wipe off the fluid level indicator cap, pull the fluid level indicator out and wipe the indicator end clean. Put the fluid level indicator back into the filler tube and make sure it is fully seated. Pull the fluid level indicator out and read the fluid level.
When checking fluid at normal operating temperature, the fluid level should be within the crosshatched area on the indicator.
Transmission Cold - Room Temperature
When the vehicle has not been driven and outside temperature is above 10° C (50°F), the fluid level should be between the holes on the indicator.
The Ford A4LD automatic transmission requires Motorcraft MERCON� Multi-Purpose ATF XT-2-QDX or -DDX, or equivalent MERCON� transmission fluid. Before adding any fluid, be sure that the correct type will be used.

Add fluid in 0.25L (1/2-pint) increments through the filler tube to bring the level to the correct area on the indicator. If an overfill occurs, excess fluid must be removed.
High or Low Fluid Level
Overfill can cause the fluid to foam and or spill out through the transmission vent (7034). Either condition could cause possible damage to internal transmission components. The excess transmission fluid must be removed by draining.
Underfill can result in transmission loss of engagement or slipping and could cause possible damage to internal transmission components. This condition is most evident in cold weather or when the vehicle is parked or being driven on a hill.
If the transmission fluid level is checked when the fluid is at room temperature the oil level indicator could indicate that fluid should be added if the indicator is misread. If fluid is added at this time, an overfill condition could result when the fluid reaches operating temperatures of 66°C-77°C (150°F-170°F) (oil level indicator hot to touch).
Transmission Fluid Condition Check
1. Make the normal fluid check according to the above procedure.
2. Observe color and odor of the fluid. It should be dark reddish, not brown or black. A burnt odor can sometimes indicate that there is an overheating condition or clutch disc or band failure.
3. Use an absorbent white paper (facial tissue, etc.) to wipe the oil level indicator. Examine the stain for evidence of solids (specks of any kind) and for coolant signs (gum or varnish on indicator).
If specks are present in the fluid or if there is evidence of coolant, the transmission fluid pan must be removed for further inspection. If coolant is found in the transmission fluid, the in-tank transmission fluid cooler (7A095) must be serviced or replaced. If fluid contamination or transmission failure is confirmed by further evidence of coolant or excessive solids in the transmission fluid pan, the transmission must be disassembled and completely cleaned and serviced. This includes cleaning the transmission and transmission cooling system.
No further checks should be performed before cleaning and servicing the transmission. During disassembly and assembly, all overhaul checks and adjustments of clearances and end play must be made.
Transmission Fluid Leakage Checks
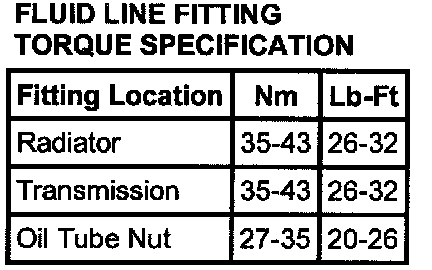
Line Fitting Torque Specifications:
Check the speedometer cable connection at the transmission. Replace the rubber 0-ring if necessary.
Leakage at the main control to case gasket (7C155) often can be stopped by tightening the attaching bolts to the proper torque. If necessary, replace the main control to case gasket.
Check the oil filler tube connection at the transmission case (7005). If leakage is found, clean area and apply sealer around tube. Check filler tube 0-ring seal for damage or omission. Install a new 0-ring seal. The filler tube bracket should align properly and be attached to the transmission or engine locations.
Check the fluid lines and fittings between the transmission and the cooler in the radiator (8005) for looseness, wear, or damage. If leakage is found, tighten the fitting to the specified torque value or replace the damaged parts.
Check the engine coolant in the radiator. If transmission fluid is present in the coolant, the cooler in the radiator is probably leaking.
The cooler can be further checked for leaks by disconnecting the lines from the internal cooler fittings. Remove radiator cap (8100). Plug one cooler inlet port and apply 345-517 kPa (50-75 psi) air pressure to the other. The internal cooler is leaking if air bubbles are present in the radiator. If the cooler is leaking and/or will not hold pressure, the cooler must be replaced.
If leakage is found at the downshift control lever and the manual control lever shaft, replace the seal.
Inspect the pipe plug on the left rear side of the transmission case. If the plug shows leakage, tighten the plug to specifications. If leakage continues, replace the plug.
Fluid leakage from the converter housing (7976) may be caused by engine fluid leakage past the rear main bearing, or from transmission case plug, or power steering fluid leakage from steering system. Be sure to determine the exact cause of the leak before starting service procedures.
Oil-soluble aniline or fluorescent dyes premixed at the rate of 2.5 ml (1/2 teaspoon) of dye powder to 0.23 liter (1/2 pint) of transmission fluid have proved helpful in locating the source of fluid leakage. Such dyes may be used to determine whether an engine oil or transmission fluid leak is present, or if the fluid in the oil cooler leaks into the engine coolant system. An ultraviolet lamp must be used to detect the fluorescent dye solution.
Fluid Leakage in Torque Converter Area
In diagnosing and correcting fluid leaks in the front pump and converter area, use the following procedures to locate the exact cause of the leakage. Leakage at the front of the transmission, evidenced by fluid around the converter housing, may have several sources. By careful observation it is possible, in many instances, to pinpoint the source of the leak before removing the transmission from the vehicle. The paths which the fluid takes to reach the bottom of the converter housing are shown.
Possible Leak Points
Torque Converter Area - Possible Leak Points:
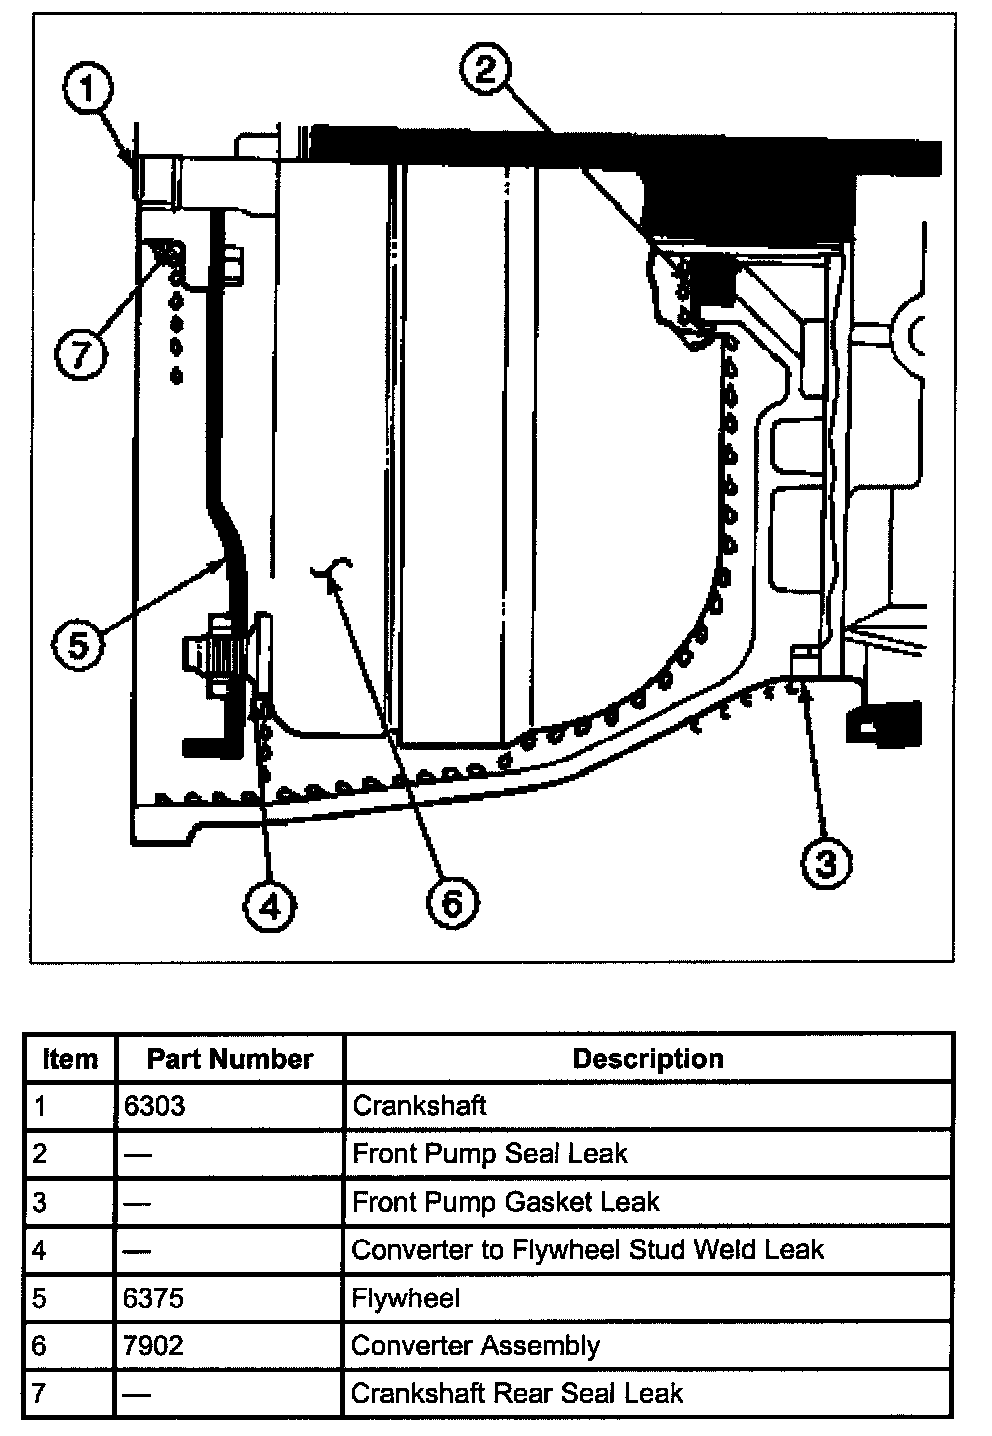
1. Fluid leaking by the front pump seal lip will tend to move along the impeller hub and onto the back of the impeller housing. Except in the case of a total seal failure, fluid leakage by the lip of the seal will be deposited on the inside of the converter housing only, near the outside diameter of the housing.
2. Fluid leakage by the outside diameter of the seal and front pump body will follow the same path which the leaks by the front pump seal follow.
3. Fluid that leaks by a front pump-to-case bolt will be deposited on the inside of the converter housing only. Fluid will not be deposited on the back of the torque converter (7902).
4. Leakage by the front pump-to-case gasket may cause fluid to seep down between the front of the case and converter housing.
5. Fluid leakage from the torque converter-to-flywheel stud weld will appear at the outside diameter of the torque converter on the back face of the flywheel (6375), and in the converter housing only near the flywheel.
Engine oil leaks are sometimes improperly diagnosed as transmission front pump seal leaks. The following areas of possible leakage should also be checked to determine if engine oil leakage is causing the problem:
a. Leakage at the valve cover or intake manifold may allow oil to flow over the converter housing or seep down between the converter housing and cylinder block, causing oil to be present in or at the bottom of the converter housing.
b. Oil galley plug leaks will allow oil to flow down the rear face of the cylinder block to the bottom of the converter housing.
c. Leakage by the crankshaft seal will work back to the flywheel, and then into the converter housing.
6. Fluid leakage from other areas, such as the power steering system forward of the transmission, could cause fluid to be present around the converter housing due to blowback or road draft. The following procedures should be used to determine the cause of the leakage before any repairs are made.
a. Remove the transmission fluid level indicator and note the color of the fluid. Original factory-fill fluid is dyed red, to aid in determining if leakage is from the engine or transmission. Unless a considerable amount of makeup fluid has been added, or the fluid has been changed, the color should assist in pinpointing the leak. Since road draft may cause leaking power steering fluid to be present on the transmission, this leakage, if present, should be eliminated before checking the transmission for fluid leakage.
b. Remove the transmission housing cover. Clean off any fluid from the top and bottom of the converter housing, front of the transmission case, and rear face of the engine and oil pan. Clean the converter area by washing with a suitable nonflammable solvent, and blow dry with compressed air.
c. Wash out the converter housing and the front of the flywheel. The converter housing may be washed out using cleaning solvent and a squirt-type oil can. Blow all washed areas dry with compressed air.
d. Start and run the engine until the transmission reaches its normal operating temperature. Observe the back of the cylinder block and top of the converter housing for evidence of oil leakage. Raise the vehicle on a hoist and run the engine at fast idle, then at engine idle, occasionally shifting to the drive and reverse ranges to increase pressure within the transmission. Observe the front of the flywheel, back of the cylinder block (in as far as possible), and inside the converter housing and front of the transmission case. Run the engine until fluid leakage is evident and the probable source of leakage can be determined.
Transmission Fluid Cooler Flow Check
NOTE: Before performing this test, the fluid level and line pressure must be within specifications.
NOTE: Before performing this test, the transmission cable linkage adjustment must be within specifications.
1. Remove transmission fluid level indicator from filler tube.
2. Place funnel in filler tube.
3. Raise vehicle on a hoist and place suitable safety stands under vehicle.
4. Remove cooler return line (rear fitting) from fitting on transmission case.
5. Connect one end of a hose to cooler return line and route other end of hose up to a point where it can be inserted into funnel at filler tube.
6. Remove safety stands and lower vehicle. Insert end of hose into funnel.
7. Start engine and run at idle with transmission in NEUTRAL position.
8. When fluid flowing from hose is solid, a liberal amount of fluid should be observed. "Liberal" is described as about 0.47L (1(2 quart) delivered in 30 seconds. If liberal flow is observed, test is completed.
9. If flow is not liberal, stop engine. Disconnect hose from cooler return line and connect it to converter out line fitting (front fitting) on transmission case.
10. Repeat steps 7 and 8. If flow is now liberal, refer to appropriate section for diagnosis of transmission fluid cooler. If flow is not liberal, service pump or converter assembly.