Brake Pad: Service and Repair
Front Brake Component View:
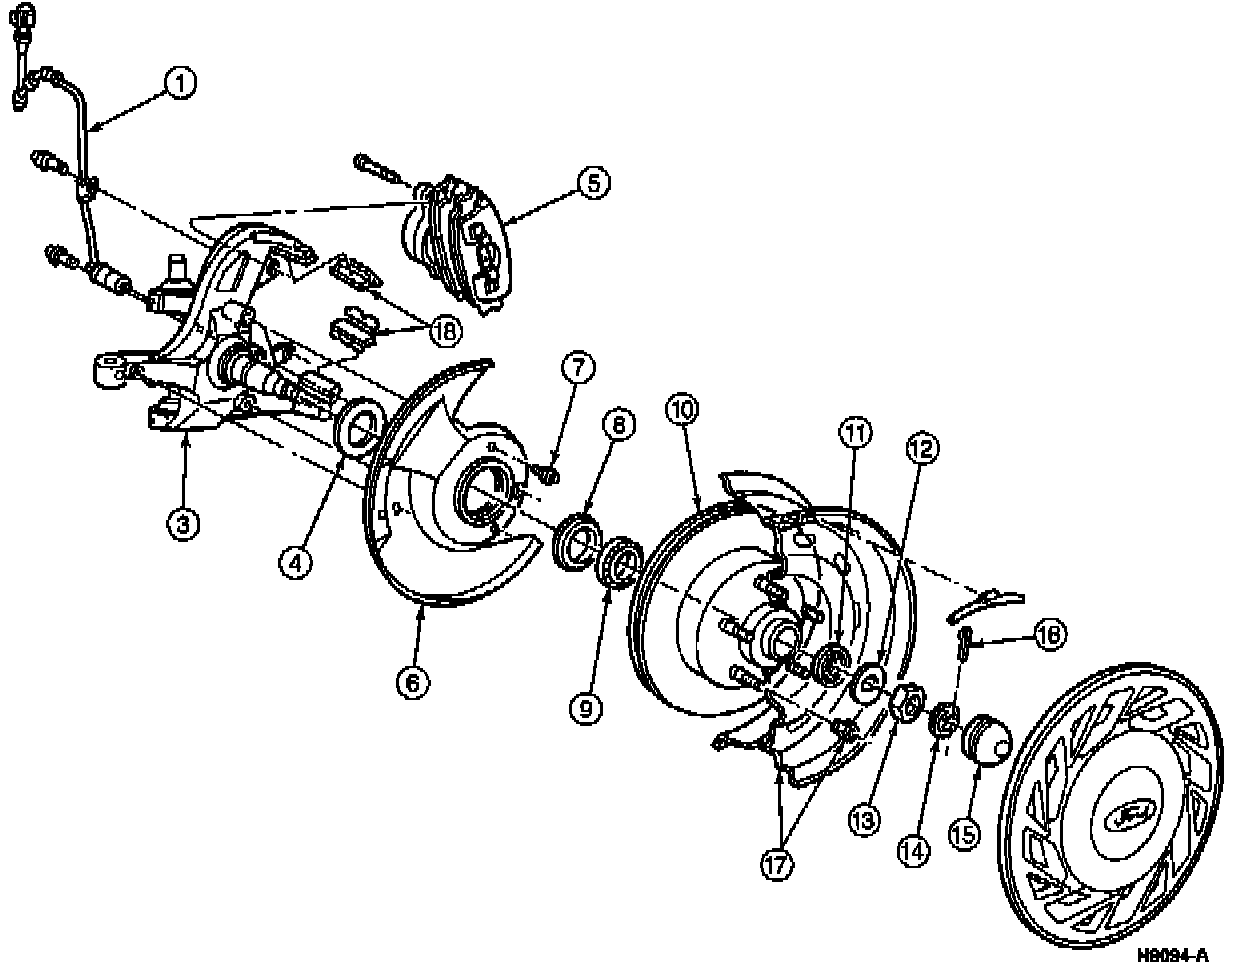
ITEM PART DESCRIPTION
NUMBER
1 2C204 Front Brake Antilock Sensor
2 N611172-S2 Screw 9.2-12.8 Nm
(7.2-9.4 ft lb)
3 3105 Front Wheel Spindle
4 2B160 Front Brake Splash Shield Gasket
5 2B120 Front Disc Brake Caliper
6 2K004 Front Disc Brake Rotor Shield
7 N611171-S2 Screw 9-13 Nm
(6.6-9.6 ft lb)
8 1190 Wheel Hub Grease Seal
9 1201 Front Wheel Bearing Inner Cone and
Roller
11 1216 Front Wheel Bearing Outer Cone and
Roller
12 1195 Front Wheel Outer Bearing Retainer
Washer
13 374504-S100 Nut 3/4-16 23-34 Nm
(17-25 ft lb)
14 390622-S Nut Retainer
15 1130 Wheel Hub Cap
16 642569-S36 Cotter Pin
17 1012 Wheel Hub Bolt Nut
18 2C150 Caliper Support Pin Assembly
NOTE:
- Replace brake shoes and linings as follows when the lining is worn to a minimum thickness of 1.5mm (1/16 inch) above the shoe plate.
- Always replace all shoe and lining assemblies on an axle. Never service one wheel only.
REMOVAL
1. To avoid fluid overflow when the caliper piston is pressed into the caliper cylinder bores, siphon or dip part of the brake fluid out of the brake master cylinder reservoir. Discard the removed fluid.
NOTE: Do not use a screwdriver or similar tool to pry wheel cylinder piston away from the front disc brake rotor.
2. Raise the vehicle and install safety stands. Remove a front wheel and tire assembly.
3. Remove caliper retaining bolts.
4. Remove the front disc brake caliper from the front disc brake rotor. Remove the front disc brake caliper by lifting it away from the wheel end. A screwdriver may be required to pry up lightly on the outer shoe clip to free the caliper from the clip.
CAUTION: Do not let the front disc brake caliper hang by the front brake hose. The front brake hose could become stretched or twisted which can cause the front brake hose to leak or rupture, resulting in failure.
5. If the front disc brake caliper is to be removed for service, remove the front brake hose from the front disc brake caliper. Plug the end of the front brake hose to prevent fluid loss or entry of air into the system. If the front disc brake caliper is not going to be removed, wire it up to the vehicle to avoid damage to the front brake hose.
6. Remove the inner and outer linings by sliding them out from beneath the brake shoe hold down springs (2068). Remove the upper anti-rattle clip by gradually pressing against the top of the clip to rotate it off the knuckle (use the free hand to catch the clip when it springs off the knuckle). Do the same for the lower anti-rattle clip.
INSTALLATION
1. Lubricate the knuckle upper and lower abutments with Disc Brake Caliper Slide Grease D7AZ-19590-A (ESA-M1C172-A) or equivalent to prevent corrosion build-up between the brake shoe hold down springs and the knuckle.
2. Install the brake shoe hold down springs by placing the lower edge of the clip beneath the abutment surface of the knuckle and rotating the clip up into position. Press against the slide surfaces of the clip to make sure the clip is tightly seated on the knuckle.
3. Position the inner shoe against the front disc brake rotor so that it is encaptured by the brake shoe hold down springs. To do this, slide the shoe past the knuckle tabs and wedge one end into position against the brake shoe hold down spring. While lifting the top spring portion of the other brake shoe hold down spring, slide the pad onto the abutment and against the front disc brake rotor.
4. Install the outer shoe in the same manner.
5. Using an 8-inch C-clamp and a block of wood (or equivalent) to protect the piston face, bottom the caliper piston in the caliper bore to provide adequate clearance when installing the front disc brake caliper.
CAUTION: Be careful not to scrape the slide pin boots across the knuckle tabs as this could damage the pin assemblies which could eventually result in corrosion on the pin, impeding slide forces and causing a brake pull.
6. Install the front disc brake caliper by pulling back the slide pins and placing the front disc brake caliper over the pads and sliding it down into the outer brake shoe clip, making sure the tips of the brake shoe clip are seated in the retention holes of the front disc brake caliper.
7. Install the caliper mounting bolts to secure the front disc brake caliper in place. Tighten the bolts to 30-36 Nm (22-27 ft lb).
8. If removed, install the front brake hose to the front disc brake caliper and perform brake bleeding procedure.
9. Install the wheel and tire assembly. Tighten the lugnuts to 135 Nm (100 ft lb).
NOTE: Do not move the vehicle until a firm brake pedal application is obtained.
10. Lower the vehicle, check the brake fluid level and fill as necessary. Check brakes for proper operation.