Compressor Fitting HVAC: Service and Repair
REMOVAL1. Recover the refrigerant. Refrigerant Recovery
Note: Cap or plug all open refrigerant line fittings to prevent entry of dirt and moisture.
2. Disconnect the battery ground cable.
WARNING: TO AVOID ACCIDENTAL DEPLOYMENT AND POSSIBLE INJURY, THE AIR BAG SYSTEM BACKUP POWER SUPPLY MUST BE DEPLETED BEFORE REPAIRING ANY CLIMATE CONTROL COMPONENTS. TO DEPLETE THE BACKUP POWER SUPPLY, DISCONNECT THE BATTERY TO STARTER CABLE AND WAIT ONE MINUTE.
3. Remove the engine air cleaner and the air cleaner outlet tube.

4. Disconnect the A/C pressure cut-off switch electrical connector.

5. Move the compressor discharge line isolator.
a. Remove the screw.
b. Move the compressor discharge line isolator.

6. Disconnect the compressor suction line.
Note: Use a wrench on each side of the fitting to prevent damage to the A/C fitting.

7. Disconnect the compressor discharge line.
Note: Use a wrench on each side of the fitting to prevent damage to the A/C fitting.

8. Remove the A/C manifold and tube.
a. Loosen the screw.
b. Remove the A/C manifold and tube.
INSTALLATION
1. Add new, clean Motorcraft refrigerant oil YN-12b or equivalent meeting Ford specification WSH-M1C231-B.
Note: Whenever replacing an A/C system component or refrigerant line, new, clean refrigerant oil must be added.
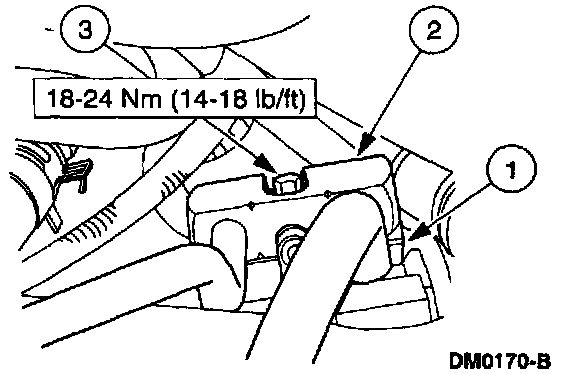
2. Install the A/C manifold and tube.
a. Install two new green O-rings.
Note: The green O-ring(s) cannot be seen. They are located in the connection(s).
b. Install the A/C manifold and tube.
c. Tighten the screw.

3. Connect the compressor discharge line.
a. Install a new green O-ring.
^ Lubricate with clean Motorcraft YN-12b refrigerant oil or equivalent meeting Ford specification WSH-M1C231-B.
Note: The green O-ring(s) cannot be seen. They are located in the connection(s).
b. Connect the compressor-to-condenser core fitting.
Note: Use a wrench on each side of the fitting to prevent damage to the A/C fitting.

4. Connect the compressor suction line.
a. Install a new green O-ring.
^ Lubricate with clean Motorcraft YN-12b refrigerant oil or equivalent meeting Ford specification WSH-M1C231-B.
Note: The green O-ring(s) cannot be seen. They are located in the connection(s).
b. Connect the compressor suction line.
Note: Use a wrench on each side of the fitting to prevent damage to the A/C fitting.

5. Install the compressor discharge line isolator.
a. Install the compressor discharge line isolator.
b. Install the screw.
6. Connect the A/C pressure cut-off switch electrical connector.
7. Install the engine air cleaner and the air cleaner outlet tube.
8. Replace the suction accumulator/drier.
Note: If a refrigerant line is being replaced due to failure, the suction accumulator/drier must be replaced at the same time.
9. Reconnect the battery ground cable.
Note: When the battery has been disconnected and reconnected, some abnormal drive symptoms may occur while the powertrain control module relearns its adaptive strategy. The vehicle may need to be driven 16 km (10 miles) or more to relearn the strategy.
10. Evacuate, charge, and leak test the A/C system. Evacuation
11. Check the A/C system for proper operation.