Windshield Glass

Special Tool(s)
REMOVAL
1. Remove the inside rear view mirror.
2. Remove the cowl top vent panel.
3. Remove the headliner.

4. Pry up the end of the windshield outside moulding.
- Twist and pull to remove.

5. Use Interior Auto Glass Cut-Out Knife Kit to cut the Urethane Sealant and remove the windshield glass.
WARNING: TO PREVENT GLASS SPLINTERS FROM ENTERING EYES OR CUTTING HANDS, WEAR SAFETY GLASSES AND HEAVY GLOVES WHEN CUTTING GLASS FROM THE VEHICLE.
NOTE: Lubricate the Urethane Sealant where it meets the glass with water to aid Interior Auto Glass Cut-Out Knife Kit when cutting the urethane sealant.

6. Insert inflatable pump bag at the top of the windshield glass. Gently push the windshield glass outward from the inside of the vehicle to ensure the Urethane Sealant seal is broken.

7. Use a razor blade knife to cut any remaining urethane that is still holding the windshield glass and remove the windshield glass.

8. Trim the remaining urethane on the pinch weld to the specified thickness.
- Apply Urethane Metal Primer to any exposed metal on the pinch weld. Allow ten minutes drying time.
- Add Urethane Sealant to bring the remaining Urethane Sealant to the specified thickness.
- If reusing the windshield glass, clean off all of the old Urethane Sealant with an alcohol-free glass cleaner.
INSTALLATION

1. Dry set the windshield glass.
- Position the windshield glass in the pinch weld.
- Align the windshield glass from the bottom center point of the glass out to the two spacers at the bottom of the pinch weld.
- Align the gap of the windshield glass at the top and sides of the back window glass edge to pinch the weld edge.
- Mark the windshield glass and the body when aligned as specified.
- Remove the windshield glass from the pinch weld and clean the back window glass inside perimeter with an alcohol-free cleaner and wipe with a clean cloth.
NOTE: Keep glass and body surfaces free of dirt, water, and oil. Do not touch coated surfaces with your hands.

2. Apply Urethane Glass Prep and repeat the application.
- Apply Urethane Glass Prep on the windshield glass directly inside the blackout ceramic coating.
- Immediately wipe off the Urethane Glass Prep.
- Repeat the Urethane Glass Prep application.
NOTE: Immediately wipe off the Urethane Glass prep after application because it flash dries.
3. Use the supplied wool applicator to apply Urethane Glass Primer.
- Apply Urethane Glass Primer around the entire outer edge of the inside of the windshield glass directly inside the blackout ceramic coating.
- Allow ten minutes drying time.
WARNING: IF PRIMER GETS ON YOUR HANDS, REMOVE IT IMMEDIATELY.
CAUTION: Do not apply Urethane Glass Primer inside of the blackout ceramic coating. The primer will permanently discolor the windshield glass.

4. Install Norton Foam Sealants 565 Black Foam Tape.
- Start at the bottom of the windshield glass and install the tape all the way around the inside of the perimeter to specification.
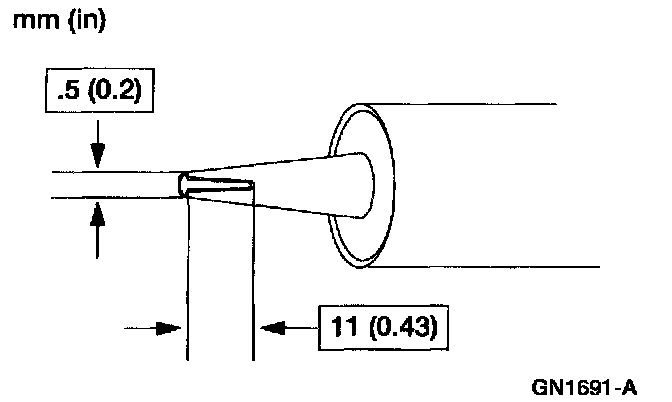
5. Cut the nozzle of the urethane sealant canister to specification.

6. Install the windshield outside moulding around the top and sides of the windshield glass then tape to hold in place.
1 Align the marks on the windshield outside moulding.
2 Install the top part of the windshield outside moulding.
3 Install the corners of the windshield outside moulding.
4 Install the sides of the windshield outside moulding from the top down.
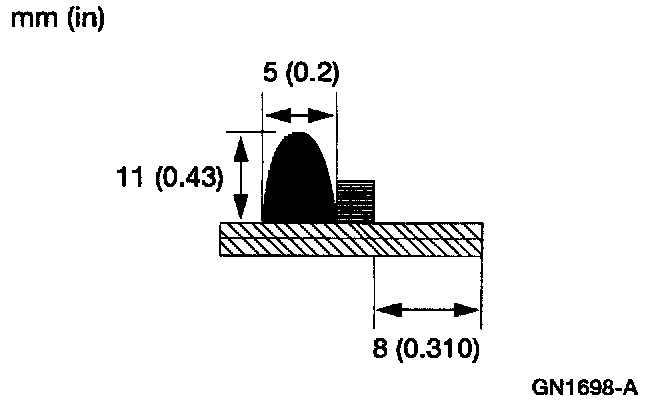
7. Apply a bead of Urethane Sealant to the windshield glass.
CAUTION:
- Use only Urethane Sealant, to repair water and air leaks in the urethane sealant.
- After replacing the urethane installed glass, the vehicle should not be driven until the urethane has cured. The curing times at temperatures above 13°C (55°F) and relative humidity above 50% curing time is 12-24 hours (decreasing at higher temperatures and lower humidities). Refer to the detailed instructions provided by the manufacturer in the kit. Inadequate curing of the urethane may adversely affect the strength of the urethane sealant bond.
8. Use the bottom spacers and alignment marks to install the windshield glass.
CAUTION: Open the windows to prevent the windshield glass from being pushed out by air pressure if a door is closed.
NOTE: Ensure that the Urethane Metal Primer is clean and dry.
9. After the Urethane Sealant has cured, check for water leaks and add Urethane Sealant where needed.
CAUTION:
- Use only Urethane Sealant to repair water and air leaks in the urethane sealant.
- After replacing the urethane installed glass, the vehicle should not be driven until the urethane has cured. The curing times at temperatures above 13°C (55°F) and relative humidity above 50% curing time is 12-24 hours (decreasing at higher temperatures and lower humidities). Refer to the detailed instructions provided by the manufacturer in the kit. Inadequate curing of the urethane may adversely affect the strength of the urethane sealant bond.
10. Install the headliner.
11. Install the cowl top vent panel.
12. Install the inside rear view mirror.