Connecting Rod: Service and Repair

The connecting rod bearings are a selective fit to provide the necessary clearance.
REMOVAL
1. Disconnect battery ground cable.
2. Drain engine crankcase.
3. Remove spark plugs.
4. Raise vehicle on hoist.
5. Remove oil pan.
6. Remove oil pump if required.
7. Turn crankshaft until connecting rod from which the connecting rod bearings are to be removed is at lowest point of travel.
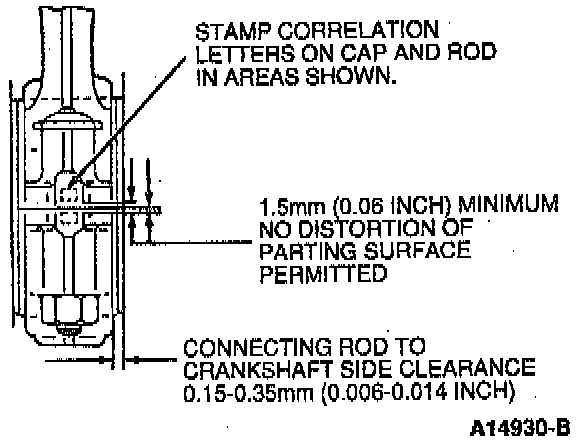
8. Loosen retaining nuts and remove from connecting rod cap. Place retaining nuts so that they may be reinstalled on the same connecting rod stud.
9. Tap connecting rod cap with a plastic mallet to separate from connecting rod. Carefully remove connecting rod cap from crankshaft. If lower connecting rod bearing remained on crankshaft carefully grasp both sides and remove (oil acts as an adhesive between two precision fitted components). Use extreme care to not scratch crankshaft journal.
10. Install a 50 mm (2 inch) piece of 3/8-inch fuel hose (or similar protector) on the connecting rod studs to protect crankshaft journal.
11. Remove upper connecting rod bearing. Push piston up enough to grasp connecting rod bearing. If connecting rod bearing remained on crankshaft, allow connecting rod bearing to remain in contact with crankshaft journal and carefully rotate to bottom side of journal. Using care, remove connecting rod bearing from crankshaft.
12. Inspect connecting rod bearings, crankshaft journal and connecting rod bearing surfaces for damage or wear.
INSTALLATION
1. Thoroughly clean connecting rod bearings, connecting rod cap and connecting rod.
CAUTION: Contaminants allowed to remain on the connecting rod cap or connecting rod bearing can distort the connecting rod bearing or damage the crankshaft journals which may result in engine failure.
NOTE: Lightly oil all bolt and stud bolt threads before installation with clean engine oil meeting Ford specification WSS-M2C153-F.
2. Lubricate crankshaft journal with Engine Assembly Lubricant or equivalent meeting Ford specification. Make sure the entire journal is well lubricated.
Piston & Rod Assembly:
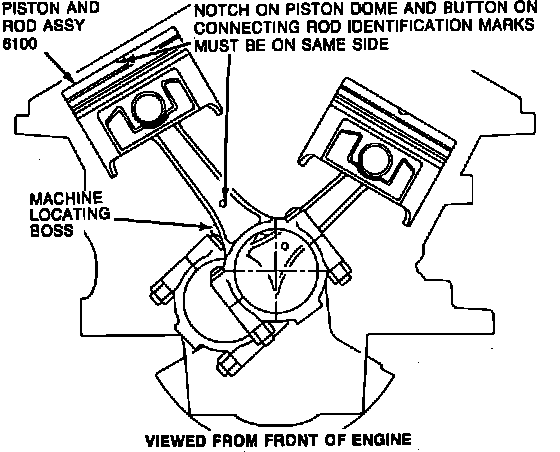
3. Install upper connecting rod bearing in the connecting rod and pull the connecting rod down until it seats on the crankshaft. When installing connecting rod bearing, make sure tab on connecting rod bearing engages slot in connecting rod and that connecting rod bearing is fully seated in connecting rod.
4. Install lower connecting rod bearing in connecting rod cap and lubricate bearing surface with Engine Assembly Lubricant.
5. Install connecting rod cap and the retaining nuts. Install caps with code letters on same side as code letters on connecting rods. Tighten nuts to 31-39 Nm (23-28 ft. lbs.).
6. Install oil pump if removed. Align oil pump intermediate shaft with camshaft position sensor housing shaft, then align oil pump with dowels and install retaining bolt. Tighten to 40-55 Nm (30-40 ft. lbs.).
7. Inspect and clean oil pump screen cover and tube.
8. Install oil pan.
9. Lower vehicle.
10. Install spark plugs.
11. Fill crankcase with the correct amount of engine oil.
12. Connect battery ground cable.
13. Disconnect engine control sensor wiring from ignition coil. Crank engine for 15 seconds to supply oil to oil pump and bearing surfaces.
14. Connect ignition coil.
15. Start engine and check for coolant, engine, oil and exhaust leaks.