Canister Purge Control Valve: Testing and Inspection
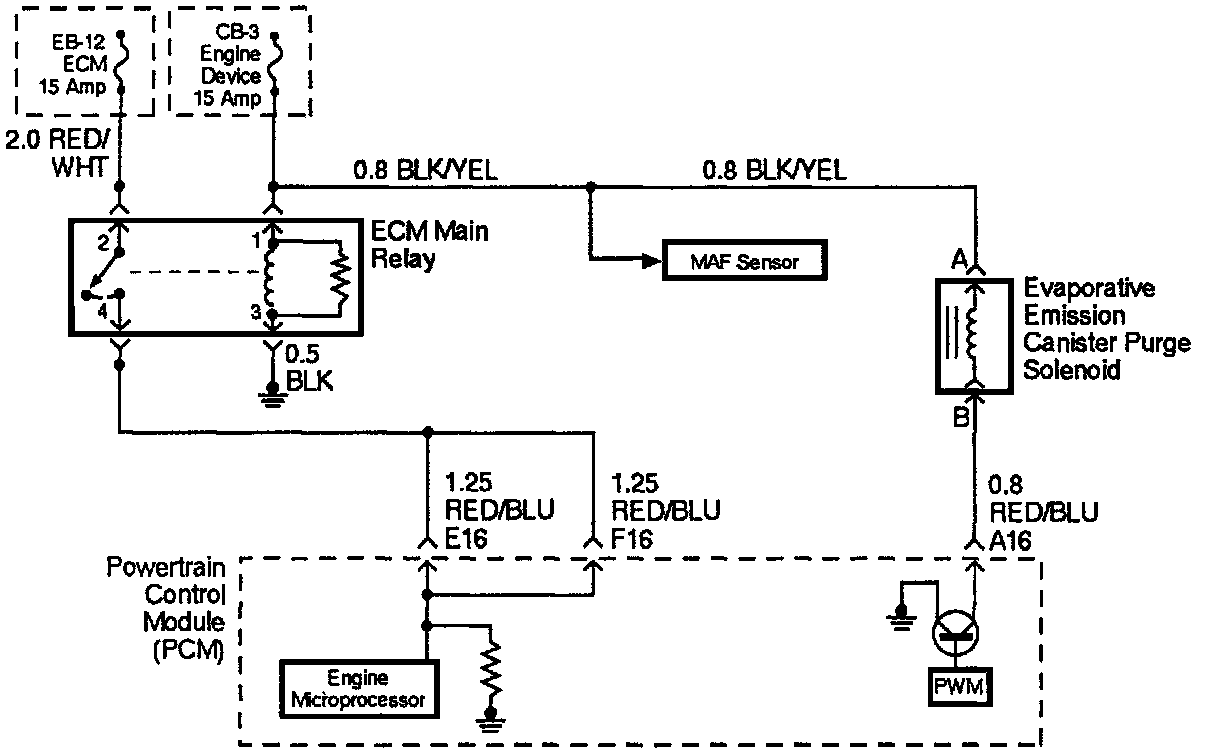
Circuit Description
Canister purge is controlled by a solenoid valve that allows manifold vacuum to purge the canister. The Powertrain Control Module ([1][2]PCM) supplies a ground to energize the solenoid valve (purge "ON"). The EVAP purge solenoid control is turned "ON" and "OFF" several times a second. The duty cycle (pulse width or "ON" time) is determined by Engine operating conditions including load, throttle position, coolant temperature and ambient temperature. The duty cycle is calculated by the PCM and the purge solenoid is enabled when the appropriate conditions have been met:
- The Engine run time after start is more than 60 seconds.
- The Engine coolant temperature is above 30°C (86°F).
- The fuel control system is operating in the closed-loop mode.
Diagnostic Aids
- Make a visual check of vacuum hoses.
- Check the throttle body for possible cracked or plugged vacuum block.
- Check the malfunction indicator lamp for a possible mechanical problem.
Test Description
Number(s) below refer to the step number(s) in the Diagnostic Test:
1. Check to see if the solenoid is open or closed. The solenoid is normally de-energized in this step, so it should be closed.
2. This step checks to determine if the solenoid was open due to an electrical circuit problem or a defective solenoid.
3. This should normally energize the solenoid, opening the valve and allowing the vacuum to drop (purge "ON").
Diagnostic Test
1. a. Ignition "OFF".
b. Ignition "ON", Engine "OFF".
c. At the throttle body, disconnect the hose that goes to the pump solenoid.
d. Using a hand vacuum pump with an attached vacuum gauge J 23738-A, apply vacuum (10" Hg or 34 kPa) to the solenoid.
e. Does the solenoid hold vacuum?
[YES] Go to Step 3.
[NO] Go to Step 2.
2. a. Disconnect the solenoid electrical connector.
b. As in Step 1, apply vacuum (10" Hg or 34 kPa) to the solenoid.
c. Does the solenoid hold vacuum?
[YES] Go to Step 4.
[NO] Go to Step 7.
3. a. At the throttle body, put a cap over the vacuum port where the hose was disconnected for testing. This is to prevent a vacuum leak when the Engine is started.
b. Ignition "OFF".
c. Install the Scan Tool.
d. Apply vacuum to the purge solenoid with the hand vacuum pump.
e. Start the Engine, run at 2500 RPM.
f. Using the Scan Tool, select FO: Engine, F4: Misc. Tests, FO: Engine Outputs, F3: EVAP Purge.
g. Turn the purge solenoid "ON".
h. Did the vacuum drop when the purge was turned on?
[YES] Go to Step 8.
[NO] Go to Step 9.
4. a. Check for a short to ground in the RED/BLU wire.
b. Is there a short?
[YES] Go to Step 5.
[NO] Go to Step 6.
5. a. Repair the short to ground.
b. Is the action complete?
[YES] Verify repair.
6. a. Replace the [1][2]PCM.
IMPORTANT: The replacement [1][2]PCM must be programmed.
B. Is the action complete?
[YES] Verify repair.
7. a. Replace the faulty purge solenoid.
b. Is the action complete?
[YES] Verify repair.
8. a. Turn the ignition "OFF".
b. At the throttle body, install a vacuum gauge where the hose from the purge solenoid was disconnected for testing.
c. Start the Engine.
d. Stabilize the Engine speed at about 2500 RPM.
e. Momentarily snap the throttle open and let it return to idle.
f. Is there approximately 10" Hg (34 kPa) of vacuum available at the EVAP emission canister purge solenoid?
[YES] No problem found in the EVAP Emission Canister Purge Valve Check.
[NO] Refer to Diagnostic Aids.
9. a. Disconnect the solenoid electrical connector.
b. Connect a test lamp between the harness terminals.
c. Does the test lamp light?
[YES] Go to Step 7.
[NO] Go to Step 10.
10. a. Probe terminal A and terminal B with a test lamp to ground.
b. Does the test lamp light on both terminals?
[YES] Go to Step 11.
[NO] Go to Step 12.
11. a. Repair the short to voltage in the RED/BLU wire.
b. Is the action complete?
[YES] Verify repair.
12. Does on of the terminals light the test lamp?
[YES] Go to Step 13.
[NO] Go to Step 14.
13. a. Check for an open in the RED/BLU wire between the purge solenoid and the [1][2]PCM.
b. Was there an open circuit?
[YES] Go to Step 15.
[NO] Go to Step 6
14. a. Repair the open in the BLK/YEL wire.
b. Is the action complete?
[YES] Verify repair.
15. a. Repair the open RED/BLU wire.
b. Is the action complete?
[YES] Verify repair.