 |
absggw00000021
HYDRAULIC LASH ADJUSTER (HLA) REMOVAL/INSTALLATION [F2]
id011094804100
1. Remove the timing belt. (See TIMING BELT REMOVAL/INSTALLATION [F2].)
2. Remove the cylinder head cover. (See CYLINDER HEAD GASKET REPLACEMENT [F2].)
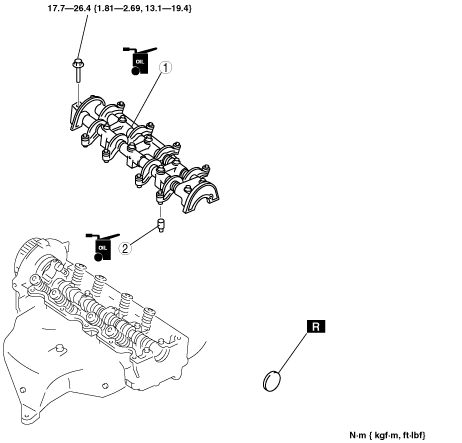
3. Remove in the order indicated in the table.
4. Install in the reverse order of removal.
5. Inspect the engine oil level. (See ENGINE OIL LEVEL INSPECTION [F2].)
6. Start the engine and
7. Inspect the HLA troubleshooting. (See Hydraulic Lash Adjuster (HLA) Troubleshooting.)
absggw00000021
|
|
1
|
Rocker arm component
|
|
2
|
Hydraulic lash adjuster (HLA)
|
Rocker Arm Component Removal Note
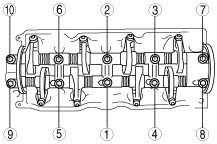
1. Loosen the bolts a few turns in the order shown.
bf2eze00000009
|
2. Identify the rocker arm and shaft assembly parts so that they can be reinstalled in the same locations from which they were removed.
3. Identify the rocker arm and shaft assembly parts so that they can be reinstalled in the same locations from which they were removed.
Hydraulic Lash Adjuster (HLA) Installation Note
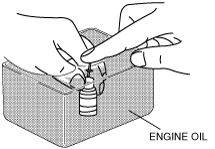
1. Place each HLA in a container filled with clean engine oil.
2. Bleed the air from the HLA by inserting a pin into the plunger hole and pressing the plunger until it no longer moves.
absggw00000022
|
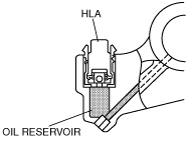
3. Pour engine oil into the oil reservoir in the rocker arm.
absggw00000023
|
4. Apply clean engine oil to HLA O-ring.
Rocker Arm Component Installation Note
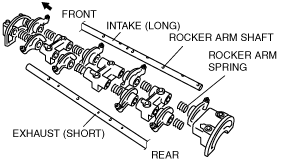
1. Assemble the rocker arms and shaft assembly as shown in the figure.
bf2eze00000035
|
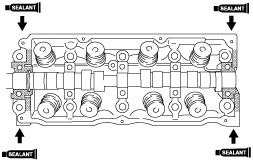
2. Apply silicone sealant to the shaded areas of the cylinder head as shown.
absggw00000024
|
3. Install the rocker arm component.
4. Tighten the bolts a few turns in the order shown.
absggw00000025
|
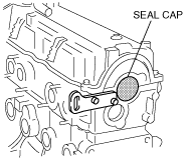
5. Tap in the new seal cap using a plastic hammer.
absggw00000026
|
Hydraulic Lash Adjuster (HLA) Troubleshooting
|
Problem |
Possible Cause |
Action |
|---|---|---|
|
1. Noise when engine is started immediately after oil is changed.
|
Oil leakage in oil passage or in HLA
|
Run engine at 2,000—3,000 rpm. If noise stops within 20 min*, HLA is normal. If not, replace HLA.
|
|
2. Noise when engine is started after sitting one day or more.
|
||
|
3. Noise when engine is started after new HLA is installed.
|
Oil leakage in HLA
|
|
|
4. Noise continues more than 10 min.
|
Insufficient oil pressure
|
Verify oil pressure. If lower than specification, verify for cause. (See OIL PRESSURE INSPECTION [F2].)
|
|
Faulty HLA
|
Press down HLA by hand. If it does not move, HLA is normal. If it moves, replace HLA.
Measure valve clearance.
(See Valve clearance inspection.)
|
|
|
5. Noise during idle after high speed running.
|
Incorrect oil amount
|
Verify oil level.
|
|
Deteriorated oil
|
Replace new engine oil.
(See ENGINE OIL REPLACEMENT [F2].)
|
Valve clearance inspection
1. Remove the cylinder head cover. (See CYLINDER HEAD GASKET REPLACEMENT [F2].)
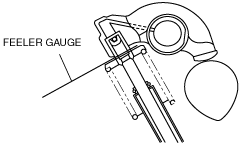
2. Measure valve clearance.
absggw00000027
|
3. Install the cylinder head cover. (See CYLINDER HEAD GASKET REPLACEMENT [F2].)