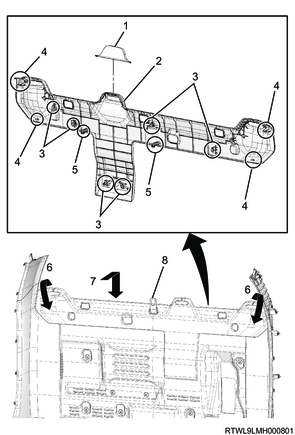
1. Component views
Crew cab
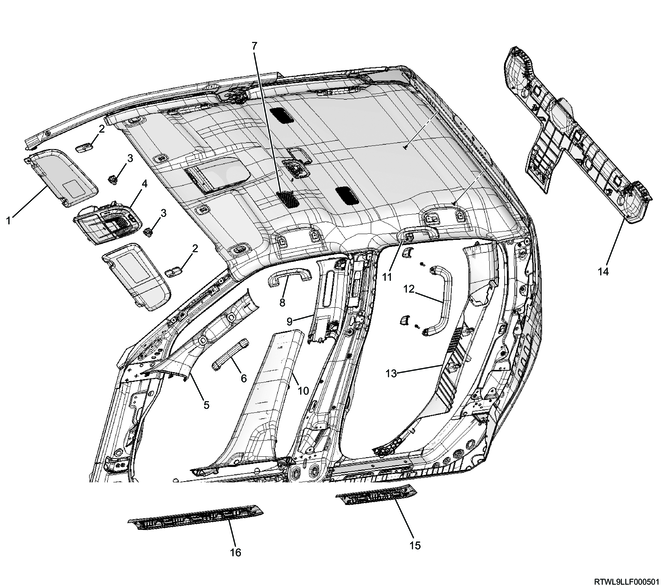
Part name
- Sun visor
- Sun visor cover
- Sun visor holder
- Map light
- Front pillar trim cover
- Assist grip
- Dome light
- Assist grip
- Center pillar upper trim cover
- Center pillar lower trim cover
- Assist grip with coat hook
- Assist grip
- Rear pillar trim cover
- Rear end upper trim cover
- Rear sill plate
- Front sill plate
2. Head lining installation
1) Connect the connector to the head lining.
2) Install the head lining to vehicle.
3) Install the sun visor holder to the head lining.
Legend
- Sun visor holder
4) Install the clips to the head lining.

Legend
- Head lining
- Clip
3. Sun visor installation
1) For models with mirror lights, connect the connector to the sun visor.
2) Install the sun visor to the head lining.
Legend
- Screw
- Sun visor
3) Install the sun visor cover to the sun visor bracket.
Legend
- Claw section
- Sun visor cover
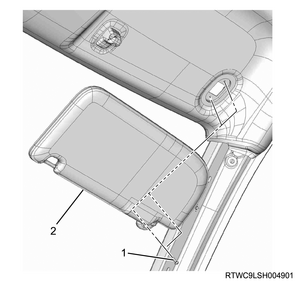
4. Map light installation
1) Connect the connector to the map light.
2) Install the map light to the head lining.
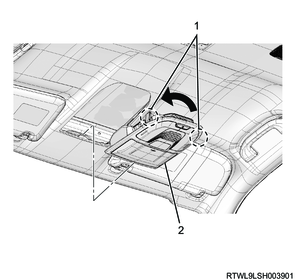
Legend
- Claw section
- Map light
5. Dome light installation
1) Connect the connector to the dome light.
2) Install the dome light to the head lining.
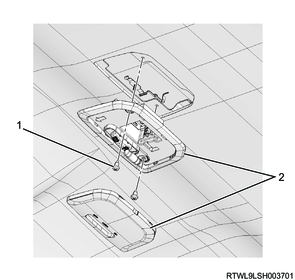
Legend
- Screw
- Dome light
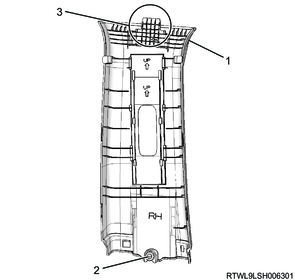
6. Rear pillar trim cover installation
1) Install the rear pillar upper trim cover to the rear pillar.
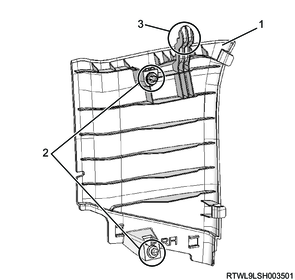
Legend
- Rear pillar upper trim cover
- Clip
- Hook
2) Install the rear pillar lower trim cover to the rear pillar.
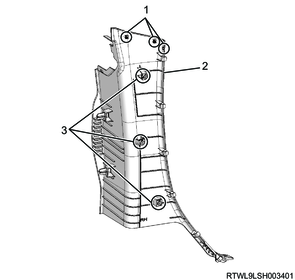
Legend
- Claw section
- Rear pillar lower trim cover
- Clip
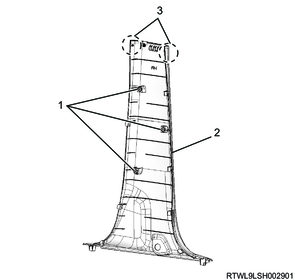
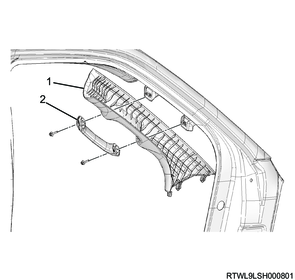
7. Rear end upper trim cover installation
1) Install the rear end upper trim cover to the body panel.
Caution
- For models with center top tethers (bracket type), install while bending the end of the rear end upper trim to an extent that it will not get damaged.
Models with center top tethers (bracket type)
Legend
- Seat belt guide cover
- Rear end upper trim cover
- Clip
- Claw section
- Hook
- Bend the end of the rear end upper trim cover.
- Install the rear end upper trim.
- Center top tether (Bracket type)
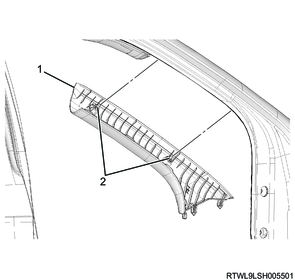
Models without center top tethers (bracket type)

Legend
- Seat belt guide cover
- Rear end upper trim cover
- Clip
- Claw section
- Hook
8. Center pillar upper trim cover installation
1) Install the center pillar upper trim cover to the center pillar.
Models with assist grips

Legend
- Center pillar upper trim cover
- Clip
- Hook
Models without assist grips
Legend
- Center pillar upper trim cover
- Clip
- Hook
2) Install the assist grip to the center pillar.
Tightening torque: 3.8 N・m { 0.39 kgf・m / 33.6 lb・in }
Models with assist grips
Legend
- Assist grip
- Cover
3) Install the seat belt upper anchor bolt to the center pillar.
Tightening torque: 46 N・m { 4.7 kgf・m / 34 lb・ft }

Legend
- Seat belt upper anchor bolt
- Adjuster cover
4) Install the adjuster cover to the seat belt upper anchor bolt.
9. Center pillar lower trim cover installation
1) Install the center pillar lower trim cover to the center pillar.
Legend
- Clip
- Center pillar lower trim cover
- Claw section
2) Install the seat belt lower anchor bolt to the center pillar.
Tightening torque: 46 N・m { 4.7 kgf・m / 34 lb・ft }
Legend
- Seat belt lower anchor bolt
10. Rear door finisher installation
1) Install the rear door finisher to the body.
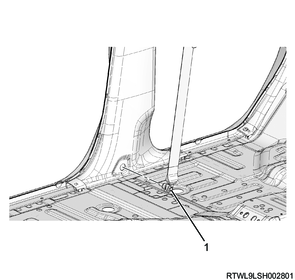
11. Rear sill plate installation
1) Install the rear sill plate to the floor.
Legend
- Rear sill plate
- Clip
- Claw section
12. Front pillar trim cover installation
1. Models with assist grips
1) Install the front pillar trim cover to the front pillar.
2) Install the assist grip to the front pillar trim cover.
Tightening torque: 3.8 N・m { 0.4 kgf・m / 34 lb・in }
Legend
- Front pillar trim cover
- Assist grip
2. Models without assist grips
1) Install the assist grip to the front pillar trim cover.
Legend
- Front pillar trim cover
- Clip
13. Front door finisher installation
1) Install the front door finisher to the body.
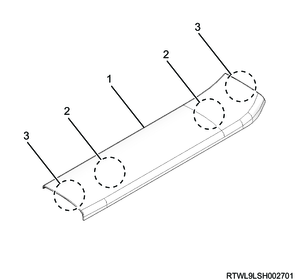
14. Front sill plate installation
Regular cab, crew cab

Legend
- Front sill plate
- Clip
- Claw section
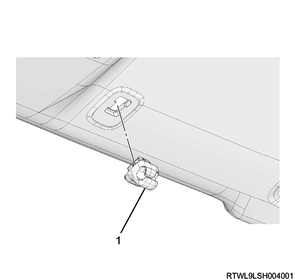
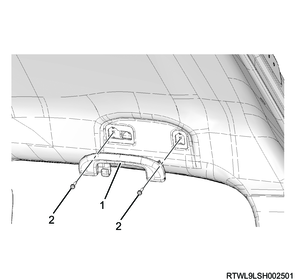
15. Hole cover installation
1. Models without assist grips
1) Install the hole cover to the head lining.
Legend
- Hole cover
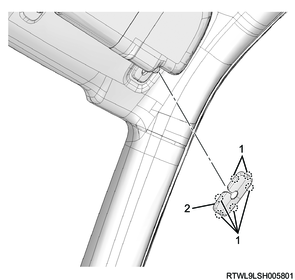
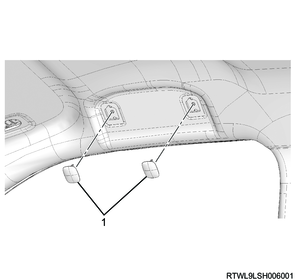
16. Assist grip installation
1. Models with assist grips
1) Install the assist grip to the head lining.
Front side

Legend
- Assist grip
- Screw
Rear side
Legend
- Assist grip
- Screw
17. Steering wheel installation
1) Install the steering wheel to the steering shaft according to the alignment marks placed during removal.
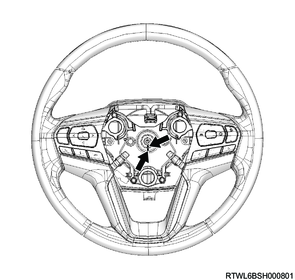
Tightening torque: 35 N・m { 3.6 kgf・m / 26 lb・ft }
Caution
- The steering wheel should never be installed using a hammer or tool that causes shock.
The steering wheel is designed to absorb impact.
18. Driver airbag installation
19. Rear ventilation duct installation
20. Rear seat installation
21. Passenger seat installation
22. Driver seat installation
23. Preliminary and post procedures
1. Post procedures
1) Connect the battery cable to the battery negative terminal.
2) Referring to the following, perform the setting of the front door power window switch with AUTO UP/AUTO DOWN function.
Refer to "9.Body, Cab, Accessories 9T.Glass, Windows, Mirrors front door power window switch setting".
3) Close the engine hood.