HEADLINER REMOVAL/INSTALLATION
id091700801600
1. Disconnect the negative battery cable. (See NEGATIVE BATTERY CABLE DISCONNECTION/CONNECTION [SKYACTIV-G 2.0, SKYACTIV-G 2.5].) (See NEGATIVE BATTERY CABLE DISCONNECTION/CONNECTION [SKYACTIV-G 2.0, SKYACTIV-G 2.5 (WITHOUT i-stop)].) (See NEGATIVE BATTERY CABLE DISCONNECTION/CONNECTION [SKYACTIV-D 2.2].)
2. Remove the following parts:
- (1) Sunroof seaming welt (with sunroof system) (See SUNROOF UNIT REMOVAL/INSTALLATION.)
- (2) A-pillar trim (See A-PILLAR TRIM REMOVAL/INSTALLATION.)
- (3) Front map light (See MAP LIGHT REMOVAL/INSTALLATION.)
- (4) Sunvisor (See SUNVISOR REMOVAL/INSTALLATION.)
- (5) Front scuff plate (See FRONT SCUFF PLATE REMOVAL/INSTALLATION.)
- (6) Front side trim (RH) (with center display) (See FRONT SIDE TRIM REMOVAL/INSTALLATION.)
- (7) Rear scuff plate (See REAR SCUFF PLATE REMOVAL/INSTALLATION.)
- (8) B-pillar lower trim (See B-PILLAR LOWER TRIM REMOVAL/INSTALLATION.)
- (9) Adjust anchor cover (See FRONT SEAT BELT REMOVAL/INSTALLATION.)
- (10) Upper anchor installation bolt on the seat belt (See FRONT SEAT BELT REMOVAL/INSTALLATION.)
- (11) B-pillar upper trim (See B-PILLAR UPPER TRIM REMOVAL/INSTALLATION.)
- (12) Assist handle (See ASSIST HANDLE REMOVAL/INSTALLATION.)
- (13) Trunk covering (See TRUNK COVERING REMOVAL/INSTALLATION.)
- (14) Trunk board (See TRUNK BOARD REMOVAL/INSTALLATION.)
- (15) Trunk end trim (See TRUNK END TRIM REMOVAL/INSTALLATION.)
- (16) Trunk side trim (See TRUNK SIDE TRIM REMOVAL/INSTALLATION.)
- (17) D-pillar trim (See D-PILLAR TRIM REMOVAL/INSTALLATION.)
- (18) C-pillar trim (See C-PILLAR TRIM REMOVAL/INSTALLATION.)
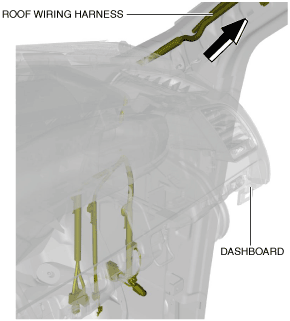
3. Disconnect the roof wiring harness connector and remove the roof wiring harness connector clip from the body.
4. Pull the roof wiring harness out from the A-pillar side. (with center display)
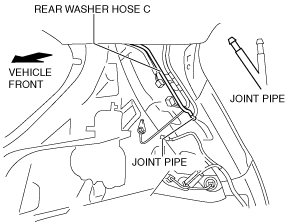
5. Disconnect the rear washer hose C.
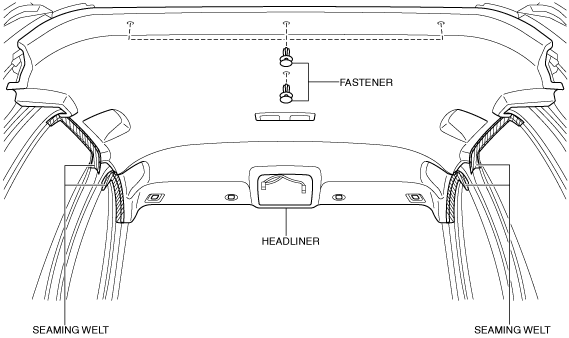
6. Temporarily install the seaming welt shown in the figure to the headliner.
-
Caution
-
• If fasteners are removed without temporarily installing the seaming welt, the headliner may fall off and the part may be damaged. Before removing fasteners, temporarily install the seaming welt to prevent the headliner from falling off.
7. Remove fasteners.
8. Partially peel back the seaming welt. Take the headliner out from the opened liftgate.
9. Install in the reverse order of removal.