 |
ac5wzw00007983
CENTER ROOF ANTENNA INSPECTION
id092000801700
Antenna amplifier inspection
1. Disconnect the negative battery cable. (See NEGATIVE BATTERY CABLE DISCONNECTION/CONNECTION [SKYACTIV-G 2.0, SKYACTIV-G 2.5].) (See NEGATIVE BATTERY CABLE DISCONNECTION/CONNECTION [SKYACTIV-G 2.0, SKYACTIV-G 2.5 (WITHOUT i-stop)].) (See NEGATIVE BATTERY CABLE DISCONNECTION/CONNECTION [SKYACTIV-D 2.2].)
2. Remove the following parts:
3. Remove the rear passenger's assist handle. (See ASSIST HANDLE REMOVAL/INSTALLATION.)
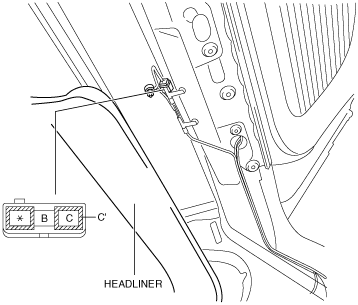
4. Partially peel back the headliner.
5. Connect the negative battery cable. (See NEGATIVE BATTERY CABLE DISCONNECTION/CONNECTION [SKYACTIV-G 2.0, SKYACTIV-G 2.5].) (See NEGATIVE BATTERY CABLE DISCONNECTION/CONNECTION [SKYACTIV-G 2.0, SKYACTIV-G 2.5 (WITHOUT i-stop)].) (See NEGATIVE BATTERY CABLE DISCONNECTION/CONNECTION [SKYACTIV-D 2.2].)
6. Switch the ignition ON (engine off).
7. Turn the audio unit power on.
8. Tune in the radio.
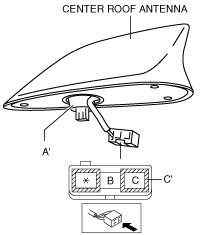
9. Verify that the battery voltage is supplied to antenna amplifier terminal B.
ac5wzw00007983
|
Feeder line inspection
1. Disconnect the negative battery cable. (See NEGATIVE BATTERY CABLE DISCONNECTION/CONNECTION [SKYACTIV-G 2.0, SKYACTIV-G 2.5].) (See NEGATIVE BATTERY CABLE DISCONNECTION/CONNECTION [SKYACTIV-G 2.0, SKYACTIV-G 2.5 (WITHOUT i-stop)].) (See NEGATIVE BATTERY CABLE DISCONNECTION/CONNECTION [SKYACTIV-D 2.2].)
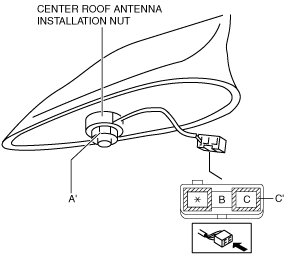
2. Remove the center roof antenna.
3. Verify that there is no continuity between center roof antenna sections A’ and B.
ac5wzw00007838
|
4. Install the center roof antenna.
5. Verify that the continuity between the center roof antenna terminals is as indicated in the table.
ac5wzw00007839
|
ac5wzw00007840
|