 |
acxaaw00001439
REAR TRAILING LINK REMOVAL/INSTALLATION [4WD]
id0214008001a2
1. When working on the left side of the vehicle, remove the rear auto leveling sensor. (Vehicle with headlight auto leveling system) (See REAR AUTO LEVELING SENSOR REMOVAL/INSTALLATION.)
2. Remove the middle pipe. (See EXHAUST SYSTEM REMOVAL/INSTALLATION [L3 Turbo]
3. Remove the rear stabilizer. (See REAR STABILIZER REMOVAL/INSTALLATION
4. Remove the rear coil spring. (See REAR COIL SPRING REMOVAL/INSTALLATION.)
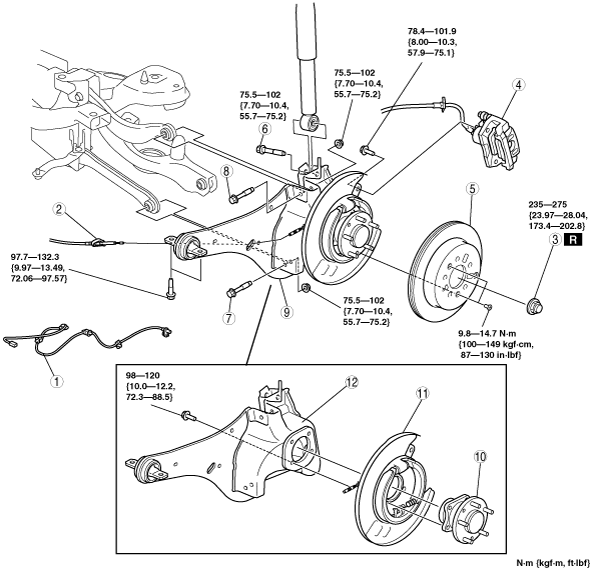
5. Remove in the order indicated in the table.
6. Install in the reverse order of removal.
7. Inspect the rear wheel alignment. (See REAR WHEEL ALIGNMENT.)
acxaaw00001439
|
|
1
|
Rear ABS wheel-speed sensor
|
|
2
|
Parking brake cable
|
|
3
|
Locknut
|
|
4
|
Brake caliper component
|
|
5
|
Disc plate
|
|
6
|
Bolt (rear shock absorber lower side)
|
|
7
|
Bolt (rear lateral link outer side)
|
|
8
|
Bolt (rear upper arm outer side)
|
|
9
|
Trailing link, rear wheel hub component and parking brake component
|
|
10
|
Rear wheel hub component
|
|
11
|
Parking brake component
|
|
12
|
Trailing link
|
Rear ABS Wheel-speed Sensor Removal Note
1. Remove the rear ABS wheel-speed sensor and rear ABS wheel-speed sensor harness connected to the rear trailing link.
acxaaw00001440
|
Brake Caliper Component Removal Note
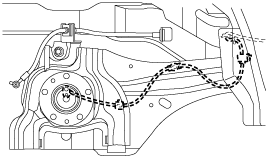
1. Suspend the caliper aside with cable.
Bolt (Rear Shock Absorber Lower Side) Removal Note
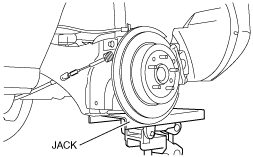
1. Support the trailing link with a jack.
acxaaw00001441
|
2. Remove the bolt.
Bolts (Rear Lateral Link Outer Side And Rear Upper Arm Outer Side) Removal Note
1. Raise the trailing link to the unloaded condition with a jack.
acxaaw00001441
|
2. Remove the bolts (rear lateral link outer side and rear upper arm outer side).
Rear Trailing Link Component Removal Note
1. Support the trailing link with a jack.
acxaaw00001441
|
2. Separate the rear drive shaft (rear axle side) from the wheel hub.
3. Remove the rear trailing link.
Bolts (Rear Lateral Link Outer Side And Rear Upper Arm Outer Side) Installation Note
1. Raise the rear trailing link to the unloaded condition with a jack.
acxaaw00001441
|
2. Tighten the bolts (rear lateral link outer side and rear upper arm outer side).