 |
acxaaw00001614
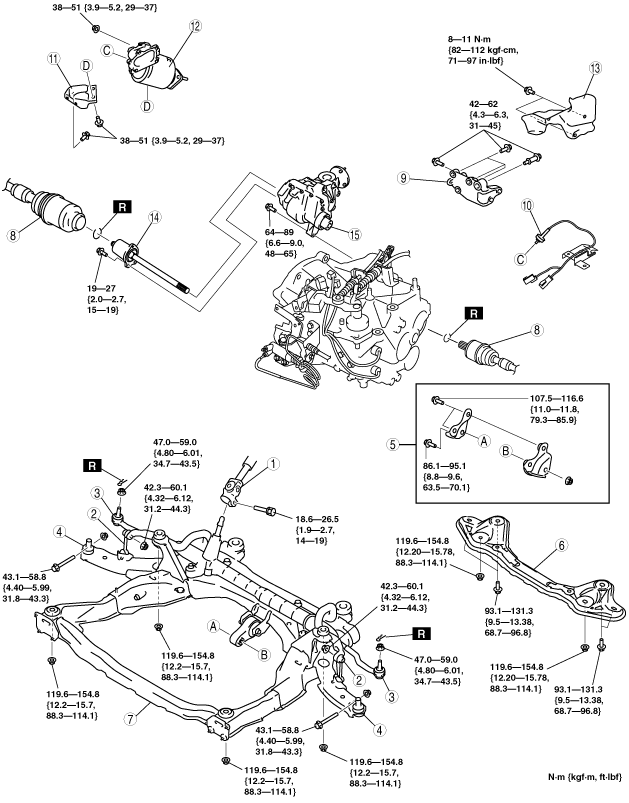
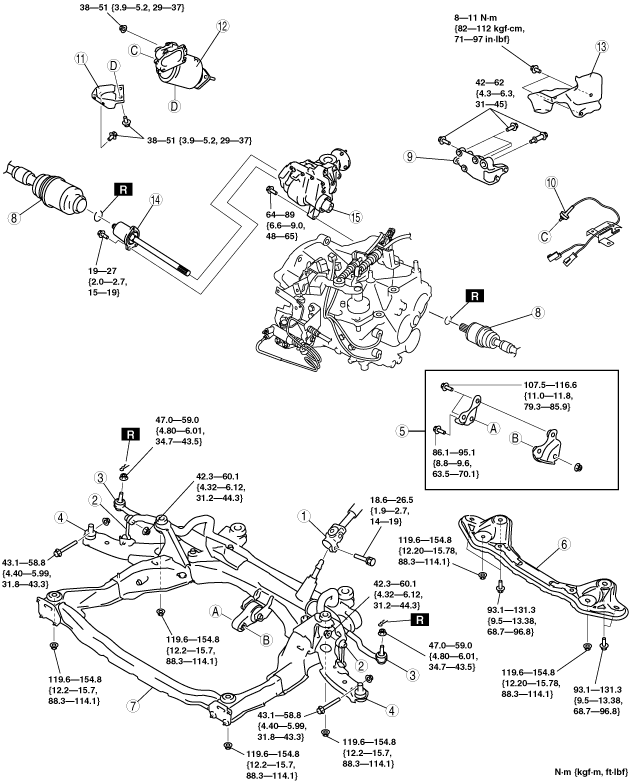
TRANSFER REMOVAL/INSTALLATION [A26MX-R]
id0316d3800600
1. Disconnect the negative battery cable.
2. Remove the following parts:
3. Disconnect the propeller shaft from the transfer side. (See PROPELLER SHAFT REMOVAL/INSTALLATION.)
4. Remove the transfer oil cooler with the hose still connected. (See TRANSFER OIL COOLER REMOVAL/INSTALLATION [A26MX-R].)
5. Remove in the order indicated in the table.
6. Install in the reverse order of removal.
7. Inspect the transfer oil level. (See TRANSFER OIL INSPECTION [A26MX-R].)
8. Warm up the engine and transaxle, inspect for oil leakage, and inspect the transfer operation.
L.H.D.
acxaaw00001614
|
R.H.D.
acxaaw00001615
|
|
1
|
Steering shaft
|
|
2
|
Stabilizer control link
|
|
3
|
Outer ball joint
|
|
4
|
Lower arm ball joint
|
|
5
|
No.1 engine mount bracket
|
|
6
|
Crossmember bracket
|
|
7
|
Crossmember
|
|
8
|
Drive shaft
|
|
9
|
Transfer bracket
|
|
10
|
A/F sensor
|
|
11
|
WU-TWC bracket
|
|
12
|
WU-TWC
|
|
13
|
Heat shield
|
|
14
|
Joint shaft
|
|
15
|
Transfer
|
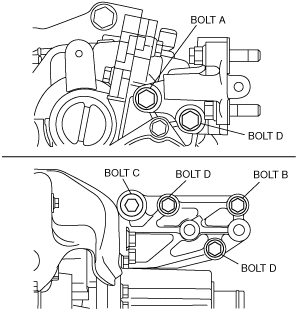
Transfer Bracket Installation Note
1. Temporarily tighten bolt A and B.
acxaaw00001616
|
2. Fully tighten bolt C.
3. Fully tighten bolt A.
4. Fully tighten bolt B and D.
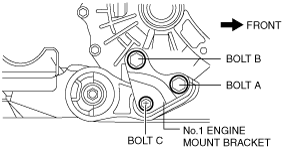
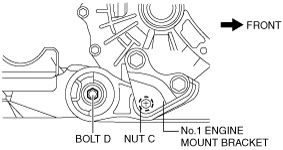
No.1 Engine Mount Installation Note
1. Install the No.1 engine mount bracket on the automatic transaxle case and temporarily tighten bolt A and B.
acxaaw00001592
|
2. Install the No.1 engine mount rubber on the bracket and temporarily tighten bolt C.
3. Tighten the No.1 engine mount bracket bolt A and B in order of A→B.
4. Fully tighten the bolt C.
acxaaw00001589
|