AUDIO UNIT REMOVAL/INSTALLATION
id092000805500
1. Disconnect the negative battery cable.
2. Remove the following parts:
- (1) Front scuff plate inner (See FRONT SCUFF PLATE REMOVAL/INSTALLATION.)
- (2) Front side trim (See FRONT SIDE TRIM REMOVAL/INSTALLATION.)
- (3) Console panel (See CONSOLE PANEL REMOVAL/INSTALLATION.)
- (4) Console (See CONSOLE REMOVAL/INSTALLATION.)
- (5) Glove compartment (See GLOVE COMPARTMENT REMOVAL/INSTALLATION.)
- (6) Bonnet release lever (See BONNET LATCH AND RELEASE LEVER REMOVAL/INSTALLATION.)
- (7) Lower panel (See LOWER PANEL REMOVAL/INSTALLATION.)
- (8) Center panel (See CENTER PANEL REMOVAL/INSTALLATION.)
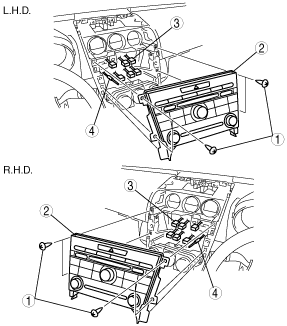
3. Remove in the order indicated in the table.
|
1
|
Screw
|
|
2
|
Audio unit
|
|
3
|
Connector
|
|
4
|
Antenna feeder
|
4. Install in the reverse order of removal.
-
Caution
-
• When installing the Audio unit, make sure that the wiring harness and antenna feeder are not caught between the unit and dashboard.If the wiring harness or the antenna feeder is caught between the unit and dashboard, it may cause malfunctions.
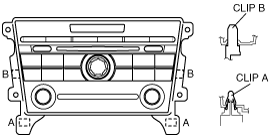
Audio Unit Removal Note
1. Detach clip A using a flathead screwdriver.
2. Pull the Audio unit outward, detach clip B from the dashboard, and then remove the audio unit.