 |
ac9uuw00001950
TRANSAXLE FLUID TEMPERATURE (TFT) SENSOR REMOVAL/INSTALLATION [AW6AX-EL]
id0517j6801100
1. Disconnect the negative battery cable.
2. Remove the air cleaner component. (See INTAKE-AIR SYSTEM REMOVAL/INSTALLATION [MZI-3.7].)
3. Drain the ATF. (See AUTOMATIC TRANSAXLE FLUID (ATF) REPLACEMENT [AW6AX-EL].)
4. Remove the TCM. (See TCM REMOVAL/INSTALLATION [AW6AX-EL].)
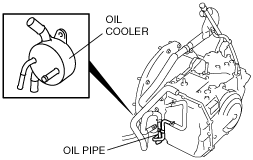
5. Remove the oil cooler.
ac9uuw00001950
|
6. Remove the oil pipe. (See OIL COOLER REMOVAL/INSTALLATION [AW6AX-EL].)
7. Remove the control valve body. (See CONTROL VALVE BODY REMOVAL/INSTALLATION [AW6AX-EL].)
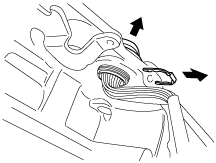
8. Remove the coupler component lock plate.
ac9uuw00001951
|
9. Remove the coupler component from the transaxle case.
10. Remove the O-ring and the gasket from the coupler component.
ac9uuw00001952
|
11. Apply ATF to a new gasket and install it on the coupler component.
12. Install a new O-ring to the coupler component.
ac9uuw00001952
|
13. Install the coupler component to the transaxle case.
14. Install a new coupler component lock plate.
ac9uuw00001953
|
15. Install the control valve body. (See CONTROL VALVE BODY REMOVAL/INSTALLATION [AW6AX-EL].)
16. Install the oil pipe. (See OIL COOLER REMOVAL/INSTALLATION [AW6AX-EL].)
17. Install the oil cooler. (See OIL COOLER REMOVAL/INSTALLATION [AW6AX-EL].)
18. Install the TCM. (See TCM REMOVAL/INSTALLATION [AW6AX-EL].)
19. Add ATF to the specified level. (See AUTOMATIC TRANSAXLE FLUID (ATF) REPLACEMENT [AW6AX-EL].)
20. Install the air cleaner component. (See INTAKE-AIR SYSTEM REMOVAL/INSTALLATION [MZI-3.7].)
21. Connect the negative battery cable.
22. Perform the mechanical system test. (See MECHANICAL SYSTEM TEST [AW6AX-EL].)