 |
ac9wzw00002837
DIAGNOSTIC ASSIST FUNCTION [AUDIO]
id0902f6804500
Activation Procedure
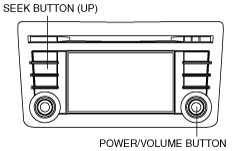
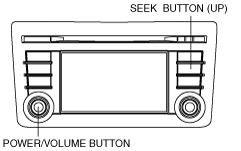
1. Turn the ignition switch to the ACC or ON position.
2. Press the POWER/VOLUME button to turn the audio on.
3. Press the POWER/VOLUME button and SEEK button (up) simultaneously to launch the diagnostic assist function.
With RDS (radio data system)
ac9wzw00002837
|
Without RDS (radio data system)
ac9wzw00002925
|
4. Verify that the launched diagnostic assist function is displayed on the screen.
ac5jjw00001775
|
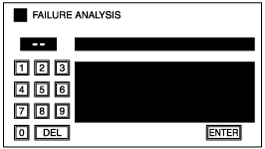
5. Input each diagnostic assist code using the diagnostic assist screen. (See Diagnostic Assist Code List.)
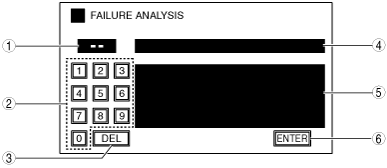
Diagnostic assist screen
ac5wzw00000738
|
|
No. |
Name |
Content/function |
|---|---|---|
|
1
|
Diagnostic assist code display screen
|
Displays the diagnostic assist code.
|
|
2
|
Diagnostic assist code input button
|
Inputs the diagnostic assist code.
|
|
3
|
DEL button
|
Clears the diagnostic assist code.
|
|
4
|
Diagnostic content display screen
|
Displays the diagnostic content.
|
|
5
|
Diagnostic results display screen
|
Displays the diagnostic results.
|
|
6
|
ENTER button
|
Transfers to the diagnostic assist function.
|
Diagnostic Assist Code List
|
Diagnostic assist code |
Content/function |
|---|---|
|
01
|
|
|
02
|
|
|
03
|
|
|
04
|
|
|
05
|
|
|
06
|
|
|
07
|
|
|
09
|
|
|
11
|
|
|
14
|
|
|
15
|
|
|
16
|
Diagnostic Assist Code "01" Display Inspection
1. Launch the diagnostic assist function. (See Activation Procedure.)
2. Input the diagnostic assist code "01"using the diagnostic input screen.
3. Select "ENTER".
4. Inspect according to the following table:
|
Inspection |
Display |
Action |
|
|---|---|---|---|
|
• Verify that the launched display inspection mode is displayed on the screen.
• Verify the display.
|
Red→Green→Blue→White→
Black→Color bar→Gray bar
|
Display functions normally.
|
Display is normal.
|
|
Display does not function normally.
|
If the display does not display/operate normally, replace the audio unit.
|
||
5. Press the POWER/VOLUME button and return to the diagnostic assist screen.
6. Press the POWER/VOLUME button and end the diagnostic assist function.
Diagnostic Assist Code "02" Switch Inspection
1. Launch the diagnostic assist function. (See Activation Procedure.)
2. Input the diagnostic assist code "02"using the diagnostic input screen.
3. Select "ENTER".
4. Inspect according to the following table:
|
Inspection |
Display |
Action |
|
|---|---|---|---|
|
• Verify that the launched switch inspection mode is displayed on the screen.
• Operate all of the switches (press).
• Does the buzzer sound?
|
Check SW
|
Yes
|
The switch is normal.
|
|
No
|
Replace the audio unit.
|
||
5. Press the POWER/VOLUME button and return to the diagnostic assist screen.
6. Press the POWER/VOLUME button and end the diagnostic assist function.
Diagnostic Assist Code "03" Speaker Inspection
1. Launch the diagnostic assist function. (See Activation Procedure.)
2. Input the diagnostic assist code "03"using the diagnostic input screen.
3. Select "ENTER".
4. Inspect according to the following table:
|
Inspection |
Display |
Action |
|
|---|---|---|---|
|
• Verify that the launched speaker inspection mode is displayed on the screen.
• Does each speaker output sound in the following order?:
Without Bose®
With Bose®
|
Check Speaker
|
Yes
|
The speakers and the wiring harness between the audio unit/audio amplifier and speakers are normal.
|
|
No
|
• If no sound is produced from all of the speakers.
• If no sound is produced from some of the speakers.
|
||
5. Press the POWER/VOLUME button and return to the diagnostic assist screen.
6. Press the POWER/VOLUME button and end the diagnostic assist function.
Diagnostic Assist Code "04" Radio Reception Condition Inspection
1. Launch the diagnostic assist function. (See Activation Procedure.)
2. Input the diagnostic assist code "04"using the diagnostic input screen.
3. Select "ENTER".
4. Inspect according to the following table:
|
Inspection |
Display |
Action |
|---|---|---|
|
Verify that the launched radio reception condition inspection mode is displayed on the screen.
|
LEVEL-10 879—LEVEL-5 879
|
Glass antenna, center roof antenna, antenna feeder and audio unit are normal.
|
|
LEVEL-4 879—LEVEL-3 879
|
Change frequencies and re-perform the inspection.
|
|
|
LEVEL-2 879—LEVEL-0 879
|
Inspect the glass antenna and antenna feeder.
(See GLASS ANTENNA INSPECTION.)
• If the glass antenna or antenna feeder is not normal, replace the malfunctioning part.
(See FILAMENT REPAIR.)
• If the glass antenna, center roof antenna, and antenna feeder are normal, replace the audio unit.
|
5. Press the POWER/VOLUME button and return to the diagnostic assist screen.
6. Press the POWER/VOLUME button and end the diagnostic assist function.
Diagnostic Assist Code "05" Antenna Control Output Condition Inspection
1. Launch the diagnostic assist function. (See Activation Procedure.)
2. Input the diagnostic assist code "05"using the diagnostic input screen.
3. Select "ENTER".
4. Inspect according to the following table:
|
Inspection |
Display |
Action |
|
|---|---|---|---|
|
Verify that the launched antenna control output condition inspection mode is displayed on the screen.
|
ANT-ON
|
Good sound quality
|
System is normal.
|
|
Bad sound quality
|
Inspect the glass antenna and antenna feeder.
(See GLASS ANTENNA INSPECTION.)
• If the glass antenna or antenna feeder is not normal, replace the malfunctioning part.
(See FILAMENT REPAIR.)
• If the glass antenna, center roof antenna, and antenna feeder are normal, replace the audio unit.
|
||
|
ANT-OFF
|
Replace the audio unit.
|
||
5. Press the POWER/VOLUME button and return to the diagnostic assist screen.
6. Press the POWER/VOLUME button and end the diagnostic assist function.
Diagnostic Assist Code "06" Manufacturer Verification
1. Refer to the manufacturer verification procedure. (See SUPPLIER IDENTIFICATION PROCEDURE [AUDIO].)
Diagnostic Assist Code "07" Audio Amplifier Specification Verification
1. Launch the diagnostic assist function. (See Activation Procedure.)
2. Input the diagnostic assist code "07"using the diagnostic input screen.
3. Select "ENTER".
4. Inspect according to the following table:
|
Inspection |
Display |
Action |
|
|---|---|---|---|
|
• Verify that the launched audio amplifier specification inspection mode is displayed on the screen.
• Verify the audio amplifier specifications.
• Are the audio amplifier specifications correct?
|
Without Bose®
• N
With Bose®
• L
|
Yes
|
System is normal.
|
|
No
|
Replace the audio unit.
|
||
5. Press the POWER/VOLUME button and return to the diagnostic assist screen.
6. Press the POWER/VOLUME button and end the diagnostic assist function.
Diagnostic Assist Code "09" Radio SEEK Inspection
1. Tune in the radio.
2. Launch the diagnostic assist function. (See Activation Procedure.)
3. Input the diagnostic assist code "09"using the diagnostic input screen.
4. Select "ENTER".
5. Inspect according to the following table:
|
Inspection |
Display |
Action |
|
|---|---|---|---|
|
• Verify that the launched radio SEEK inspection mode is displayed on the screen.
• Verify “ANY-CONT ON” is displayed and select “OK”.
• Verify “MOV SIG AREA” is displayed and select “OK”.
• “Now SEEKING” is displayed.
• Is the inspection result normal?
|
--ch
RECEIVED
|
Yes
|
System is normal.
|
|
No
|
Replace the audio unit.
|
||
6. Press the POWER/VOLUME button and return to the diagnostic assist screen.
7. Press the POWER/VOLUME button and end the diagnostic assist function.
Diagnostic Assist Code "11" CD Diagnostic inspection
1. Verify that a CD is not inserted.
2. Launch the diagnostic assist function. (See Activation Procedure.)
3. Input the diagnostic assist code "11"using the diagnostic input screen.
4. Select "ENTER".
5. Inspect according to the following table:
|
Inspection |
Display |
Action |
|
|---|---|---|---|
|
• Verify that the launched CD diagnostic inspection mode is displayed on the screen.
• Verify “INSERT NEW DISC” is displayed and insert a disc.
• “NOW CHECKING USER DISC DEFECT” is displayed.
• Verify the inspection results.
|
OK/DISC DEFECT
|
Yes
|
System is normal.
|
|
MALFUNCTION
|
No
|
Replace the audio unit.
|
|
6. Press the POWER/VOLUME button and return to the diagnostic assist screen.
7. Press the POWER/VOLUME button and end the diagnostic assist function.
Diagnostic Assist Code "14" dial Inspection Verification
1. Launch the diagnostic assist function. (See Activation Procedure.)
2. Input the diagnostic assist code "14"using the diagnostic input screen.
3. Select "ENTER".
4. Inspect according to the following table:
|
Inspection |
Display |
Action |
|
|---|---|---|---|
|
• Verify that the dial inspection screen is displayed.
• Rotate the dial switch.
• Does the switch rotation direction correspond to the direction displayed in the diagnostic assist screen?
|
VOL ENC ←→
TUNE ENC ←→
COMMANDAR ENC
|
Yes
|
System is normal.
|
|
No
|
Replace the audio unit.
|
||
5. Press the POWER/VOLUME button and return to the diagnostic assist screen.
6. Press the POWER/VOLUME button and end the diagnostic assist function.
Diagnostic Assist Code "15" Vehicle NAVI Signal Verification
1. Launch the diagnostic assist function. (See Activation Procedure.)
2. Input the diagnostic assist code "15"using the diagnostic input screen.
3. Select "ENTER".
4. Verify that the vehicle NAVI signal verification screen is displayed.
ac5jjw00001776
|
ac5jjw00001777
|
5. Verify the vehicle NAVI signal status displayed in the display.
|
Name |
Content/function |
|---|---|
|
TNS
|
Displays the TNS signal status.
|
|
REV
|
Displays the reverse signal status.
|
|
PKB
|
Displays the parking brake signal status.
|
|
SPEED
|
Vehicle speed is displayed.
|
|
ST-SW
|
Displays the steering switch connection status.
|
|
MIC
|
Verifies the microphone connection status.
|
|
NAVI (USB)
|
Verifies the NAVI (USB) connection status.
|
|
NAVI GPS ANT
|
Verifies the GPS antenna connection status.
|
6. Press the POWER/VOLUME button and return to the diagnostic assist screen.
7. Press the POWER/VOLUME button and end the diagnostic assist function.
Diagnostic Assist Code "16" Exterior Device Connection Information Clearing
1. Launch the diagnostic assist function. (See Activation Procedure.)
2. Input the diagnostic assist code "16"using the diagnostic input screen.
3. Select "ENTER".
4. Verify that the exterior device connection information clearing screen is displayed.
5. Perform the exterior device connection information clearing according to the screen display.
6. Press the POWER/VOLUME button and return to the diagnostic assist screen.
7. Press the POWER/VOLUME button and end the diagnostic assist function.