FRONT POWER WINDOW MOTOR REMOVAL/INSTALLATION
id091200701400
1. Perform the front door glass preparation. (See FRONT DOOR GLASS REMOVAL/INSTALLATION.)
2. Disconnect the negative lead-acid battery terminal. (See NEGATIVE LEAD-ACID BATTERY TERMINAL DISCONNECTION/CONNECTION.)
3. Remove the following parts.
- (1) Inner garnish (See INNER GARNISH REMOVAL/INSTALLATION.)
-
- (2) Power window main switch component (to remove from driver's side) (See POWER WINDOW MAIN SWITCH REMOVAL/INSTALLATION.)
-
- (3) Power window subswitch component (to remove from passenger's side) (See POWER WINDOW SUBSWITCH REMOVAL/INSTALLATION.)
-
- (4) Front door trim (See FRONT DOOR TRIM REMOVAL/INSTALLATION.)
-
- (5) Front inner handle (See FRONT INNER HANDLE REMOVAL/INSTALLATION.)
-
- (6) Door-electrical supply unit (See DOOR-ELECTRICAL SUPPLY UNIT REMOVAL/INSTALLATION.)
-
- (7) Front door glass (See FRONT DOOR GLASS REMOVAL/INSTALLATION.)
-
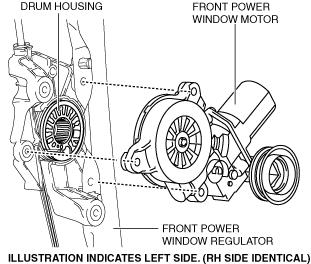
- (8) Front power window regulator (See FRONT POWER WINDOW REGULATOR REMOVAL/INSTALLATION.)
-
-
Note
-
• If work is performed without supporting the drum housing of the front power window regulator, the drum housing may come off from the front power window regulator. Support the drum housing as you work so that it does not come off.
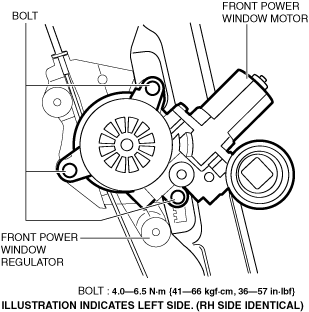
4. Remove the bolt.
5. Remove the front power window motor.
6. Install in the reverse order of removal. (See Front Power Window Motor Installation Note.)
7. Perform the power window system initialization. (See POWER WINDOW SYSTEM INITIALIZATION PROCEDURE.)
Front Power Window Motor Installation Note
1. Attach the front power window motor so that the center of the bolt fastening hole of the front power window motor is aligned with the center of the bolt fastening part of the front power window regulator.