 |
a30zzw00002451
FRONT DOOR KEY CYLINDER REMOVAL/INSTALLATION
id091400200500
TYPE A
1. Fully close the front door glass.
2. Disconnect the negative lead-acid battery terminal. (See NEGATIVE LEAD-ACID BATTERY TERMINAL DISCONNECTION/CONNECTION.)
3. Remove the following parts.
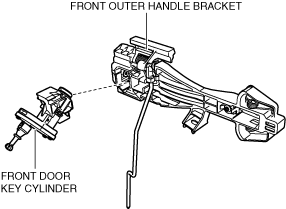
4. Remove the front outer handle bracket and front door key cylinder as a single unit. (See FRONT OUTER HANDLE REMOVAL/INSTALLATION.)
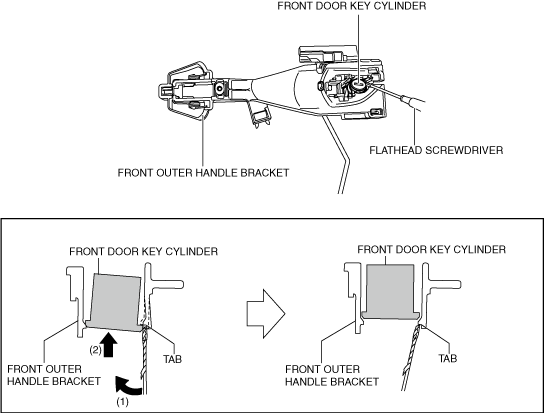
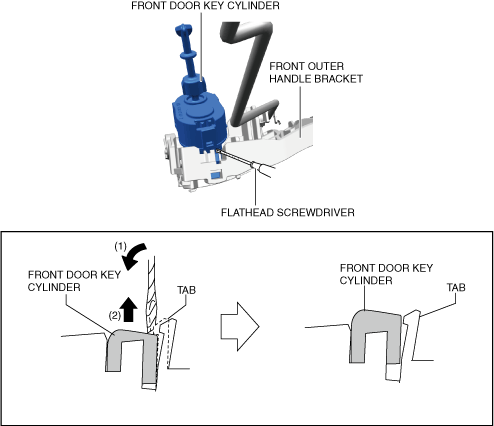
5. Insert the tape-wrapped flathead screwdriver into the position shown in the figure.
a30zzw00002451
|
6. Move the tape-wrapped flathead screwdriver in the direction of arrow (1) shown in the figure, press the front door key cylinder in the direction of arrow (2), and then detach the front outer handle bracket tab from the front door key cylinder.
7. Insert the tape-wrapped flathead screwdriver into the position shown in the figure.
a30zzw00002452
|
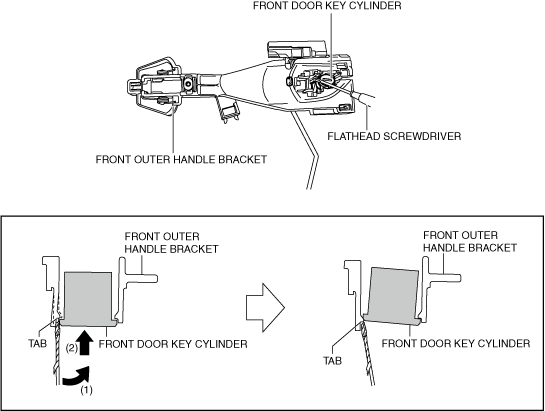
8. Move the tape-wrapped flathead screwdriver in the direction of arrow (1) shown in the figure, press the front door key cylinder in the direction of arrow (2), and then detach the front outer handle bracket tab from the front door key cylinder.
9. Remove the front door key cylinder.
a30zzw00002453
|
10. Install in the reverse order of removal.
TYPE B
1. Fully close the front door glass.
2. Disconnect the negative lead-acid battery terminal. (See NEGATIVE LEAD-ACID BATTERY TERMINAL DISCONNECTION/CONNECTION.)
3. Remove the following parts.
4. Remove the front outer handle bracket and front door key cylinder as a single unit. (See FRONT OUTER HANDLE REMOVAL/INSTALLATION.)
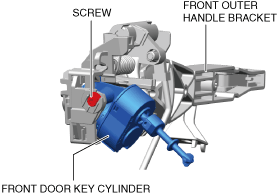
5. Loosen the screw.
a30zzw00007441
|
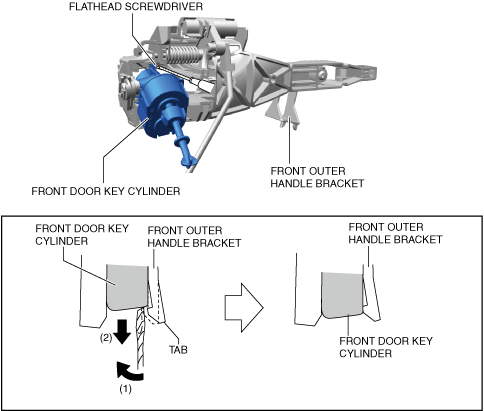
6. Insert a tape-wrapped flathead screwdriver into the position shown in the figure.
a30zzw00007442
|
7. Move the tape-wrapped flathead screwdriver in the direction of arrow (1) shown in the figure, press the front door key cylinder in the direction of arrow (2), and then detach the front outer handle bracket tab from the front door key cylinder.
8. Insert a tape-wrapped flathead screwdriver into the position shown in the figure.
a30zzw00007443
|
9. Move the tape-wrapped flathead screwdriver in the direction of arrow (1) shown in the figure, press the front door key cylinder in the direction of arrow (2), and then detach the front outer handle bracket tab from the front door key cylinder.
10. Insert a tape-wrapped flathead screwdriver into the position shown in the figure.
a30zzw00007444
|
11. Move the tape-wrapped flathead screwdriver in the direction of arrow (1) shown in the figure, press the front door key cylinder in the direction of arrow (2), and then detach the front outer handle bracket tab from the front door key cylinder.
12. Remove the front door key cylinder.
13. Install in the reverse order of removal.