HEADLIGHT AUTO LEVELING SYSTEM INITIALIZATION
id091800702400
-
Note
-
• The auto leveling control module/adaptive LED headlight control module stores the vehicle attitude angle by performing the headlight auto leveling system initial setting.
• Perform headlight auto leveling system initial setting if any of the following services is performed.
-
― Auto leveling control module/adaptive LED headlight control module replacement
― Any servicing which changes the vehicle attitude angle is performed, such as suspension replacement, removal, or installation
• Two different procedures are available for the headlight auto leveling system initial setting; one which uses the M-MDS, and one which does not.
Procedure Using M-MDS
1. Empty the vehicle except for the jack and vehicle tools.
2. Inspect the wheel alignment. (See WHEEL ALIGNMENT PRE-INSPECTION.) (See FRONT WHEEL ALIGNMENT.) (See REAR WHEEL ALIGNMENT.)
3. Adjust the tire pressure to the standard.(See WHEEL AND TIRE SPECIFICATION [(E)].)
4. Move the vehicle to level ground.
5. Connect the M-MDS to the DLC-2.
6. Switch the main power ON (READY off or on).
7. Activate the M-MDS and perform the following procedure.
- (1) Press [Start] to start the vehicle identification.
-
- (2) Press the [Toolbox] tab.
-
- (3) Press the [Work Support] icon.
-
- (4) Press [LIGHTING SYSTEMS].
-
- (5) Press [Run] for [Calibrating Headlight Leveling Sensor].
-
- (6) Confirm the Calibrating Headlight Leveling Sensor procedure from Step (7) to Step (10), and press [Next].
-
- (7) Verify that the following conditions/operations are met/completed and then press [Next].
-
-
• Wheel alignment and tire pressure are inspected
-
• Vehicle is moved to level ground
-
• Vehicle is not shaken up/down, left/right
-
• Worker is out of vehicle
- (8) When the M-MDS processing is completed, press [Next].
-
- (9) Press [Next] to complete [Calibrating Headlight Leveling Sensor].
-
- (10) Switch the main power OFF and press [Next].
-
8. Perform the headlight aiming adjustment.(See HEADLIGHT AIMING [(E)].)
Procedure Not Using M-MDS
-
Caution
-
• Perform Steps 4—5 within 30 s.
1. Empty the vehicle except for the jack and vehicle tools.
2. Adjust the tire pressure to the standard.(See WHEEL AND TIRE SPECIFICATION [(E)].)
3. Move the vehicle to level ground.
4. Switch the main power ON (READY off or on).
-
Note
-
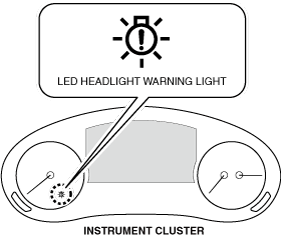
• The LED headlight warning light continues flashing during the first initial setting, however, continue the work because it does not indicate an improper procedure.
-
Caution
-
• If the terminals are mistakenly connected, vehicle damage or fire could occur. When connecting with the jumper wire, thoroughly verify what terminals are being connected to prevent a miss-connection.
5. Using jumper wires, connect terminal B and terminal J (GND) of DLC-2 three times at 0.5—1.5 s intervals as shown in the figure.
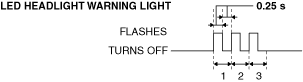
6. Verify the LED headlight warning light.
-
• If the LED headlight warning light flashes three times at 0.25 s intervals and turns off as shown in the figure, it indicates that the headlight auto leveling system initialization is complete. Go to the next step.
• If the LED headlight warning light flashes at intervals of 0.25 s, the servicing may not have completed normally, so start over from Step 5.
• If the LED headlight warning light turns on, the headlight auto leveling system may have a malfunction. Perform DTC inspection. (See
DTC INSPECTION.)
-
― Repair or replace the malfunctioning location, then repeat the procedure from Step 4.
7. Perform the headlight aiming adjustment.(See HEADLIGHT AIMING [(E)].)