|
am6zzw00008262
FUSE BLOCK INSTALLATION
id092100702300
Replacement parts
|
Band
Quantity: 1
Location of use: Fuse block
|
1. Move a flathead screwdriver in the direction of arrow (1) shown in the figure, and while pressing the stopper, pull the wiring harness in the direction of arrow (2) to detach the fuse terminal from the stopper.
am6zzw00008262
|
2. Relocate all fuse terminals to the new fuse block.
am3uuw00011418
|
3. Attach the wiring harness clip to the fuse block.
a30zzw00004012
|
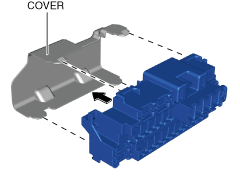
4. Attach the cover to the fuse block.
am3zzw00032349
|
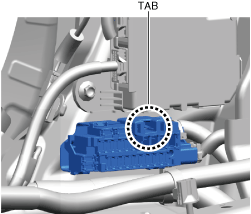
5. Attach the fuse block tab to the bracket.
a30zzw00004010
|
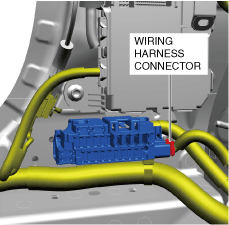
6. Connect the wiring harness connector.
a30zzw00004633
|
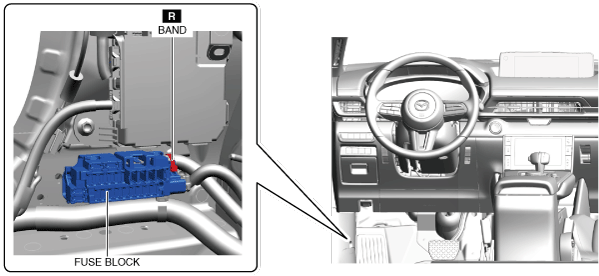
7. Install the band to the position shown in the figure.
a30zzw00004003
|
8. Install all fuses.
9. Install the following parts.
10. Perform the confirmation work after replacing the fuse block. (See Confirmation work after replacing fuse block.)
11. Connect the negative lead-acid battery terminal. (See NEGATIVE LEAD-ACID BATTERY TERMINAL DISCONNECTION/CONNECTION.)
Confirmation work after replacing fuse block
1. Temporarily connect the negative lead-acid battery terminal and verify that the related wiring harness is not hot.
2. Switch the main power ON (READY off).
3. Verify that the fuse is not blown and the related wiring harness is not hot.
4. Verify DTCs using the M-MDS. (See DTC INSPECTION.)
5. If there are no malfunctions in Steps 1, 3, or 4, switch the main power ON (READY on).
6. Operate all the switches of the interior/exterior lights of the vehicle and verify that all the light bulbs turn on and flash.
7. Operate the audio, air conditioner, wiper switch and selector lever and verify that everything works properly.
8. Perform a running test to check for malfunctions in the low speed, acceleration, shift up, and shift down states.