 |
a30zzw00004155
COOLANT RESERVE TANK REMOVAL/INSTALLATION
id301200000700
Coolant draining procedure
Replacement part
|
Gasket
Quantity: 2
Location of use: Drain plug
|
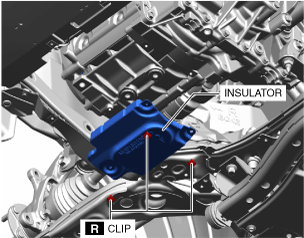
Clip
Quantity: 3
Location of use: Insulator
|
1. Load the vehicle on the auto lift so that it can be lifted up.
2. Remove the seal cover. (See SEAL COVER REMOVAL/INSTALLATION.)
3. Remove the cooling system cap.
4. Remove front under cover No.2. (See FRONT UNDER COVER No.2 REMOVAL/INSTALLATION.)
5. Implement [Coolant Draining Procedure] for the coolant replacement. (See COOLANT REPLACEMENT.)
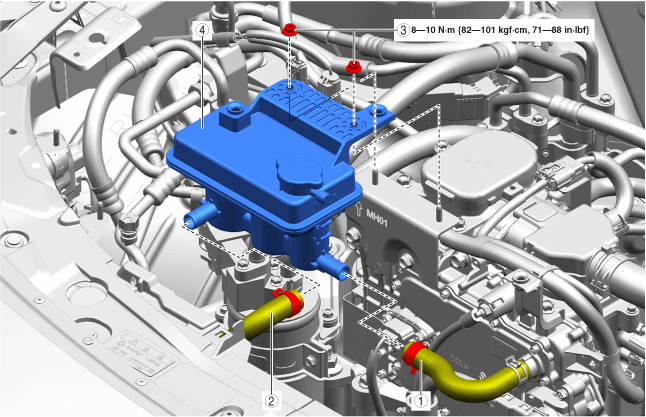
COOLANT RESERVE TANK REMOVAL/INSTALLATION
1. Remove using the procedure shown in the figure.
a30zzw00004155
|
|
1
|
Water hose (DC-DC converter side)
|
|
2
|
Nut
|
|
3
|
Upper radiator hose
|
|
4
|
Coolant reserve tank
|
2. Install in the reverse order of removal.
Coolant Replenishment Procedure
Air Bleeding Procedure
1. Implement [Air Bleeding Procedure] for the coolant replacement. (See COOLANT REPLACEMENT)
2. Inspect each area for coolant leakage. (See COOLANT LEAKAGE INSPECTION.)
3. Install the insulator.
a30zzw00007304
|
4. Install front under cover No.2. (See FRONT UNDER COVER No.2 REMOVAL/INSTALLATION.)
5. Lower the vehicle to the ground and adjust the coolant amount to the F line on the coolant reserve tank.
6. Install the seal cover. (See SEAL COVER REMOVAL/INSTALLATION.)
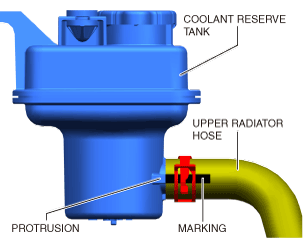
Upper Radiator Hose Installation Note
1. Align the marking on the upper radiator hose to the protrusion on the coolant reserve tank as shown in the figure.
a30zzw00004160
|
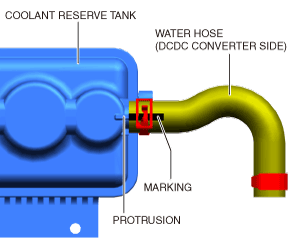
Water Hose (DC-DC Converter Side) Installation Note
1. Align the marking on the water hose (DC-DC converter side) with the protrusion on the coolant reserve tank as shown in the figure.
a30zzw00004451
|