SAS CONTROL MODULE REMOVAL/INSTALLATION [TWO-STEP DEPLOYMENT CONTROL SYSTEM]
id0810b1702800
-
Warning
-
• If the connector is connected and the ignition is switched ON (engine off or on) with the SAS control module not secured completely using the installation nuts, the SAS control module may detect a degree of impact even when something contacts it lightly, deploying the air bag module and pre-tensioner seat belt unexpectedly.
-
Caution
-
• When replacing the SAS control module, perform the configuration to assure that the system operates correctly.
-
Note
-
• The SRS air bag system can be identified by whether or not the seat track position sensor is present.
-
― Standard deployment control system: Without seat track position sensor
― Two-step deployment control system: With seat track position sensor
1. When replacing the SAS control module, perform the configuration using the following procedure.
- (1) Connect the M-MDS to the DLC-2.
-
- (2) Switch the ignition ON (engine off).
-
- (3) Activate the M-MDS and perform the following procedure.
-
- 1) Press [Start] to start the vehicle identification.
-
- 2) Press the [Toolbox] tab.
-
- 3) Press the [Work Support] icon.
-
- 4) Press [Configuration].
-
- 5) Press [Run] to perform the configuration.
-
- 6) Press [SAS].
-
- 7) Verify that the ignition is switched ON (engine off) and press [Next].
-
-
• If the ignition cannot be switched ON (engine off), leave it as it is and press [Next].
- 8) When [Install the new ECU] is displayed, move to the SAS control module replacement procedure.
-
2. Switch the ignition OFF.
3. Disconnect the negative battery terminal and wait for 1 min or more. (See NEGATIVE BATTERY TERMINAL DISCONNECTION/CONNECTION.)
4. Remove the following parts:
- (1) Selector lever knob (See SELECTOR LEVER COMPONENT REMOVAL/INSTALLATION.)
-
- (2) Shift panel (See SHIFT PANEL REMOVAL/INSTALLATION.)
-
- (3) Console panel (See CONSOLE PANEL REMOVAL/INSTALLATION.)
-
- (4) Rear console (See REAR CONSOLE REMOVAL/INSTALLATION.)
-
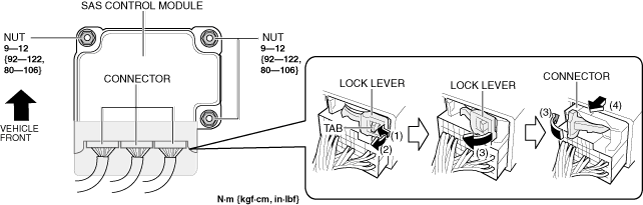
5. Push the lock lever tab in the direction of arrow (1) shown in the figure, and pull out the lock lever in the direction of arrow (2).
6. Move the lock lever in the direction of arrow (3) shown in the figure and pull out the connector in the direction of arrow (4).
7. Disconnect the connectors.
8. Remove the nuts.
9. Remove the SAS control module.
10. If the SAS control module is replaced, perform the following procedure.
- (1) Switch the ignition ON (engine off).
-
- (2) Return to the M-MDS operation and press [Continue].
-
- (3) Press [Finish].
-
- (4) Perform the following initial setting using the M-MDS. (See ELECTRONICALLY CONTROLLED BRAKE UNIT RELATED PARTS SENSOR INITIALIZATION PROCEDURE.) (See VEHICLE CONTROL MODULE (VCM) INITIAL SETTING.)
-
-
• Calibrating Lateral G Sensor for DSC
• Calibrating Longitudinal G Sensor for DSC
• Calibrating Yaw Rate for DSC
• Calibrating Yaw Rate for VCM
- (5) Clear the DTC. (See CLEARING DTC.)
-
- (6) Switch the ignition ON (engine off).
-
- (7) Check that the air bag/front seat pre-tensioner system warning light turns on for approx. 6 s and then turns off.
-
-
• If the air bag/pre-tensioner warning light does not work properly, verify the DTCs. (See
DTC INSPECTION.)