e5u114zw5031
|
FUEL PUMP UNIT REMOVAL/INSTALLATION [L8, LF]
id0114a3800900
1. Follow “BEFORE SERVICE PRECAUTION” before performing any work operations to prevent fuel from spilling from the fuel system. (See BEFORE SERVICE PRECAUTION [L8, LF].)
2. Remove the battery cover. (See BATTERY REMOVAL/INSTALLATION [L8, LF].)
3. Disconnect the negative battery cable. (See BATTERY REMOVAL/INSTALLATION [L8, LF].)
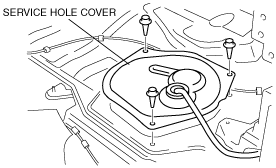
4. Perform the following procedure to remove the service hole cover.
e5u114zw5031
|
5. Disconnect the quick release connector from the fuel pump unit. (See QUICK RELEASE CONNECTOR (FUEL SYSTEM) REMOVAL/INSTALLATION [L8, LF].)
6. Disconnect the fuel pump unit connector.
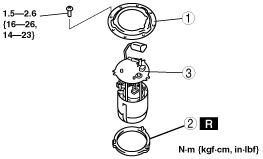
7. Remove in the order indicated in the table.
e5u114zw5002
|
|
1
|
Plate
|
|
2
|
Packing
|
|
3
|
Fuel pump unit
|
8. Install in the reverse order of removal.
9. Complete the “AFTER SERVICE PRECAUTION”. (See AFTER SERVICE PRECAUTION [L8, LF].)