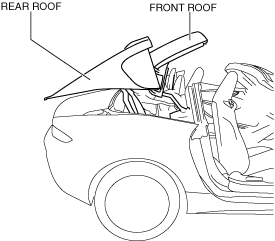
 |
REAR WINDOW GLASS REMOVAL/INSTALLATION
id091200428900
1. Using the retractable hardtop switch, keep the front roof half-open.
amxuuw00005935
|
2. Disconnect the negative battery cable. (See NEGATIVE BATTERY CABLE DISCONNECTION/CONNECTION)
3. Remove the following parts:
4. Remove the seat belt retractor installation bolts and set aside the seat belt retractor. (See SEAT BELT REMOVAL/INSTALLATION.)
5. Remove the lock bracket. (See LOCK BRACKET REMOVAL/INSTALLATION.)
6. Remove the retractable hardtop control module from the seat back crossmember assembly and set it aside so that it does not interfere with the servicing.
7. Remove the seat back crossmember assembly. (See SEAT BACK CROSSMEMBER ASSEMBLY REMOVAL/INSTALLATION.)
8. Remove the roof link assembly. (See ROOF LINK ASSEMBLY REMOVAL/INSTALLATION.)
9. Disconnect the connector.
amxzzw00004556
|
10. Remove the caps.
amxzzw00004557
|
11. Place alignment marks on the rear window glass and rear window glass installation nut.
12. Remove the nuts and washers.
amxzzw00004558
|
13. Remove the shims.
14. Remove the rear window glass.
15. Install in the reverse order of removal. (See Rear Window Glass Installation Note)
Rear Window Glass Installation Note
1. Install the shim according to the number verified prior to removal.
2. Install the rear window glass with the alignment marks aligned.
3. Perform the retractable hardtop adjustment. (See RETRACTABLE HARDTOP ADJUSTMENT.)